Hamonses

Last Visible Canary

actively parsing hurf durf
Joined
Nov 28, 2006
Messages
4,577
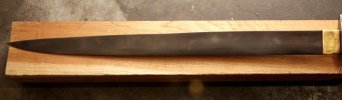
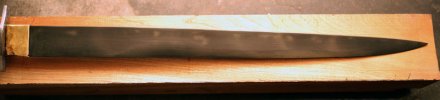
So, I went ahead and etched all of the khukuries I have in my possesion. I still have no idea how I'm supposed to sand them to keep the hamon present, wether I'm supposed to move from 600 to 800, then 1000, 2000, 4000 etc, or if I'm supposed to start at 2000 or what. I need to look into that....


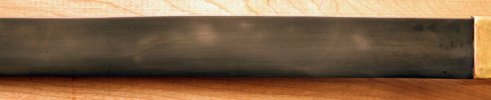
BUT.... I had a question about what the color reveiled by the etchings meant, or shade I guess, since its all blue grey. Theres what I would expect, the spine area is grey leading up to the pale hardened area, but there are also a lot of ghost area's above the hamon that look like where the water ran across the blade. I can understand that - but what does it mean when then area at the main part of the hammon, the sweet spot is black? the spine is grey, the hammon is white/silver/light grey, but instead of just ending, it darkenes at the sweet spot?

I'll have pics up when I'm done with the etching process.... I'll have to make room in my attachments since I still havent put anything up on my website (or learned how to)....
 
I think what I was seeing was etchant pooling in one localized area....

I think that the first time, the etching was bueatiful and even, but I over polished it, and this second round I etched it to much making it uneven and difficult to remove without over polishing....

there was a couple of really nice lines in there though, my 18" kobra is hardened almost from cho to tip, and my himalayan sword is also really pleasing in appearance....
 
I have been told that some of these "ghost" areas that you speak of can be caused by the contact of the tongs used by the smith(kami) to handle the blade during the final forging process,the tongs work as a heat sink. Do these areas match from one side of the blade to the other?
 
I have been told that some of these "ghost" areas that you speak of can be caused by the contact of the tongs used by the smith(kami) to handle the blade during the final forging process,the tongs work as a heat sink. Do these areas match from one side of the blade to the other?

for the most part they do. I'm going to do a lighter etch this round and see if I can bring them out, take a photo, and then lighly sand it to maintain the hamon line...
 
It really depends on what you want the hamon to look like. For the Japanese-look hamon, when i etch a blade that is already highly polished ( like most of the non- villager HI khukris) I only polish them with a metal polishing creme or compound after I etch them. It is really not a lot of work and leaves a nice cloud like hamon. If it is a villager model, you'll have to go with the escalating grit method like you said and then etch and repolish. On a blade with a villager finish, it will be hard to see the hardening line so you'll have to finish it before the etch ( at least to some degree...the higher you finish it, the clearer the hamon).

Just my method :D ... others may have different ways:thumbup:

here is a thread with some pics of a blade I etched and polished. The last pic in the group shows the hamon you get by just repolishing a polished blade after etching with FeCl2.

http://www.bladeforums.com/forums/showthread.php?t=447461
 
attachment.php

attachment.php

attachment.php

attachment.php


working within the limits of the attachment system.... SO.... I can get a really nice hamon to etch out, but I dont know what to do with it from there. I tried polishing the entire blade on my 20" siru on one side, then tried selectively polishing, leaving the line of the hamon only half polished. Fully polished it disappeared, but I think that was because it was mostly 600, with places approaching 1000. Selectively polished it just looked dirty.

I guess I'll sand it down and polish as best I can by hand, etch it, and then try polishing it with a liquid/gel polishing compound.

The blade looks dirty in the picture, but thats actually just stuff on my lens... I never see it until I have the photo already taken and on my computer, then I realize that I need to clean my lens/sensor :(... sorry the pics are a little dark.
 

Attachments

  • IMG_7248.JPG
    IMG_7248.JPG
    30.2 KB · Views: 150
  • IMG_7253.JPG
    IMG_7253.JPG
    17.9 KB · Views: 151
  • IMG_7254.JPG
    IMG_7254.JPG
    19.2 KB · Views: 150
  • IMG_7260.JPG
    IMG_7260.JPG
    23 KB · Views: 150
the only thing I could find at our two local hardware stores (osh and home depot) that worked was brasso, wich is contains silica, ammonia, and oxylic acid. and MAN does that stuff do wonders for the brass portions. It makes the stuf literally glow its so bright. and while it doesnt seem to do much in the polishing department, it does remove the patina/tarnish without me having to do any actual sanding, wich is what I beleive is the ideal situation?

Gonna see if I can get something back up to mirror, etch it and then see what the brasso can do...
 
The stuff I use is Wenol. I forget were I got it ( which reminds me I need to look for more) but it works really well.I think it is also used for auto care.. maybe shining chrome and such...? I usually can take a blade up to 1500 or 2000 grit sandpaper then polish with the Wenol and get great results without a buffer. The buffer would probably do it faster and at a lower final grit but I don't have my buffer set up right now so, I just use the Wenol.
 
Back
Top