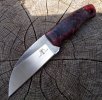
Handle finishing advice

Joined
Jan 5, 2014
Messages
1,495
I have a knife that another maker did for me, that has a stabilized pine cone for the handle scales. The finish on it just doesn't have that deep sheen to it that I've seen on some other examples of stabilized pine cone. I took it to my buffer with some white compound and then some pink rouge on the softest wheel, but still it doesn't have that sheen, just a little smoother now. I am looking for advice on how to get that deep glassy look on a handle scale such as this--

Appreciate any advice/experience
 
Last edited:
OK let me try this another way. How do you guys go about getting a glass like finish on the stabilized materials you handle knives with??
 
For composites, I wet sand to 2000, then use flitz polish, then buff with pink compound. Might not be the best way but that's my method.
I almost never go for a high polish on handle materials though, because even the lightest scratches from carry or use will be very obvious.

I like the looks of the stabilized pine cone handles but haven't used any yet, do you have any pictures?
 
That is a cast piece, not "stabilized". Only a few people cast cones commercially so ask the maker who did the casting and what casting resin was used. Alumilite is a popular brand, but there are several versions of it. Different buffing technigues for differrent resins. As in so called "stabilizing", not all cast products are equal quality.
 
I would contact the maker you got the knife from to find out where he sourced the handle material. If it came from Ankrom Exotics then the casting resin used was Alumilite. The manufacturer of Alumilite recommends to ALWAYS wet sand when attempting to polish starting with 320 grit and taken to 2000 grit. At that point, they recommend that you hand buff but, if you use a power buffer it is NOT to exceed 300 rpms at the wheel. They recommend 3M automotive rubbing compound but I'm sure you can use the buffing compound of your choice. You can use CA to fill any open voids if present. Since it is compatible with CA, I assume you could also try the CA finish that many makers use on stabilized wood. Good luck.
 
Larry and Adam thanks, I will contact the maker for sure. Spketch, I think I've got a pic or two, I'll try and round them up. It's a cool looking end product.
Here it is.:

Talus knife.jpg
 
Hello folks, I got a message from Jarrett, and the scale came from KnifeScales.com, from a guy name Travis Zumwalt. I haven't found a lot on his website yet. Jarrett said he currently doesn't buff handle scales due to customer desires. So I still need to figure out the best way to get these scales to that glassy finish.

Thanks for the help--Don
 
You polish cast pieces like you polish plastic.

Start by sanding to as high a grit as possible ( wet sanding helps if possible). The 3M color coded polishing papers excel at this task. Once at the highest grit ( 8000 for 3M) polish with a plastic polish just like you would polish an acrylic pen turning or other plastic casting. It is usually a two step kit. Use the first polish to get a shiny satin surface, and the finish polish to get a glass shine. This is easily done by hand. Buffing requires a deft hand and slower clean buffs.
 
Thanks Stacy, I need to get some of those 3M papers anyway. Got any preferred sources for them?

Appreciate the input folks.
 
If Alumilite Water Clear was used do not expect a high gloss finish look. If Alumilite Clear was used a higher gloss can be achieved. This formulation was made for pen turners and is more brittle than the Water Clear. Happy buffing :)
 
I think most all the knife suppliers sell the 3M papers now. They are also popular in the jewelry industry for hand polishing platinum. Jewelry suppliers carry them.

Oh, I forgot to say, while they are simply called 3M polishing papers in the industry, the actual full brand name is "3M wet-or-dry Tri-M-ite Polishing Paper". It comes in six color coded sheets from 400 to 8000 grit. Here is a link to a random supplier in a search for info only :
http://www.contenti.com/products/abrasives/210-044-01.html

General tips for sanding knife blades and handles using 3M papers:
Mark the back of each sheet with the grit equivalent when they are new ( just use a laundry marker or sharpie). This prevents using the wrong side and getting the grit order confused. The white 8000 sheet is very hard to tell front from back once used, so mark it's back right out of the wrapper.

Keep the sheets by color/grit in large plastic bags. Cut some up into 1/4s to use for small sanding jobs. They can be used again until completely worn out.

Sand to 800/1000 grit with SC paper or belts, clean everything really well, and go back to the green/400 3M sheet and go up the grits when getting a final finish.

Even if you plan on stopping with a satin finish on a blade or handle, go past that and do at least two papers finer. This will quickly expose small scratches you missed. Once you've got them all sanded away, go back down the grits to the finish desired.

Wet sanding leaves a much smoother and crisper finish than dry. Wet sanding wood is not usually a good idea. However, plastics and steel both do well with wet sanding. Plastic should be done with water only. When using water on blades, a few drops of dish soap added helps a lot. Water is really a good agent for sanding and is easy on the hands and such, but isn't a great idea on blades already mounted if it might seep under the handle. On knives where water would be a problem, oils can be used as the lubricant.
Water or oil, use just enough to "wet" the blade surface and carry the grit and swarf. Wipe/wash off frequently and don't let dry up in sanding.

Wash everything thoroughly between grit changes....especially your hands. Change the water tub and rinse it out, change the wiping towels or cloths, wipe off the sanding jig, etc.. Coarser grits can hang around a long time and suddenly jump out at 8000 to make you curse.

Japanese blades tip:
If you do hybrid togi, cut the papers into approximate 1" squares and put in marked plastic bags. Use a piece to polish a small area and then toss it. I sometimes use a small square of leather as a backer between my thumb/finger and the polishing paper. The 3M papers will take a blade to a really bright finish. A final polish with your slurry of choice and a stack of gun cleaning pads will make it a mirror. The small cut up pieces of polishing paper are super good for working around the hamon in the final shiage togi. Little triangular wedges of leather, used as a backer, will get right up to delicate details without risk. This works pretty much like using hazuya and jizuya stones...but much easier and neater. A single $1.25 sheet of polish paper makes a bag of 100 squares.
 
Back
Top