Yes, you can HT stainless in a PID control forge. Tim has given good info.
I find a blown forge can be regulated much better than a venturi burner.
Karl has a wonderful setup that regulates quite well. Here is a forge build thread he had with lots of good build info.
I have four vertical forges of different sizes - and love them. I built my first one right at 18 years ago after seeing Don Fogg's forge at the Ashokan Seminar.
I had been using coal until then.
They do many things well, but nothing does everything well.
With some up-coming projects that might benefit from a horizontal forge I decided to add one to the arsenal.
Maybe something a person sees here can help them with their own ideas for their forge build.
Other good forge build threads:
I thought I would make a thread as I slowly build my vertical forge. Maybe this will also help me from making too many major mistakes.
Right now I am still gathering materials.
https://imgur.com/gallery/DjnYWyF
The body of the forge is an old air tank I got from the scrapyard (12” diameter). Inside that is going an 8” stovepipe wrapped in two inches of insulwool. Inside the stovepipe I have a 6” high density foam roller which will be a hollow form for the forge chamber. I’ll be pouring kasto-o-lite to from a 1” liner inside the stove pipe. All this of course after I’ve cut out and...
Fred Rowe's Vulcan's Chariot PID forge -
https://www.bladeforums.com/threads/vulcans-chariot-is-ready-to-tune.540299/
Nick Anderson's PID control forge Plans -
https://www.bladeforums.com/threads/pid-controlled-forge-heat-treat-oven-plans-wip.1385057/
There is a section in the Stickys about PID control forge building -
https://www.bladeforums.com/threads/pid-control-forge-salt-pots-and-more.782574/
TIPS:
1) Wrap the blade in well sealed stainless foil.
2) Use a muffle pipe. I use a piece of very thick walled 3" stainless pipe. Place the muffle in te forge before turning it on and allow it to come up to heat with the forge.
3) Soak the forge for a good 15 minutes to get the refractory and muffle fully heated.
4) Tune the burner control. Start on manual (by-pass only) and adjust to get the forge running stable at around 10°F below the target temp.
5) Switch to PID mode and let the autotune zero in on the cycling. As mentioned, set the cycle time to a reasonable time span.
Some suggestions for a PID control build:
1) Only use a propane rated solenoid valve. They aren't cheap, but some shopping around the auction sites can snag one for a fraction of the regular price. Don't be tempted by the cheap On/OFF propane valves, They won't work for long. You want a good Red Hat or similar valve.
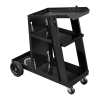
2) Mount the forge on a rolling cart. The metal shop carts and small welder carts are perfect. I like the $49 HF welder cart the best for a forge. Use the two lower holes so the top shelf is level not tilted. Mount the PID control on the back side. Put tongs and other welding stuff on the shelves. This cart is great for any forge, PID control or not.

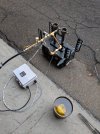
3) Don't hard mount the control piping and solenoid like the one shown in this thread. That puts a lot of strain on the tubing as well as exposes the parts to heat. Instead, build the control unit and mount it on a board or sheet of metal and mount it on the side of the bench or on a rolling forge cart.. Use flex gas line to connect the burner control to the forge. I like the Eastman 36" long 3/8" ID flex lines. They are very low price and work perfect for any forge build.
Eastman 36 Inch x 3/8 Inch OD Flexible Gas Line Connector with (2) 1/2 Inch MIP Fitting Ends for Natural Gas and Liquid Propane, Stainless Steel, Yellow,


