Recommendation? Help, I don't know what to do with this handle!

ErikMB

Gold Member
Joined
Jul 27, 2017
Messages
870
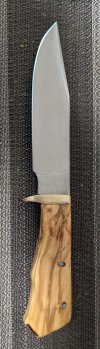
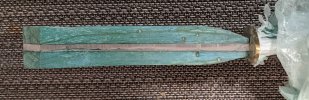
I had a design for this (penciled on but sanded off) but it just didn't look right so I am stopping to reassess before finishing the handle.

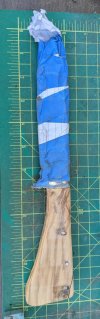
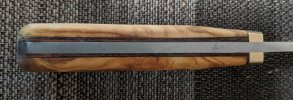
The tang runs along the spine as opposed to the middle so I can only really work on the bottom of the handle.

The tang seems to be too long for a person's hand which might be why it just doesn't look like it's turning out right thus far.

One idea would be to shorten it to fit better, grind in just a little around where the pinky finger goes, and come straight down from the new top of the tang -or- have a curve or diagonal from the top of the tang to the bottom of the butt.

I would LOVE some advice, folks! I don't want to grind away any more of that olive wood or, especially, the metal tang until I have a new plan.

I will never buy a blank with the tang at the top again... sheesh....
 

Attachments

  • PXL_20211103_221601047_1.jpg
    PXL_20211103_221601047_1.jpg
    257.4 KB · Views: 84
Make some handle blanks out of cardboard or ply, make few different ones till it feels right then use that as a template to trace onto your wood. Grind most of the top and bottom first so you dont lose your lines, but you can use the template to check or retrace your lines.
 
could you put more pics so the tang can be seen?
 
you just need to draw a nice shape at the bottom and reshape it. it looks to be 5 inches long, thats within normal range, somewhere between 4 and 5 inches usually.
 
Play with the handle thickness too and you might clean up those scruffy lookin pin holes, you got plenty of wood to work with if you're slow 'n careful
 
Keep this handle simple, look at green river and Kephart handles, maybe Loveless or Dozier, but dont get too fancy.
Overspecialization limits application.
 
Let it have a straight handle.
Maybe just a bit wider at the butt end, less then 1/8"
Handles like that can be surprisingly comfortable if you contour them well
 
Here is a very quick and dirty line of the direction I would head. Now I don’t like getting this close to a pin near the butt, but in this case I feel it would help.

CC21F1E5-2E33-4A8C-AACF-6CC8A3983ED3.jpeg

Judging by your other thread I’d assume this handle is on the thicker side as well, which may help. If you reduce the thickness it may help clean up your pins and holes. What’s the thickness as it sits now?
 
Last edited:
You guys are wonderful, thanks for all the advice!

My difficulty was not in transferring a design to the wood but in making the design itself.

357's image is exactly what I was after.

Here's what I have at the moment. I am frustrated by the bent pins. The catch was that the widest ones I had were a bit too narrow and that I did not cut them close enough to the wood so they bent over when I peened them. Grrrrr.... Is there a way to straighten them or do I need to bang them out from the other side and replace them?

The handle is more comfortable than it looks but it still needs improvement.

Also, the blue handle is my WIP "coffin" bowie. Having a similar problem.
 

Attachments

  • PXL_20211104_151832833_1.jpg
    PXL_20211104_151832833_1.jpg
    256.9 KB · Views: 28
  • PXL_20211104_151804072_1.jpg
    PXL_20211104_151804072_1.jpg
    289.6 KB · Views: 29
  • PXL_20211104_151850638_1.jpg
    PXL_20211104_151850638_1.jpg
    422.1 KB · Views: 29
  • PXL_20211104_151856600_1.jpg
    PXL_20211104_151856600_1.jpg
    232.7 KB · Views: 28
Last edited:
If you try to bang them out you'll have to replace the handle. Bending them like that was the result of hitting them way too hard. Next time, epoxy the handle and or scales on, have the holes drilled or drill the holes. Sand your handle scales or handle pretty close to the final thickness you want. Epoxy the pins in place. After dry, grind them down to about a 1/16" above the handle material. Very slowly so as not to overheat them.Then get a small hammer, like a kids hammer, and lightly tap around the edges of the head of the pin. Lightly. You should be able to see it flare out.
You can get an idea about how much force it takes to deform the pins by laying one on a hard surface and tapping. It doesnt take much force.
 
Last edited:
If you have a good drill press and some bits that can go through hardened steel you could drill through the old pins and put bigger pins in. To counter the offset pins, you could add more pins. I would simplfy the handle like this.
9I9Mxzi.jpg
 
That's clever, thanks.

I don't have a drill press, unfortunately (though once we recover disposable income after Christmas... ;) ).

The good news is that the tang does not extend that far down so a second row of pins would just be cosmetic. That gives me some flexibility.

I think this lack of a drill press has been a problem with a lot of my projects, especially the slipjoints.
Pretty hard to get decent pins done with anything other than a press or mill. Might be some jigs you can use?

You can always just sand the pins flush, they don't have to be peened.
 
You can cut the length of the tang too - before you apply the handle. Next time :thumbsup:
 
Hi Ray, I did shorten the tang, maybe a little too much, but I am learning.

Nick, would you suggest a cube for a jig, with a just-right hole drilled in there? I'm not sure how to do this.
 
Back
Top