Hidden tang advice

Joined
Jan 31, 2022
Messages
4
Hey all,

I’m a stock removal knifemaker starting my foray into hidden tangs. I’ve got some questions about process that I’m hoping some of you can give me some guidance on please.

I don’t have a heat treating setup, so I’ve been outsourcing my heat treating until now. What order of operations would you recommend? Profile the blade and leave a good bit of extra material around the tang and shoulders and cut those in post HT? That seems to make sense to me, but then how do I go about cutting in the shoulders on the width of the ricasso? I don’t have a mill so just hoping to file these in by hand. Should I blue back the tang and file them in post HT? Done correctly, does this have any negative repercussions on the strength of the knife? Or should I completely finish out the tang/shoulders prior to HT? This seems risky as I could pretty easily wreck the shoulders while finish grinding the flats, right? I’ve tried grinding in these shoulders with AO belts and my carbide file guide, but have not been able to get clean shoulders on the width of the ricasso this way. I just can’t seem to get the belt to cut in square and flush with the file guide.

Next, if using 1/8” stock, would you still cut in shoulders on the width of the ricasso, or would you just leave flat and press fit the bolster? I tried cutting in shoulders on the width on an 1/8” tang and it definitely leaves a pretty thin piece of material by the time you’re done tapering. I know some believe in not having shoulders on the width of the ricasso at all…should I not bother with these and leave the tang flat and press fit everything, even on bigger knives with thicker stock?

Sorry for the rambling and potentially incoherent spewing of questions….my brain has been working overtime trying to figure this stuff out! Thank you for your time and knowledge…I’m definitely looking forward to getting this process dialled in. Getting my own heat treating setup is definitely my top priority, but I simply can’t wait any longer to start making hidden tangs!

Thanks,
Kieran
 
I cut the shoulders, drill the hole(s), finish the flats to 400x before ht. Chances are not 0% that your tang will stay straight during the quench, so I always expect to taper it some after heat treatment.
 
I cut the shoulders, drill the hole(s), finish the flats to 400x before ht. Chances are not 0% that your tang will stay straight during the quench, so I always expect to taper it some after heat treatment.
Thank you — very helpful. What is your opinion on cutting shoulders on the width/flat of the ricasso? And what is your method for doing it if you do?
 
Shape the tang pre HT.
Get a carbide face file guid and you can refine post HT if you like.
I only remove the thickness of one layer of masking tape post HT.
Make sure the ricasso is the thickest part of the knife.
I always grind the tang a bit post HT to have fresh scratches the epoxy can grip without HT scale in them.
 
Thank you — very helpful. What is your opinion on cutting shoulders on the width/flat of the ricasso? And what is your method for doing it if you do?
I don't do that, and I don't think it's a good idea, generally speaking
 
Shoulders on the flats of the ricasso are only used in thick blades, like swords and large bowies. If the ricasso is under .25"/6mm thick, it doesn't need the extra shoulders.

When doing the regular shoulders there are a few simple things to do to get a presentation fit:

NEVER
... repeat ... NEVER ... fit the guard to the tang before final assembly. The ricasso and tang will get smaller as you do the final sanding and if you filed the guard slot in the earlier stages it will be too big and have a gap.

1) Always make the transition from shoulder to tang a radius. It doesn't need much, .06"/1.5mm radius is sufficient. You can use a small round file, but the easiest way is to drill two 1/6"/1.5mm holes at the junction and saw to the holes from both directions. A radiused shoulder transition removes the most common stress riser point that breaks a knife.

2) Use a carbide file guide to file the shoulders before HT and again with EDM stones or the belt grinder after HT. This will give you absolutely flat and even shoulders that show no gaps. A carbide file guide is pretty much a must have for any knifemaker who wants a good guard fit.

3) Taper the tang a bit so the guard stops snug about .50"/12mm from the shoulders. Tap it down snug until it binds with a flat ended wooden block with a hole drilled in it to fit over the tang. Remove the guard and carefully file the shiny spots in the slot. Refit and tap again until it is about .125"/3mm from the shoulders. It should tap home with a few good raps. With some practice, the fit will be so tight that there is no need for solder or JB Weld to seal the joint. (Note - Mark the back side of the guard so you don't accidentally turn it over and put it on backwards.)

4) Once the guard is seated, pre-shape the handle and check the alignment of the end to the guard. If it is close, use a sharp knife or a Dremel tool with a ball burr to relieve end around the tang hole just a tad. This makes the contact area only along the perimeter of the handle and prevents gaps. It gives a really snug fit. It also gives the resin a little pool inside of the handle-guard joint. Done right and clamped in a handle clamping jig, the resin will not leak out during curing, even with the point downward.
 
I know it's too much work, but I wish this topic had pictures....
 
I would prioritize getting or using a mill at some point. It'll make things much easier. Mill in your guard shoulders before heat treat, you will not have to mess with it again. And if you're talking about undercutting a shoulder on the blade along the flat of the ricasso as you mentioned, if I understand you correctly, this is not necessary at any thickness of blade. All you're really doing is introducing a potential stress riser if the process is not done correctly.

As mentioned, taper the tang down just a little bit right before you fit the guard. All you have to do is take off 5 to 10 thou and the guard will slide up right to the guard shoulders, which is the only area that needs to be an actual tight fit. As mentioned, about a half inch or even a quarter of full thickness tang right below the ricasso is all that's necessary.

Sam⚔️⚔️
 
Thank you all very much for the help here. Glad to hear I can forgo the shoulders on the flats of the ricasso.

Stacy, thank you for the detailed tips! This is super helpful stuff. Hope the book isn’t far off—you’ve clearly got a wealth of knowledge to share.

Sam, thanks for the tips and I definitely hope to get a mill in my life ASAP! First a shop big enough to fit the tools I do have….

Kieran
 
My pleasure, happy to add to the rest of the good advice already in the thread by the others.

I may have missed it, but what is your guard material going to be out of?

Sam⚔️⚔️
I have been working with brass so far. Came very close to a good fit on my last attempt but had a persistent gap under the spine shoulder area.

That brings up another question actually: when making a bolster out of a non-malleable material like micarta or G10, how do you get a seamless fit if you don’t have shoulders on the flats of the ricasso for it to sit on? Do you simply have to file a perfect slot?

Thanks,
Kieran
 
I don't have much to add since the advice already given is perfect. I want to provide mostly pictures and videos from the advice above.
All the steps bellow are done using files and hand tools. As much as a mill would make my life easier, it's not required for a perfect fit.

You can use a carbide file guide to avoid filling more than needed (great for materials that cannot be peened over ie micarta).
135.jpg

I'd suggest using a flat piece of steel with a leather piece glued on to avoid marring the backside of the guard (specially on soft metals like brass).
136.jpg

Instead of filling blind, file the shinny spots. Shinny spots=places the guard rubs against the tang.
137.jpg

An even easier way is to use a candle. I copied this techunique from gunsmiths. The black layer from the candle rubs right off at all the places it touches on the tang/shoulders. File those places lightly, reblacken, refit. Repeat enough times and you will reach the desired fit.

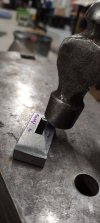
Once the guard is flush with the shoulders, you can peen over small gaps. As you can see, I didn't do a great job filling this guard. Tap lightly otherwise you will spend a lot of time sanding the divots off. It's better to repeat this process a few times than creating huge divots.
138.jpg139.jpg


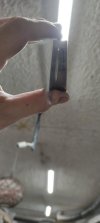
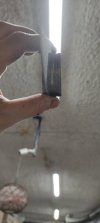
Checking against a light source will reveal even the tiniest of gaps. Careful if your light source is on the ceiling, if you drop the knife it will stab you in the face.

Before and after peening.
140.jpg141.jpg

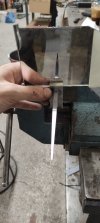
A mirror against the backside of the guard will show you whether it's square to the blade. When sighting down the spine, the reflection must be spot on, if it's canted then you are out of square.
142.jpg

Finally, sand the face of the guard and you are done!
145.jpg

Don't know whether or not all the above make sense, however do not hesitate to ask for any clarification/questions you might have.
 
Nice work, and good fit.🔥🔥

Sam⚔️⚔️

I don't have much to add since the advice already given is perfect. I want to provide mostly pictures and videos from the advice above.
All the steps bellow are done using files and hand tools. As much as a mill would make my life easier, it's not required for a perfect fit.

You can use a carbide file guide to avoid filling more than needed (great for materials that cannot be peened over ie micarta).
View attachment 2880515

I'd suggest using a flat piece of steel with a leather piece glued on to avoid marring the backside of the guard (specially on soft metals like brass).
View attachment 2880516

Instead of filling blind, file the shinny spots. Shinny spots=places the guard rubs against the tang.
View attachment 2880517

An even easier way is to use a candle. I copied this techunique from gunsmiths. The black layer from the candle rubs right off at all the places it touches on the tang/shoulders. File those places lightly, reblacken, refit. Repeat enough times and you will reach the desired fit.

Once the guard is flush with the shoulders, you can peen over small gaps. As you can see, I didn't do a great job filling this guard. Tap lightly otherwise you will spend a lot of time sanding the divots off. It's better to repeat this process a few times than creating huge divots.
View attachment 2880518View attachment 2880519


Checking against a light source will reveal even the tiniest of gaps. Careful if your light source is on the ceiling, if you drop the knife it will stab you in the face.

Before and after peening.
View attachment 2880520View attachment 2880521

A mirror against the backside of the guard will show you whether it's square to the blade. When sighting down the spine, the reflection must be spot on, if it's canted then you are out of square.
View attachment 2880522

Finally, sand the face of the guard and you are done!
View attachment 2880523

Don't know whether or not all the above make sense, however do not hesitate to ask for any clarification/questions you might have.
 
What is your opinion on cutting shoulders on the width/flat of the ricasso? And what is your method for doing it if you do?
Depends on how thick your tang is. If we're talking 2-3mm I would not, it's going to get too thin. My current approach has a ~5-6mm square tang that i then forge down into the blade, and for those i do a shoulder in the sides too.
It's the same process, just rotated 90 degrees
 
I don't have much to add since the advice already given is perfect. I want to provide mostly pictures and videos from the advice above.
All the steps bellow are done using files and hand tools. As much as a mill would make my life easier, it's not required for a perfect fit.

You can use a carbide file guide to avoid filling more than needed (great for materials that cannot be peened over ie micarta).
View attachment 2880515

I'd suggest using a flat piece of steel with a leather piece glued on to avoid marring the backside of the guard (specially on soft metals like brass).
View attachment 2880516

Instead of filling blind, file the shinny spots. Shinny spots=places the guard rubs against the tang.
View attachment 2880517

An even easier way is to use a candle. I copied this techunique from gunsmiths. The black layer from the candle rubs right off at all the places it touches on the tang/shoulders. File those places lightly, reblacken, refit. Repeat enough times and you will reach the desired fit.

Once the guard is flush with the shoulders, you can peen over small gaps. As you can see, I didn't do a great job filling this guard. Tap lightly otherwise you will spend a lot of time sanding the divots off. It's better to repeat this process a few times than creating huge divots.
View attachment 2880518View attachment 2880519


Checking against a light source will reveal even the tiniest of gaps. Careful if your light source is on the ceiling, if you drop the knife it will stab you in the face.

Before and after peening.
View attachment 2880520View attachment 2880521

A mirror against the backside of the guard will show you whether it's square to the blade. When sighting down the spine, the reflection must be spot on, if it's canted then you are out of square.
View attachment 2880522

Finally, sand the face of the guard and you are done!
View attachment 2880523

Don't know whether or not all the above make sense, however do not hesitate to ask for any clarification/questions you might have.
Nice write up! I do almost exclusively hidden tangs, but the candle and the mirror tips were solid. I suppose this is also where I should insert a joke about smoke and mirrors...
 
Sam, thanks for the tips and I definitely hope to get a mill in my life ASAP! First a shop big enough to fit the tools I do have….

Kieran

You won't regret getting a mill. I started using one for guards years ago, I haven't touched a file to fit a guard in over 5 years now. It's great. This is what typical guard fit up looks like, the knife pictured below.

I have been working with brass so far. Came very close to a good fit on my last attempt but had a persistent gap under the spine shoulder area.

Thanks,
Kieran

Good choice, brass is a great guard material, especially if you're still getting your system down. You can easily be undersized by several thou and the brass will deform enough to go on and form a nice tight fit.

AUa6xAX.jpg


YYxbzl5.jpg


Sam⚔️⚔️
 
Thank you — very helpful. What is your opinion on cutting shoulders on the width/flat of the ricasso? And what is your method for doing it if you do?
I forgot to mention this.
I know many highly regarded makers who undercut the ricasso. Could it become a stress riser on an already weak place? Perhaps, I do not have the scientific means to test that properly.
Is it a foolproof method? not really, it takes some practice to nail down the process (like anything else).
My logic says that if I'm going to spend the time to learn something, if the end result visually is the same, why choose the one with an extra step, a potentially weaker transition and also another chance of making a mistake?


Nice work, and good fit.🔥🔥

Sam⚔️⚔️
Nice write up! I do almost exclusively hidden tangs, but the candle and the mirror tips were solid. I suppose this is also where I should insert a joke about smoke and mirrors...
Thank you for the kind words!
 
I am by no means an expert on hidden tang knives, but have been doing more of them lately. I have done both a milled shoulder and a taper on the tang and prefer the taper, not from a strength standpoint, but because I thing the gradual taper lends itself to a tighter fit, all things considered. Sort of like a wedge over a straight peg, the wedge gets tighter when forced into a hole, the straight peg requires more careful fitting. The ledge merely hides any minor mistakes (keep in mind it is only .015-.020 deep). The milled shoulder also requires more set up time to accomplish and I have in fact had to....uh....ADJUST my final dimensions when my measurements were off by less than the width of two sheets of paper.
 
Back
Top