- Joined
- Apr 19, 2005
- Messages
- 5,533
It all started out like curosity killed the cat. I like light grey dymondwood scales. I had a dark dymondwood 303 cadet so I decided I would take off scales to see what the guts looked like. Knowledge is power..........
So here is what the knife looked like after I coping sawed the scale in two places and pried the three peices off.

Some of the rivets came off, some didn't till I tood a pliers and twisted them back and forth. See the new scale plate. Its not like the older sawcut style which is made itergal to the liner. Then I tried small nippers to cut off spring pin, then I tried big nippers, then I ended up using hacksaw blade in small handle. Then ground off even to liners.
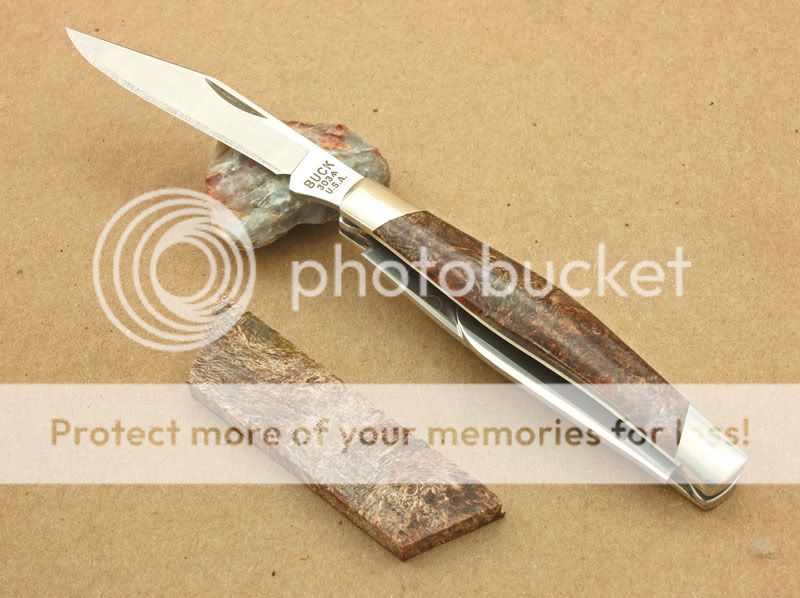
So la-de-da there it was. After I got tired of looking at it, I decided to put a new scale on myself. I guessed (correctly in retrospect) that stag would be a hard hill to climb. So while at the Wannemacher Tulsa gun show I bought a 5 dollar piece of CA Buckeye Tree Burl wood that had been stablized. I am hoping it really is a piece of good ole mother earth tree. Never having scaled a knife before I jumped in with both feet and marked off the little slab.

Something in my half century brain said this was an important step.....next I pulled out the trusty Dremel destruction tool and roughed up the liner surface and cleaned it with rubbing alcohol. At this point I should of had some Dave shine and drank it and forgot about the whole thing. Because I am making this sound like it took an hour or two but the truth is a week or so.

Then I very carefully cut the scales out with a copying saw and gave myself some extra. I ground off the extra wood to the penciled line, mind you very very carefully and slowly, fitting as I went.

Next was gluing. I consulted with some fourmites and they used special epoxy glue which was running about $15 for three ounces. I had a Aracglas gun bedding kit and used some of that along with the brown dye supplied. And it appears to have worked OK.
After 24 hours I began the long, stressfull period of grinding, sanding and polishing the scale to fit. All I can say is a 20 mile hike in the hot sun with a full pack and bare feet is preferred in the end. One little slip and you have a ding that will double your time and agony. But in the end here is what happened.

Don't think I will take this up as side job.
P.S. I carefully and artfully positioned knife in photos to hide my mistakes.
300Bucks
So here is what the knife looked like after I coping sawed the scale in two places and pried the three peices off.

Some of the rivets came off, some didn't till I tood a pliers and twisted them back and forth. See the new scale plate. Its not like the older sawcut style which is made itergal to the liner. Then I tried small nippers to cut off spring pin, then I tried big nippers, then I ended up using hacksaw blade in small handle. Then ground off even to liners.
So la-de-da there it was. After I got tired of looking at it, I decided to put a new scale on myself. I guessed (correctly in retrospect) that stag would be a hard hill to climb. So while at the Wannemacher Tulsa gun show I bought a 5 dollar piece of CA Buckeye Tree Burl wood that had been stablized. I am hoping it really is a piece of good ole mother earth tree. Never having scaled a knife before I jumped in with both feet and marked off the little slab.

Something in my half century brain said this was an important step.....next I pulled out the trusty Dremel destruction tool and roughed up the liner surface and cleaned it with rubbing alcohol. At this point I should of had some Dave shine and drank it and forgot about the whole thing. Because I am making this sound like it took an hour or two but the truth is a week or so.

Then I very carefully cut the scales out with a copying saw and gave myself some extra. I ground off the extra wood to the penciled line, mind you very very carefully and slowly, fitting as I went.

Next was gluing. I consulted with some fourmites and they used special epoxy glue which was running about $15 for three ounces. I had a Aracglas gun bedding kit and used some of that along with the brown dye supplied. And it appears to have worked OK.
After 24 hours I began the long, stressfull period of grinding, sanding and polishing the scale to fit. All I can say is a 20 mile hike in the hot sun with a full pack and bare feet is preferred in the end. One little slip and you have a ding that will double your time and agony. But in the end here is what happened.
Don't think I will take this up as side job.
P.S. I carefully and artfully positioned knife in photos to hide my mistakes.
300Bucks
Last edited:

") ...Great write-up and pics 3CBucks...Really nice wood on that slippie now...Next we'll see blade changes, bolster embellishments and on and on...
...Great write-up and pics 3CBucks...Really nice wood on that slippie now...Next we'll see blade changes, bolster embellishments and on and on...

