Homemade Knife Scribe

Joined
Jul 3, 2002
Messages
645
OK maybe it's the kid's braces I'm still paying on, but I'm feeling cheap. I didn't want to pay the $20 for a knife scribe.

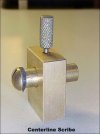
I have a cheap scribe that came with extra points. So I built this from scrap aluminium:

scribe.jpg


I opened the groove in the bolt to allow for the point, then I epoxied the little sucker in. Place the bolt thru a hole where it can spin. Adjust for height with the top nut, and lock it down the bottom nut.

Works great!. Nice big platform.

I try to make other things, but won't admit to most of it. :barf:

Steve
 
Looks like just the ticket. After several bloody encounters, either stabbing or scraping myself with my hand scribe, I finally started to put it in the vise and use it like the one you built. You'd think pain and blood would be a quicker teacher.
 
I maked mine with a few old piece of aluminium
and old drill bit sharpened. It work fine !

Alain M-D

scribe.jpg

scribe2.jpg
 
I've heard of some using a sharpened valve in a drill press. I have a valve here for just that purpose once I get it sharpened. I have trouble keeping track of the sribed lines, so this seems like a much more viable/visible solution.
I'm making a small table with a runner underneath that can be clamped in the vise so I can just run the edge of the future blade against the rotating valve head, flip it over and do the same.
 
I've tried the valve in the drill press for scribing. Initially, I couldn't get a decent scribe from it, after sharpening the edge and putting several notches in it, the scribe line was more visible. I found a hand scribe much quicker and gave a clearer scribe line. You might give it a try though if you already have the valve.
 
I was just about to tell everyone about the valve trick, which has worked well for me and did. Please learn from my obvious mistake and read all the posts before you get excited about sharing your expertise. I have been using the valve scenario for a few years, maybe I just got a good valve, but it seems to give me nice clean lines./:rolleyes: Terry
 
Guys: Creative solutions, all. I just use a Vernier caliper, adjusted to where I want it and scribe away.

RJ Martin
 
;) ;) ;)

Neat ideas everybody. Except RJ and Sylvester.

I don't like that simple direct approach. Why right now I'm building my own drill press.

3hp Briggs & Stratton lawnmower motor (variable speed), driveshaft from a 65 Ford Fairlane, and misc parts from the underside of a broken freezer. I figure I only need two kids to raise and lower it over the table.

"No no Jimmy you have to lower at the same rate as your sister. Otherwise it binds on the driveshaft. ... Hold still while I adjust the choke. ..... Gee kids this is more fun than TV! ...."


Steve
 
Originally posted by itrade
;) ;) ;)

3hp Briggs & Stratton lawnmower motor (variable speed), driveshaft from a 65 Ford Fairlane, and misc parts from the underside of a broken freezer. I figure I only need two kids to raise and lower it over the table.

Steve

Wow man! I thought I was the only one who liked doing things the hard way!

Now if you only had a diesel-powered drill press motor...


Jeff
 
I've tried all of the gadgets. I now use a cobalt lathe bit. Just sharpen one end. You can grind it up or down to adjust to the stock that you are using. I have one end set for 1/8 inch stock and the other set for 3/16 stock. Once it is sharp, all you need is a flat surface to lay the knife on and just drag the lathe bit across the flat surface along area to be marked. Then flip the blade over and you have two parallel lines. They last a long time.
 
I'm with IG. Just eye it. I am still a rookie at this craft, but if it looks good then it probably is. I do the same for thickness. My eyes can see a 0.010 difference in the thickness of the billet when I am grinding. Well for the time being anyway. I am sure that will deteriorate with age (and not wearing UV glasses while forging damascus):)
 
Well, this must be a popular tool to make! :D I made one too, here's mine. But frankly, I like Bobby's idea the best, I'm going to make a couple of those old cutters into scribes, I use mostly the same stock anyway. Good thread, thanks Steve.

Dave
 

Attachments

  • bfscribe.jpg
    bfscribe.jpg
    27.4 KB · Views: 83
A little trick to help you see the scribe line was told to me by Mike Miller of Wagoner, Ok. Before you scribe, use a 400 grit belt to put sanding marks perpendicular to the line and it will be easier seen. When the dye gets hot, the line in the middle will stand out better. You also don't follow another scratch line :).
 
Back
Top