- Joined
- Oct 1, 1999
- Messages
- 6,490
Ive been around these boards for a lot of years, not as much as I used to be. Ive done a bunch of tutorials on down and dirty photography, image editing, and digital painting using Photoshop.
I started with a tutorial No Frills Lighting
http://www.bladeforums.com/forums/showthread.php/306402-No-Frills-Lighting?highlight=Frills+Lighting
Next How I Photograph Knives
http://www.bladeforums.com/forums/showthread.php/452121-How-I-photograph-knives
Then How I do Image Editing is still a Sticky at the top of this page.
http://www.bladeforums.com/forums/showthread.php/455896-Image-Editing-Tutorial
I wrote this tutorial on How I Do a Photo Montage for another forum, but if nobody minds Ill post it here as well. With the hope of seeing more interesting images and to inspire you to make them.
I want to take some of the mystery about putting two (or more) knives in the same image. Putting two or more knives in a photo is easy, its just a matter of knowing what buttons to push in your Image Editing program (Photoshop, Elements or GIMP).
Lets say you wanted to show both sides of a knife in one image. If you start by photographing them with the intent to put them together, then shoot one side on an angle leaving space for where the other side is going to go in the final image. Take the second shot of the other side. Take the best photos you can to start. If you have a tripod use it, this will help to make sure the angles match.
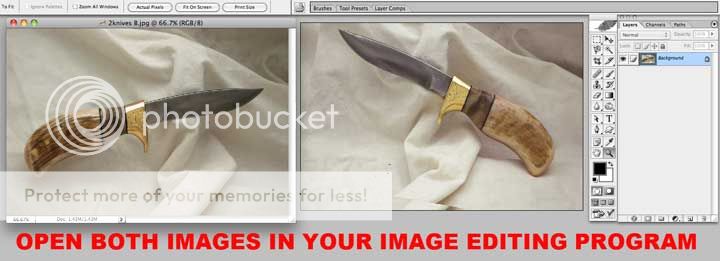
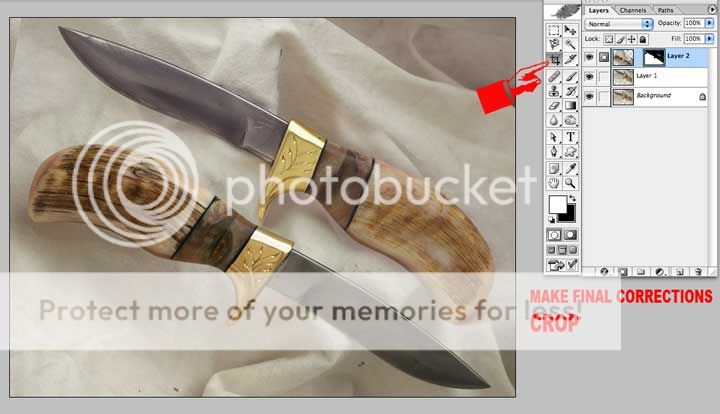
Open up both images in your image editing program and compare them, they need to match in contrast and color. Make your corrections, but dont crop.
Duplicate the Background Layer by pressing Control + J, in case you need to rotate the background knife.
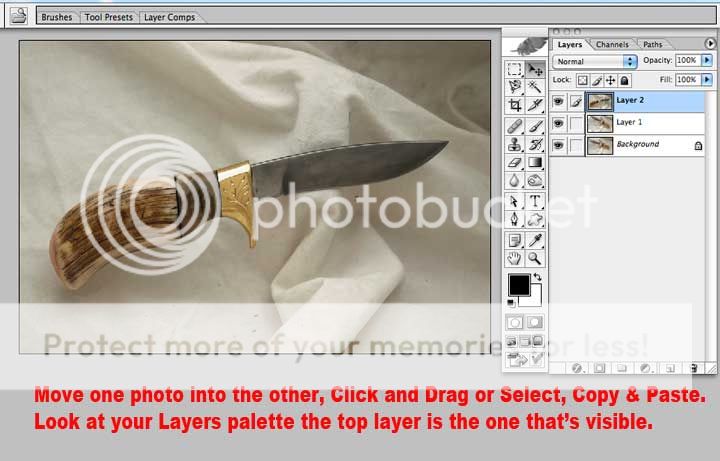
Move one photo into the other, Click and Drag or Select, Copy & Paste. Look at your Layers palette the top layer is the one thats visible.
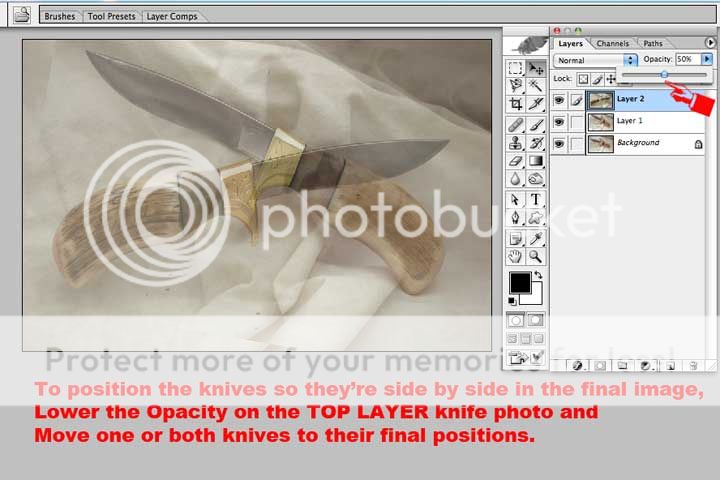
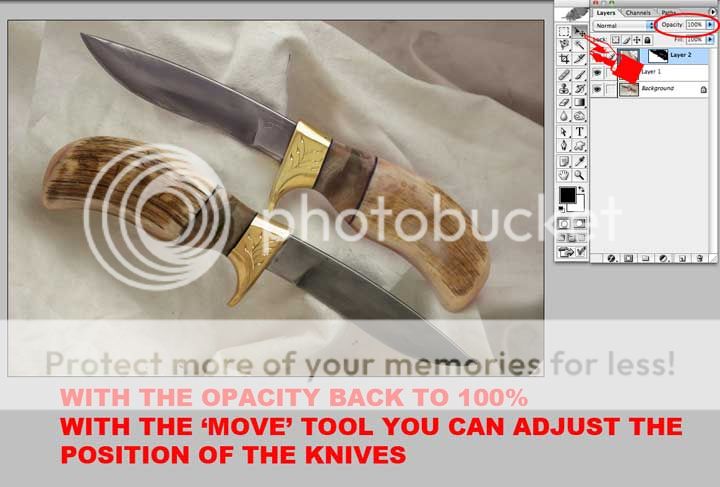
To position the knives so theyre side by side in the final image, Lower the Opacity on the knife photo and Move one or both knives to their final positions.
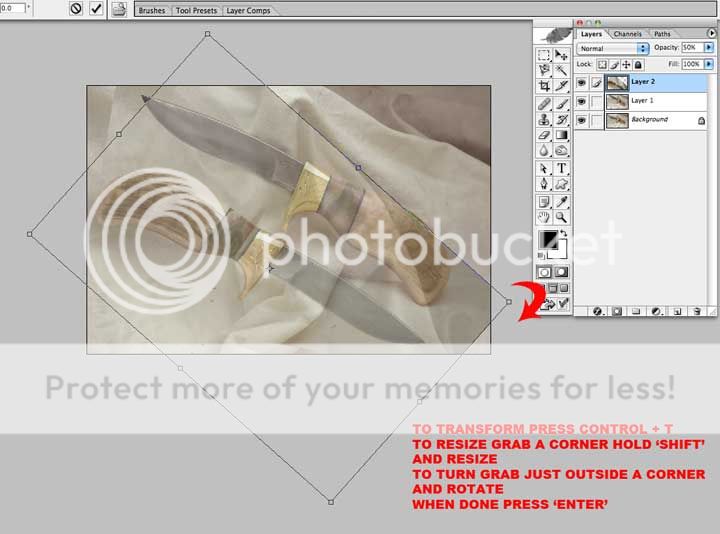
To Transform Press Control + T. Now you have both knives in the same image, but the top knife is ghostly because we lowered the Opacity. We want to reveal the bottom knife when the Opacity is 100% on the top image. Theres a couple of ways to do this.
With the top Layer selected and the opacity lowered, go to your Tools and choose the Erase tool and just erase the section of the top photo so that the lower knife is shown. Increase the Opacity of the top layer to 100%. There you have it, both sides of the knife in the same image. Thats pretty easy, but there is one drawback, youve erased the pixels from the top photo, it would be hard to go back and make changes later. There is a Non-destructive way to accomplish the same image.
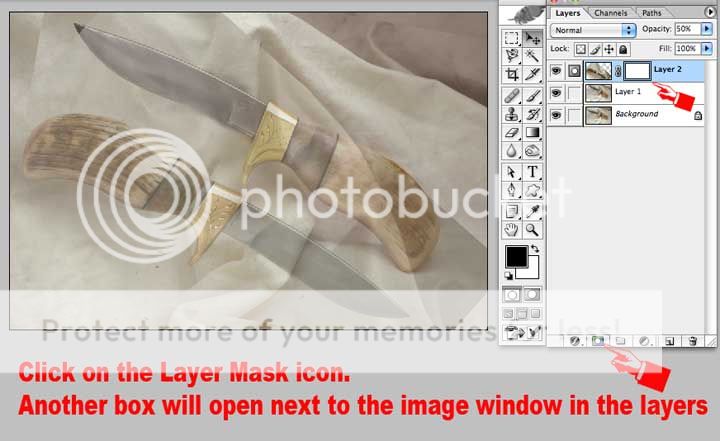
Again with the top Layer selected and the opacity lowered, go to your Layers palette and with the top layer selected and highlighted, Click on the Layer Mask icon. Another box will open next to the image window in the layer. Make sure the Layer Mask is selected and highlighted.
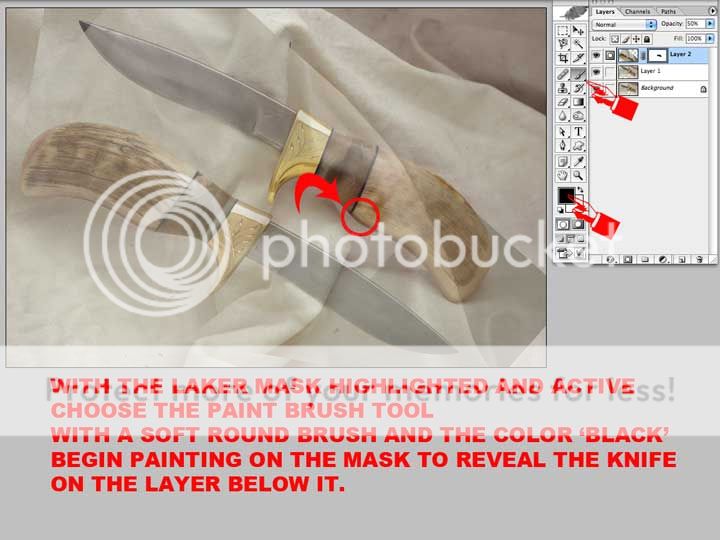
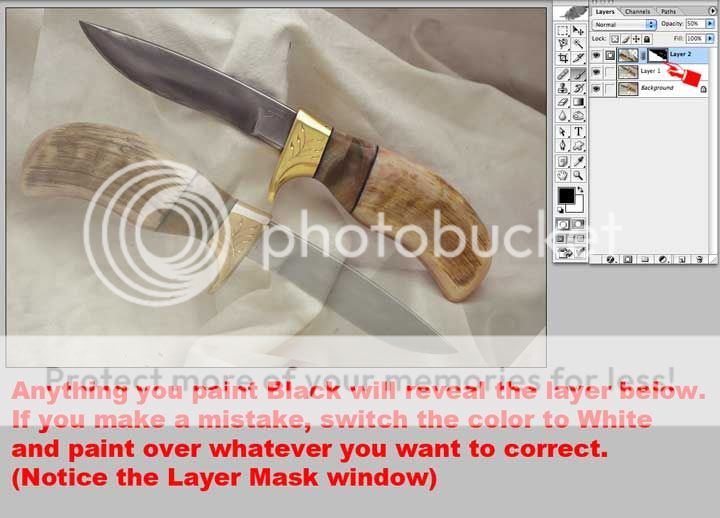
Go to your Tools and choose the Paint Brush tool and just Paint in Black the section of the top photo so that the lower knife is shown. Anything you paint Black will be revealed. If you make a mistake, switch the color to White and paint over whatever you want to correct.
Increase the Opacity of the top layer back to 100%.
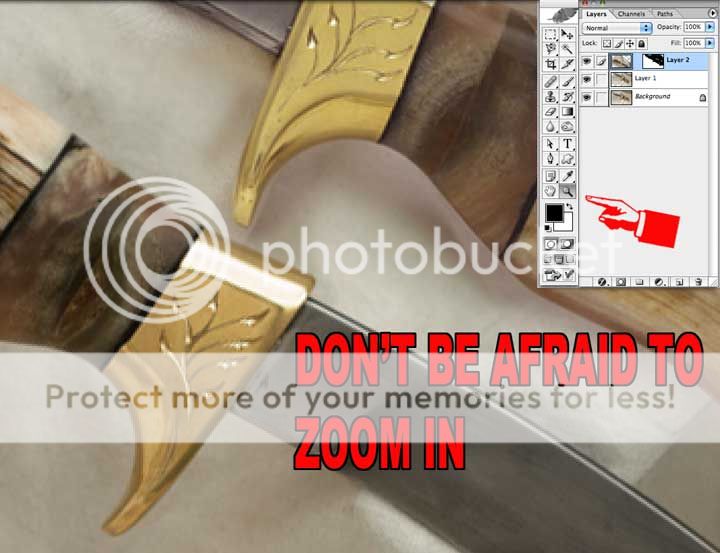
The Layer Mask acts just the same as the Eraser, except that it is Non-Destructive and can be changed at any time as many times as you want with nothing being removed for the photo. Theres other advantages to this Layer Mask approach.
If you want to see some excellent photography and this montage technique used masterfully go take a look at my friend Jim Coopers website.
http://www.sharpbycoop.com/jalbum/index.html
Go get inspired.
I started with a tutorial No Frills Lighting
http://www.bladeforums.com/forums/showthread.php/306402-No-Frills-Lighting?highlight=Frills+Lighting
Next How I Photograph Knives
http://www.bladeforums.com/forums/showthread.php/452121-How-I-photograph-knives
Then How I do Image Editing is still a Sticky at the top of this page.
http://www.bladeforums.com/forums/showthread.php/455896-Image-Editing-Tutorial
I wrote this tutorial on How I Do a Photo Montage for another forum, but if nobody minds Ill post it here as well. With the hope of seeing more interesting images and to inspire you to make them.
I want to take some of the mystery about putting two (or more) knives in the same image. Putting two or more knives in a photo is easy, its just a matter of knowing what buttons to push in your Image Editing program (Photoshop, Elements or GIMP).
Lets say you wanted to show both sides of a knife in one image. If you start by photographing them with the intent to put them together, then shoot one side on an angle leaving space for where the other side is going to go in the final image. Take the second shot of the other side. Take the best photos you can to start. If you have a tripod use it, this will help to make sure the angles match.
Open up both images in your image editing program and compare them, they need to match in contrast and color. Make your corrections, but dont crop.
Knife Photos by Ed Fowler
Duplicate the Background Layer by pressing Control + J, in case you need to rotate the background knife.
Move one photo into the other, Click and Drag or Select, Copy & Paste. Look at your Layers palette the top layer is the one thats visible.
To position the knives so theyre side by side in the final image, Lower the Opacity on the knife photo and Move one or both knives to their final positions.
To Transform Press Control + T. Now you have both knives in the same image, but the top knife is ghostly because we lowered the Opacity. We want to reveal the bottom knife when the Opacity is 100% on the top image. Theres a couple of ways to do this.
With the top Layer selected and the opacity lowered, go to your Tools and choose the Erase tool and just erase the section of the top photo so that the lower knife is shown. Increase the Opacity of the top layer to 100%. There you have it, both sides of the knife in the same image. Thats pretty easy, but there is one drawback, youve erased the pixels from the top photo, it would be hard to go back and make changes later. There is a Non-destructive way to accomplish the same image.
Again with the top Layer selected and the opacity lowered, go to your Layers palette and with the top layer selected and highlighted, Click on the Layer Mask icon. Another box will open next to the image window in the layer. Make sure the Layer Mask is selected and highlighted.
Go to your Tools and choose the Paint Brush tool and just Paint in Black the section of the top photo so that the lower knife is shown. Anything you paint Black will be revealed. If you make a mistake, switch the color to White and paint over whatever you want to correct.
Increase the Opacity of the top layer back to 100%.
The Layer Mask acts just the same as the Eraser, except that it is Non-Destructive and can be changed at any time as many times as you want with nothing being removed for the photo. Theres other advantages to this Layer Mask approach.
If you want to see some excellent photography and this montage technique used masterfully go take a look at my friend Jim Coopers website.
http://www.sharpbycoop.com/jalbum/index.html
Go get inspired.
Last edited:


") :thumbup:
:thumbup:


