How I lighten a full tang

Joined
Dec 4, 2001
Messages
3,824
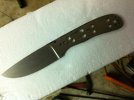
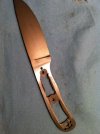
here's how I do a full tang knife. I see a lot of people drilling a bunch of holes and tapering the tang. I started out that way, and still taper, but this is how I do mine. Basically I drill 4 smaller holes and use a cut off wheel on the foredom to remove the section. Lots easier and takes more metal out than just drilling holes, and doesn't weaken the knife at all. After tapering and grinding a shallow hollow down the center it makes for a very lively knife when finished.

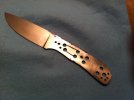
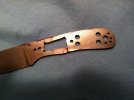
On the rear there are a few more holes to lighten the knife some more and I tend to put a few groves in with the cut off wheel as well to allow epoxy to flow in better. On the handle slabs I draw out where the cut outs are and drill a bunch of shallow holes to allow more room for epoxy and to undercut a bit for a mechanical lock with the epoxy.

I'm sure it's nothing new, but maybe help some new makers out trying to figure out how to lighten the handle up. Just leave plenty of metal around the pin area's and more metal towards the front of the knife for strength.
 

Attachments

  • IMG_0362.jpg
    IMG_0362.jpg
    44.3 KB · Views: 160
  • IMG_0363.jpg
    IMG_0363.jpg
    49.6 KB · Views: 166
  • IMG_0364.jpg
    IMG_0364.jpg
    60.1 KB · Views: 175
  • IMG_0367.jpg
    IMG_0367.jpg
    34.7 KB · Views: 226
That looks good, Will. Why don't you just drill your pin holes and then use a small contact wheel to hollow out the tang, leaving a thin layer in the middle? I can see you did that a bit, but I'm guessing you used a 8" wheel. It seems to me that you could drill your pin holes only, hollow the tang, then taper and it would be faster with less chance of stress fractures.
 
That's the way I used to do them, but the thin hollow ground section in the middle is very very thin. Your rite, it's ground with an 8" wheel, only one I've got. The reason I drill basically 4 holes then connect them with the cut off wheel is to have a rounded corner and not a square corner in the handle. I could mill it out, but I like a rough surface for epoxy to grab onto. Also having the window's in the middle and shallow cuts into the handle material means the epoxy is acting like a hidden rivet holding the scales on, there connected throughout. Not the only way to make a solid knife, just the way I do them. For as durability I've destroyed several in testing and non of the handles failed.
 
Sounds good. And if nothing if failing, keep it up! I'm not concerned about a rough surface on mine because I bolt them and use an anaerobic epoxy, but I'm going for speed these days. Thanks for posting. EA
 
I hear you on speed, but it really doesn't take that long to make the cuts, and really makes a big difference on weight and balance.
 
You obviously do this prior to HT?
I am not knocking the method... you leave a lot of stock at the front for strength but I am concerrned about all the little nicks and cuts along the inner edge of the cutouts.(particularily the forward notches in pics 3&4. I would suggest a smooth finish to avoid problems in HT. I am not really a fan of skeletonized handles. Tapered tangs or hollow ground, just make more sense(to me) from a structural perspective. Though, they are holding up to your expectations of a working knife and that is the goal.
 
Only the holes are drilled before heat treat, all other, including tapering is done after heat treat to prevent any chance of warp, or possibly a stress riser.

Also I either use Loveless bolts or peen pins, even after all the trouble to ensure a good epoxy bond I don't fully trust it.
 
That is great, Will. The fact that the majority of the process is done post HT, takes care of most of the concerns from my previous reply.:thumbup:
 
Thanks, I'd add that for ones with a guard notch, and the holes, have a slight chamfer on them to prevent stress risers. Also on smaller knives like folder blades and such I've pretty much went to just the profile before heat treat and grind the blade in the hard state. That's with stainless, forged blades are a different story.
 
One suggestion - I learned this during my boatbuilding days. Mix epoxy and micro-balloons to make a thick paste and fill your hollow areas in the tang, before gluing the scales on. If you leave them unfilled, the air in them will expand and contract with temperature changes. Over time, the constant expansion and contraction will very possibly break the epoxy bond. I have seen seats which were tabbed into boats literally break loose because the air chamber inside the seat was not filled with foam.

Tim
 
Thanks, I'll look into them. But again, I don't rely on the epoxy to hold the scales on, pins or bolts do the holding. But then again I'm all for increasing the bond strength. On hidden tang knives I make the fit a good bit tighter between the handle and tang, leaving just enough room for a coating of epoxy, but that's a different animal.
 
Back
Top