I just did pull the clip off. Underneath the clip, it's a little shiny...you can see where the base of the clip was on the scale, but it does not look any different in color than the surrounding G10.
Nice ! Thanks !
Good news.
As far as tapering the back side of the hole, that sounds like a workable idea to me, though it is easy for me to just lessen the outside diameter of the flair, which takes me less than 1 minute total. May I ask--how do you taper the back side of the hole in the scale?
So the tube is flaired ? Weird, not the best situation for disassembly. I was thinking it was just that the fit between the tube and the scale was too tight but you tapered the tube to help get it started into the hole.
anyway . . .
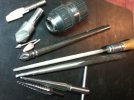
There are many tools one could use. I rounded up some and took a photo.
The top thing that looks like a metal tube the diameter of a pencil with a slot cut in it . . . well that's what it is. I can stick a strip of sand paper in the slot, turn on a hand held grinder and do some quick change (grit wise) sanding. There is a strip of paper in it in the photo but you can see how one can get it to taper like a cone. Hate that ? There's more.
You could just "counter sink" the very edge of the hole using the next tool down from the top; that is a single flute counter sink which chatters less if you use a power tool to turn it than the fifth tool down which is the same kind of thing but has multiple flutes. Third down and forth down are smaller version. Fourth down is basically a fairly coarse grinding stone. Often I don't use a power tool for this kind of thing I just use the quick locking drill chuck shown (purchased at Home Depo about a hundred years ago / they are still available on amazon for sure). This one has a good quality rubber housing and I can get a secure grip on it. It will take the larger diameters shown including the long rod on the multi fluted counter sink; I use those two together a lot (the shaft is not tapered it just looks that way.
Sixth down is just your plain old tapered rough rat tail file. You could put that in the hole and just turn it by hand gently. All of this is trial and error. Bellow the rat tail file is an alignment punch. One could spiral wrap a little strip of sand paper around it and tape the top of the paper near the handle.
Bellow that . . . well now we get into the precision high tech stuff right . . . a tapered reamer . . . but that just makes it all too easy and takes the fun out of it right ?
And bellow that, what might actually be the best choice once you find the exact size you need (they make metric and SAE sizes in these UniBits. Here's the beauty of these. The smaller tip end centers the bit, and the next size step larger behind that drills what is roughly termed a counter bore that is a little larger and tapers the transition between the larger step and the stock hole size from the factory. What this means to you is it is self aligning . . . the laniard tube drops into it and it stands up straight perpendicular to the inside of the scale and then the tapered transition helps ease the end of the laniard tube into the stock (show side) of the hole.
I don't know, I haven't done what you want to do but probably what you actually need is some where between the long gradual tapered reamer and a little bit of sand paper.
But there you have it.
I was thinking about it while I was piling up the tools and if it were me I might put some rubbing alcohol or candle wax on the laniard tube to help it slip into place easier and the candle wax would help with future disassembly . I have been using rubbing alc. more and more for easing press fits where oil would be undesirable and the alc. is more slippery than you might think. Obvious prob is evaporates fast.


