How to cut wood to show flecks - Oak, Sycamore & Lacewood

Joined
Dec 7, 2008
Messages
7,187
Some woods if cut correctly will show really cool flecks or patterns like snakeskin. Some of the more obvious woods are oak, sycamore and lacewood.

One of the other forum members in Hawaii has some macadamia logs he will be cutting. Macadamia is one of the woods that can show the flecks when cut correctly. This post is a copy of the message I sent to him advising how to cut the wood.

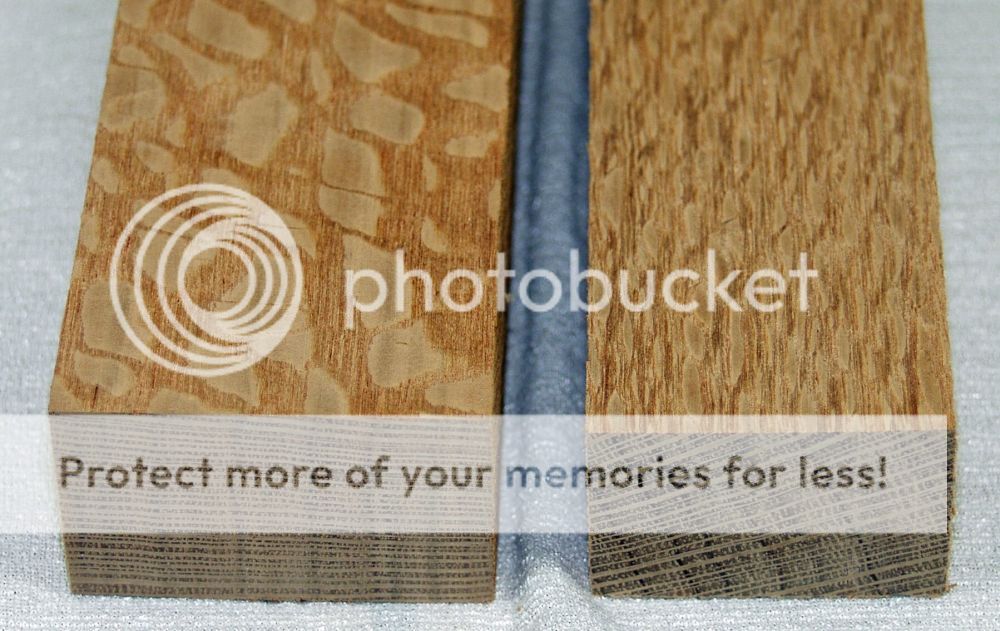
For illustration purposes I am using 2 pieces of lacewood cut from the same chunk of wood. The end grain is facing you at the bottom.
The medullar rays are the lines going horizontally and the growth rings are the vertical lines. The growth rings are the circles you see when looking at the end of a log. The medullar rays radiate outward from the center of the log to the outer surface. They will be perpendicular to the growth rings. Most woods that have distinct medullar rays will produce flecks if the lumber is cut to follow the rays. Examples, oak, sycamore and lacewood. Looking at the surface of these 2 blocks you can see the difference in the flecks when the rays are followed vs when the cut is off by even a slight angle. I hope this makes sense. Please excuse the spelling.
phil.jpg


There is contradictory information on the internet as to what is quarter sawing and what is rift sawing. What I call quarter sawing is cutting perpendicular to the growth rings as seen in the left block. Rift sawing is at an angle to the growth rings like the right block.
 
Hey Mark,

I got your PM and was going to suggest your info be shared with folks. You beat me to it! Family and voting kept me pretty busy today. Hopefully tomorrow I'll find out if there's any good mac nut wood from that old log. If so, hopefully I can cut it so I get some real flecky pieces. :)

I saw some of macadamia wood turned into bowls at a wood working show here not too long ago. The pieces were spectacular with figures that spanned the gamut of grains, rays, fleck, etc. One piece was turned so thin and finished so well it was translucent...a real eye popper!

Thanks for the tips, Phil
 
Mark and Phil,
One additional thing. Such angled-grain cuts are great for making furniture and flat things, but for a knife handle, rotating the cut can really mess things up. One side of the handle may have the pattern on the upper quadrant, and the opposite side would have it on the lower quadrant. The other problem is that a good handle has little or no flat surfaces. The curves go 360 degrees around the axis of the grain, so all patterns will show in different places. Aligning such woods with the grain either exactly vertical or horizontal (Block "A" - left block), with the grain also centered longitudinally ,is the best way to get an even looking handle. If Block "B" was made into a knife the end result may look strange.
 
Last edited:
Thanks Stacy. As I understand what you and Mark said, you both recommend cutting the wood like the block on the left.
 
Yes, that is what I meant. I changed a few words in the post to make it clearer.

One advantage to sawing your wood into square ended blocks is you get to choose the grain direction. Making 1.5X1.5 or 2X2 blocks will allow the handle to be aligned with vertical or horizontal grain ( x or y axis). It also allows burl wood ( or poorly cut flitches)to be aligned to show the best pattern. In a burl, since grain is virtually non-existent, the direction of the cut and the surface shown can be drastically different. Curly woods can show similar differences.

A good trick for experimenting with a big burl ( or any good slab/block before you cut it all up) is to cut only one 2X2X6" block out of it, make a line across the end for reference to how the burl slab was originally oriented, and grind it into a cylinder. Then sand it to 400 and give it a buff. Now you can rotate the cylinder and decide what orientation will show the best pattern from the top and/or sides ( the two directions that matter most on a handle). Once determined, cut the rest of your handle blocks at this orientation ( using the reference line to mark the angle of the cuts). Keep an eye on the pieces as you cut them, as burl can change form place to place in the slab. It is better to waste 30-40% of a slab and get 20 exhibition handles that to use 100% of the slab and get 50-60 mediocre handles.
 
From what I've noticed with Macadamia wood, the flecks show up on the flat sawn surface. A little different than the flecks that show up on something like quarter sawn oak. The pattern on Mac wood will show up easily without looking for it. I'd try to get a few good chunks out of a log rather than try to get maximum yield. The log might be full of checks.

Take care, Craig
 
What you folks are calling flecks on the QS are actually medullary rays that transport nutrients in a tree aligned radially or bark to pith. If you do not cut so to disect the ray it will not show true form. Angles other than 90* perpendicular to tangent will still provide unique and predictable ray flecks. Oak will not show ray fleck unless dead on quarter. There is no one single "best" way to cut wood, just cut for how you like it to show. ALL wood will show ray flect cut on direct, true quarter.
 
Yes, that is what I meant. I changed a few words in the post to make it clearer.

One advantage to sawing your wood into square ended blocks is you get to choose the grain direction. Making 1.5X1.5 or 2X2 blocks will allow the handle to be aligned with vertical or horizontal grain ( x or y axis). It also allows burl wood ( or poorly cut flitches)to be aligned to show the best pattern. In a burl, since grain is virtually non-existent, the direction of the cut and the surface shown can be drastically different. Curly woods can show similar differences.

A good trick for experimenting with a big burl ( or any good slab/block before you cut it all up) is to cut only one 2X2X6" block out of it, make a line across the end for reference to how the burl slab was originally oriented, and grind it into a cylinder. Then sand it to 400 and give it a buff. Now you can rotate the cylinder and decide what orientation will show the best pattern from the top and/or sides ( the two directions that matter most on a handle). Once determined, cut the rest of your handle blocks at this orientation ( using the reference line to mark the angle of the cuts). Keep an eye on the pieces as you cut them, as burl can change form place to place in the slab. It is better to waste 30-40% of a slab and get 20 exhibition handles that to use 100% of the slab and get 50-60 mediocre handles.


great suggestion.
It is similar also what we do for luthiery.
 
Back
Top