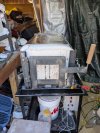
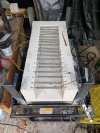
I picked up 40 K23 Fire bricks, 3" thick and got my 8mm fused quartz tubing in, so it's time to start my 2nd HT oven build! I am going to convert my old HT oven to a 110V tempering oven and drop the chamber height down a bit since I can lay flat for tempering. So it's getting a new control box wired for 110V instead of 220 and the wall bricks are going to get cut down a bit to lower the height overall. I will probably mortar the bricks together as well to make it more stable/less gapping as well. That's the easy part!
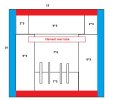
This is what I am looking at for the front view of the new kiln:

Chamber size is 7" wide, 6" tall with the coil over tube construction again. I am going to cut the bottom bricks to 7" wide and use the other 2" x 3" piece in the corner on one side on the top and cut down some other bricks to fill in the gaps at the top so I have a more square brick setup and simple straight cuts instead of trying to cut small blocks out from the corners for overlapping. This time around, I will use mortar to make the bottom one piece, and each of the sides 1 piece. I will mortar the 2x3" side pieces to the ends of the top brick, so it's more stable, but the top bricks themselves will be separate (or maybe in pairs) so I can open up the top to deal with the elements easier and not have to lift a big heavy piece off. My last oven was somewhat wobbly and things didn't want to stay lined up/sealed tightly since the bricks were not mortared at all except the back wall and the door pieces.
Instead of doing the removable blade stand inside, I am going to drill some holes partially (1" deep, sticking out 1.5" into the oven) into the bottom fire brick (probably in 2nd brick in from the door, so around 6"-8" in from the front so I can insert ceramic rods into the floor itself to use to hold the blades upright. That way, I can remove them if I need a wider area (or want to use the rack) or put them back in as I need them before I turn the oven on. This will save me some height in the chamber as well.
Does it makes sense to put a 1/2" (or 1"?) layer of the hard ceramic board (1 piece) over the top of the wall bricks under the roof fire bricks for better sealing since it is so close to the element? I had a lot of heat loss at the top last time!
The frame will be angle iron/bar stock again and will have some runners front to back on the bottom, so the soft insulation should be OK over that on the bottom for the whole oven to rest on. I put red where I was looking at using hard ceramic insulation board, but I am thinking of just doing it on top instead now (but under the top firebricks) and using the regular ceramic insulation on the bottom.
To wrap around the sides/top (blue on the sides, red on the top), is the ceramic insulation with foil on one side worth it for simplicity or should I just do the regular insulation and aluminum flashing (or sheet metal) again?
Last time, the bricks were around 1/4" away from the front of the frame, so the door had a bit of a gap there. The ceramic rope gasket I tried to mortar into the door failed (fell out), so I bought some 1/4" ceramic fiber paper to screw to the brick face to act as a gasket (or some thin kaowool), but never got around to it. I am thinking of making the door using some kaowool and a piece of hard ceramic board (with a satanite or ITC 421 coating on the inside) on the inside and outside faces. This would let the kaowool compress a bit to let the hard board form a better seal with the bricks? Or should I just do bricks and put the fiber paper or kaowool on the brick face on the inside of the door and around the opening on the oven itself? The fiber board is fairly expensive, so I am wondering if it's worth it or not?
I am not sure if I am going to go with the self closing hinge again? It was a pain to have to hold the door open, so I will probably do regular hinges this time. Now that I have a fluxcore mig welder, hopefully welding the frame goes better this time and will make the hinge welding a lot easier, too! Couple weldable hinges welded to the frame and then welded to the door frame, bullet hinges so the door is removeable? I want to do something more simple, but get a better seal at the door this time.
I want to change up the thermocouple placement. With a 3" thick brick, I will only have 9" of the TC into the kiln if I go in from the back. I am debating if I want to come in through the side and bend the TC to do a right angle bend and then run along the wall (around 1" or so away from the wall) or maybe come straight up from the bottom floor and stick up 2" or so above the brick floor?
Last time, I used Terminal blocks to connect the elements to the SSR wiring and they sucked. I am not sure if it was because it was on a rolling cart (vibration), or the heat or both, but the screws kept loosening up (and shorted out), so I went with a different connector last time that compressed the 2 wires together, which was still kinda iffy. This time, I am going to leave the pigtails long, make them into a loop and use stainless nuts and bolts to connect the high temp wire to the element pigtails.
I think I am going to put the tempering and HT oven side by side on a table in my garage instead of on the cart. The cart was a nice idea, but the vibrations aren't good for the electronics or bricks! I need to do some re arranging of my garage anyway, and have a couple spare tables that should work nicely! I can mount the project boxes under the table so they are out of the way and run the wiring down through the table top to the control boxes and put the ovens right near the door, so I can oil quench outside in the driveway, or plate quench inside next to the ovens.
This is what I am looking at for the front view of the new kiln:

Chamber size is 7" wide, 6" tall with the coil over tube construction again. I am going to cut the bottom bricks to 7" wide and use the other 2" x 3" piece in the corner on one side on the top and cut down some other bricks to fill in the gaps at the top so I have a more square brick setup and simple straight cuts instead of trying to cut small blocks out from the corners for overlapping. This time around, I will use mortar to make the bottom one piece, and each of the sides 1 piece. I will mortar the 2x3" side pieces to the ends of the top brick, so it's more stable, but the top bricks themselves will be separate (or maybe in pairs) so I can open up the top to deal with the elements easier and not have to lift a big heavy piece off. My last oven was somewhat wobbly and things didn't want to stay lined up/sealed tightly since the bricks were not mortared at all except the back wall and the door pieces.
Instead of doing the removable blade stand inside, I am going to drill some holes partially (1" deep, sticking out 1.5" into the oven) into the bottom fire brick (probably in 2nd brick in from the door, so around 6"-8" in from the front so I can insert ceramic rods into the floor itself to use to hold the blades upright. That way, I can remove them if I need a wider area (or want to use the rack) or put them back in as I need them before I turn the oven on. This will save me some height in the chamber as well.
Does it makes sense to put a 1/2" (or 1"?) layer of the hard ceramic board (1 piece) over the top of the wall bricks under the roof fire bricks for better sealing since it is so close to the element? I had a lot of heat loss at the top last time!
The frame will be angle iron/bar stock again and will have some runners front to back on the bottom, so the soft insulation should be OK over that on the bottom for the whole oven to rest on. I put red where I was looking at using hard ceramic insulation board, but I am thinking of just doing it on top instead now (but under the top firebricks) and using the regular ceramic insulation on the bottom.
To wrap around the sides/top (blue on the sides, red on the top), is the ceramic insulation with foil on one side worth it for simplicity or should I just do the regular insulation and aluminum flashing (or sheet metal) again?
Last time, the bricks were around 1/4" away from the front of the frame, so the door had a bit of a gap there. The ceramic rope gasket I tried to mortar into the door failed (fell out), so I bought some 1/4" ceramic fiber paper to screw to the brick face to act as a gasket (or some thin kaowool), but never got around to it. I am thinking of making the door using some kaowool and a piece of hard ceramic board (with a satanite or ITC 421 coating on the inside) on the inside and outside faces. This would let the kaowool compress a bit to let the hard board form a better seal with the bricks? Or should I just do bricks and put the fiber paper or kaowool on the brick face on the inside of the door and around the opening on the oven itself? The fiber board is fairly expensive, so I am wondering if it's worth it or not?
I am not sure if I am going to go with the self closing hinge again? It was a pain to have to hold the door open, so I will probably do regular hinges this time. Now that I have a fluxcore mig welder, hopefully welding the frame goes better this time and will make the hinge welding a lot easier, too! Couple weldable hinges welded to the frame and then welded to the door frame, bullet hinges so the door is removeable? I want to do something more simple, but get a better seal at the door this time.
I want to change up the thermocouple placement. With a 3" thick brick, I will only have 9" of the TC into the kiln if I go in from the back. I am debating if I want to come in through the side and bend the TC to do a right angle bend and then run along the wall (around 1" or so away from the wall) or maybe come straight up from the bottom floor and stick up 2" or so above the brick floor?
Last time, I used Terminal blocks to connect the elements to the SSR wiring and they sucked. I am not sure if it was because it was on a rolling cart (vibration), or the heat or both, but the screws kept loosening up (and shorted out), so I went with a different connector last time that compressed the 2 wires together, which was still kinda iffy. This time, I am going to leave the pigtails long, make them into a loop and use stainless nuts and bolts to connect the high temp wire to the element pigtails.
I think I am going to put the tempering and HT oven side by side on a table in my garage instead of on the cart. The cart was a nice idea, but the vibrations aren't good for the electronics or bricks! I need to do some re arranging of my garage anyway, and have a couple spare tables that should work nicely! I can mount the project boxes under the table so they are out of the way and run the wiring down through the table top to the control boxes and put the ovens right near the door, so I can oil quench outside in the driveway, or plate quench inside next to the ovens.


