In Process ...............

pappy1959

Banned
Joined
May 27, 2008
Messages
433
I'm working on something that I hope will be unusual and interesting.

Sheffield knives give me so much energy. Knowing what was done, and even more, HOW it was done, just sends shivers up and down my spine. The turn-of-the-century Sheffield knives are works of art that, in some cases, have never been surpassed.

So, here is my Sheffield Norfolk pen knife, in process.....................
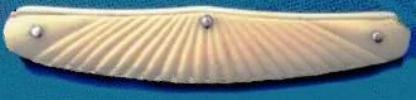
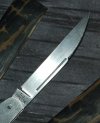
Usually this pen knife has two small blades, but in today's world, a single blade gents is what I'm most used to. So, putting the two together just seemed to make sense. It is 3" long, closed. 154cm blade steel and 410 stainless liners.

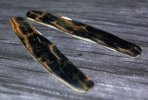
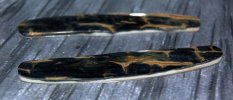
The handle material is the black and gold mammoth ivory seen in the photos. The black coloration goes very deep. I hope it is that deep throughout both pieces.

The blade is about 2/3 finished. The blade and spring have been married and the action is fairly smooth so far. The pull-apart is shown in the photos with the scales.

attachment.php


attachment.php


attachment.php


Now for some hafting, some carving, maybe some filework?

So, wish me luck. Lots left to do.

Look for more pics as it moves forward.
Thanks for looking. Comments most welcome.

Keep Care,

Tim


Attachments

  • DSC_0009.jpg
    DSC_0009.jpg
    72.8 KB · Views: 518
  • DSC_0011.jpg
    DSC_0011.jpg
    56.8 KB · Views: 517
  • DSC_0013.jpg
    DSC_0013.jpg
    39 KB · Views: 515
Great Looking knife Tim, can't wait to see the end result, keep us posted.
Jim
 
I think the Norfolk is a really nice pattern. Yours looks great, I can't wait to see it finished.
 
I already like the looks of that one, (have not seen any of Tim's work that did not fit that statement though).
The long pull behind the swedge is very distinctive and I especially like that on the warncliff.
 
The long pull in the blade looks as though it was stamped rather than cut(inside edges appear square to the bottom as if pressed or stamped). Is that an optical illusion?

I really like the looks of a long pull. :thumbup::cool:
 
Knifehead. Mr. Balda has described his knifemaking operations at least three times and it has changed each time. The original description is in a GB&U thread, but unfortunately he edited out every one of his responses. At that time he indicated that the knives were factory made by a staff that was diminishing on a daily basis. In March, he stated in the for sale section:

"This knife is hand-sharpened by me (Pappy) and is razor sharp. It will stay that way for a long, long time.!! (Yes, Not only do I prepare the handle materials, I'm in charge of lapping all the parts, at least checking, if not actually doing the assembly, and the I'm the one that has to make sure the knife is hand-finished properly and to my liking. Only then...........can I sharpen it!!)"

In a thread on Knives for Blade in April he stated:

My knives are 'handmade' but not "custom" Right now I am making them all myself, but in the recent past I have had a couple of employees and I can see in the future also having 2-3 people that would help me make them. "My Amherst Cutlery knives do not pretend to be anything but what they are. They are not custom, not production. They are hugely labor intensive. They are priced mostly in the $200-$500 range with handle materials like mammoth ivory, elephant ivory, fossil walrus, great sambar stag, black pearl and antique tortoise shell. I do mostly slipjoints and do have a lockback or two and some odds and ends small fixed blades. For those of you who don't know AC, that's the general overview."

As Levine would say, read the knife.
 
Since I dabble with knife making a bit, I thought I might learn a new technique. I find that many of the knife makers on BF are very sharing of their techniques, tools used, shop photos, work-in-progress shots, etc. and coining bolsters and pressing pulls(instead of cutting them) is something I find interesting. No other custom maker(that I know of) is using a process like that.

I "read the knife" and it might just be my eyes or a trick of the light...that's why I ask. I don't mean any offense, brownshoe, but I don't know about those other situations. I just want to know how he makes those elements of the knife.

The pulls are pressed. I use a progressive die to do the tang stamp and the pull. I do that because I like the clean look of the pull when done this way. I would like the pulls to be thinner (narrower) in the future to be more classic looking and I'm working on that. With this particular knife, I made 10 blades originally. They were put through the die, then the profile was wire cut. I boogered a few while grinding them. I might end up with 6 usable blades, maybe. Fortunately I don't have to put a distal grind on this blade so I didn't booger as many as I usually do.

The bolster caps on the crown jack are also pressed. They are separate bolsters made and then welded to the liner. It's amazing what a 100 ton press will do to steel! The crown jack is made from parts generated for a 100 knife limited edition run.

This little norfolk gents is really the first knife made with my personal name on it. My situation has changed quite a bit in the last year and I'm doing a variety of things right now where I'm kind of playing it by ear.

The knives with my name on them are mine. The Amherst knives may have others involved (though not right at this moment) That's actually part of the reason for me making this post. I want to make the distinction between Amherst knives and my own.

I'd be happy to answer any of your questions and share with you anything I do. Most of the time, when I have shared................people have tried to use the information to hurt me. But, I don't care about those kind of people. I'm just trying to make a living. If you have any other questions, please ask. I like what I do. I hope it shows in the work.

This norfolk knife I hope to do
  • one with the black mammoth ivory, carved
  • one with pearl, carved, gold leaf under the pearl, gold pique, and some sheffield style filework
  • one with antique tortoise shell, gold leaf underneath the shell, gold pique and some filework
  • one in elephant ivory, plain with no adornment
  • and one other in stag if I can find the right material, with some sheffield style filework too
I'll vary the blade swage and finish with each knife.
I hope to post each one as they are in progress here. It's supposed to be fun.
Wish me luck.

Keep Care,

Tim
 
That's an impressive process, Tim...thanks for the explanation. Sounds like some equipment you need to keep your fingers away from. ;) :D
 
Mr. Balda,

I looked at your website and you have some cool patterns....love the easy opens.
As someone who is not too familiar with your work, can you explain the difference between your products? Based on your posts here I'm assuming the knives on your website are hand assembled from at least some parts obtained from a 3rd party?

Are the knives you are showcasing in this thread different from the knives on your website in regards to parts used to build the knife? If not, I'm curious as to why you would make the distinction.

Thanks for answering my questions. Your handle material is always spectacular and I'm looking forward to seeing what you do with this pattern.
 
Here is the product of today's work on the knife.
The mammoth ivory handle material was leveled on the top first, then leveled on the bottom. I thinned the material down to about .115" so the knife would not be too 'boxy' looking.

I attached the handle material to the liners with epoxy. After the mastic set, I put a light polish on the ivory to see where the colors were and how deep the color runs in the ivory.

attachment.php


attachment.php


I think the color will be deep enough to do the carving. The third pic is an actual sheffield pen knife hafted in ivory which has some basic shell carving on it. This is my starting point.

attachment.php


Tomorrow, drill the holes in the handles. Re-assemble the knife to see if I bent the liners (LOL) and then mount the handles to a block so they can be carved.

I'll post the next step photos tomorrow.

Keep Care,

Tim


Attachments

  • DSC_0001.jpg
    DSC_0001.jpg
    50.6 KB · Views: 191
  • DSC_0002.jpg
    DSC_0002.jpg
    36.7 KB · Views: 191
  • carved_norfolk.jpg
    carved_norfolk.jpg
    7.1 KB · Views: 186
As someone who is not too familiar with your work, can you explain the difference between your products? Based on your posts here I'm assuming the knives on your website are hand assembled from at least some parts obtained from a 3rd party?

Are the knives you are showcasing in this thread different from the knives on your website in regards to parts used to build the knife? If not, I'm curious as to why you would make the distinction.

The original concept for Amherst Cutlery was to have a small group of people make limited numbers of traditional slipjoints using ivory, stag and pearl. Most parts are either made in-house, or by people I trust. The aim was to make near custom quality within a particular price range. We wanted to make products that no one else was making, with materials that few people were even willing to try working with.

That concept is moving along, just rather slowly.

My own personal knives, which will carry my name, are more for my own expression and both mental and physical health. I need to carve, embellish, design, research and have fun with some of this or I'll go crazy. So, MY knives are made by ME.

I hope this makes sense. Thanks for asking the question.

Keep Care,

Tim
 
Carving a knife can be a daunting task. It is really much more simple than you might think, particularly when trying to do a classic ornamental design.


Here is the pattern for the norfolk gents carving.

attachment.php


The curved shell ridges are actually made with straight lines which eminate from an apex located away from the carving itself. You can see the initial sketches I did and then the red lines where I finally figured out the correct apex distance.

The actual carving will be more simple than you think. First I make incisions along the lines shown on the drawing. Those are straight lines and they go the width of the shell. All the incisions will be the same depth and (hopefully) the black color is thick enough where I won't poke through to the white underneath.

The curves in a classical shell are really not curves at all. The top ridge line will the the thickest part of the ivory scale. I will carve away from that line toward the front of the knife with a gentle slope.

The bottom ridge line is the next highest point on the knife. It has to be there so that the material remains the thickest near the center pin. This is to minimize the chance of the center pin spring tension cracking the material. I'll carve away from the bottom ridge line toward the back of the knife in a gentle slope.

Then the edges get slightly rounded.

The net effect will be to "bend" the scallops of the shell to the eye. They really won't be curved, they will only appear to be curved. It's an optical illusion.

I'll rough carve this knife and post a photo. Then do the relieving away from the ridge lines. I'll try to post the photos so you can see how it appears to curve as the carving progresses.

If you read all of this, thanks.................I am also a professional wood-carver and it is rare that I can share any of the things I've learned over the years.

Keep Care,

Tim
 

Attachments

  • shellpattern.jpg
    shellpattern.jpg
    56.5 KB · Views: 108
Back
Top