- Joined
- Mar 25, 2014
- Messages
- 2,010
This is an abbreviated treatise on installing inlays in wood from molten metal. This requires attention to detail almost every step of the way and SAFETY FIRST!! Apron, goggles, long legged pants, and especially away from the kitchen table--unless of course you're a bachelor. If you are, then no sweat. There's probably a few holes drilled on it's top or on the counter by the sink.
I poured a nose cap on my final rifle, #400. and here's how I went about it. Lines and mysterious glyphs were scribed onto the rifle's nose cap area of the fore arm with pencil. Pencil marks can be erased. Then some of the stripes were shaded in to provide an alternating effect.
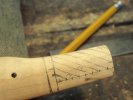
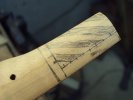
An Exacto brand mini "Gentleman's saw" was used to cut the lines approximately 1/8" deep using extreme caution not to saw into the non-nose Cap portion of the fore arm tip. A super sharp chisel slightly narrower than 1/8" wide was used to remove wood from the portions that would receive the molten metal. Keep at it, working slowly, carefully, and paying attention not to remove wood that should remain!
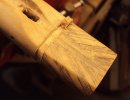

Next, shallow holes were drilled in various positions to enable the metal to anchor itself to the wood. There are no pins or screws used to hold the nose cap on or in position. Some holes were drilled completely into the barrel channel. The holes that appeared in the barrel channel were countersunk. This allows the metal to form a "rivet" type head.
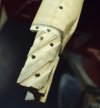
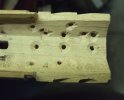
Take your lead pencil and blacken all areas that have holes drilled in them. The leaded surfaces reduces friction and allows a faster, more complete pour.
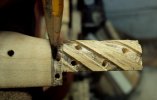
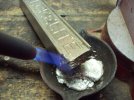
Traditionally, the metal used to create this style of nose cap or inlays was often lead. Babbitt was preferred, as was German silver. Tonight I used some Bawanna's Babbitt. Thanks, Joe! This is Nickelite brand of Babbitt. It is compounded a little differently than common Babbitt and stays shiny longer. A couple of ounces was melted off the bar into a 2 lb. ladle.
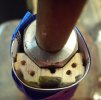
Now comes the hard part. The barrel was warmed up a bit to slow the molten Nickelite from cooling too fast. If it does, there'll be shuts & voids. A sad situation, yes, indeedy! Next a heavy paper dam was laid around the nose cap portion and taped in place. This is not positioned tightly around the area and stands proudly off the surface of the wood. Tape is used prolifically in this area to seal off all nooks, crannies, and cracks. You simply DO NOT WANT MOLTEN METAL ALL OVER YOUR FLOOR, YOUR CLOTHING, OR ANY WHERE ELSE THAT IT IS NOT SUPPOSED TO BE! You got fire insurance on your body? In my case, all openings, screw holes, and pin holes had to be covered with masking tape or plugged. A dowel was used to plug the barrel. Don't be a Cheap Charlie and spare the tape. Here's a pic of the dam around the nose cap looking from the top.
The Babbitt was then heated up past the melting point and then poured from the ladle into the dam. Confession is supposedly good for the soul.....I was not paying attention while I was taping the dam shut. Someone had stopped by the shop and broke my concentration, and guess what--everything single I didn't want to have happen, all of what I just told you how to prevent--HAPPENED! ARRGH! What a mess! Both sides of the nose cap had to be partially re-poured. This makes the sides thicker and requires a lot more elbow grease to get off. It took an hour of steady rasping to get it down. But I got it--finally. Below is The Blob...a most definite horror show.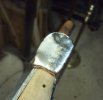
I poured a nose cap on my final rifle, #400. and here's how I went about it. Lines and mysterious glyphs were scribed onto the rifle's nose cap area of the fore arm with pencil. Pencil marks can be erased. Then some of the stripes were shaded in to provide an alternating effect.


An Exacto brand mini "Gentleman's saw" was used to cut the lines approximately 1/8" deep using extreme caution not to saw into the non-nose Cap portion of the fore arm tip. A super sharp chisel slightly narrower than 1/8" wide was used to remove wood from the portions that would receive the molten metal. Keep at it, working slowly, carefully, and paying attention not to remove wood that should remain!


Next, shallow holes were drilled in various positions to enable the metal to anchor itself to the wood. There are no pins or screws used to hold the nose cap on or in position. Some holes were drilled completely into the barrel channel. The holes that appeared in the barrel channel were countersunk. This allows the metal to form a "rivet" type head.


Take your lead pencil and blacken all areas that have holes drilled in them. The leaded surfaces reduces friction and allows a faster, more complete pour.

Traditionally, the metal used to create this style of nose cap or inlays was often lead. Babbitt was preferred, as was German silver. Tonight I used some Bawanna's Babbitt. Thanks, Joe! This is Nickelite brand of Babbitt. It is compounded a little differently than common Babbitt and stays shiny longer. A couple of ounces was melted off the bar into a 2 lb. ladle.

Now comes the hard part. The barrel was warmed up a bit to slow the molten Nickelite from cooling too fast. If it does, there'll be shuts & voids. A sad situation, yes, indeedy! Next a heavy paper dam was laid around the nose cap portion and taped in place. This is not positioned tightly around the area and stands proudly off the surface of the wood. Tape is used prolifically in this area to seal off all nooks, crannies, and cracks. You simply DO NOT WANT MOLTEN METAL ALL OVER YOUR FLOOR, YOUR CLOTHING, OR ANY WHERE ELSE THAT IT IS NOT SUPPOSED TO BE! You got fire insurance on your body? In my case, all openings, screw holes, and pin holes had to be covered with masking tape or plugged. A dowel was used to plug the barrel. Don't be a Cheap Charlie and spare the tape. Here's a pic of the dam around the nose cap looking from the top.

The Babbitt was then heated up past the melting point and then poured from the ladle into the dam. Confession is supposedly good for the soul.....I was not paying attention while I was taping the dam shut. Someone had stopped by the shop and broke my concentration, and guess what--everything single I didn't want to have happen, all of what I just told you how to prevent--HAPPENED! ARRGH! What a mess! Both sides of the nose cap had to be partially re-poured. This makes the sides thicker and requires a lot more elbow grease to get off. It took an hour of steady rasping to get it down. But I got it--finally. Below is The Blob...a most definite horror show.


