Is slightly irregular stamping better?

Joined
Aug 13, 2002
Messages
5,703
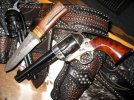
Something jumped out at me the other day while looking at some stamped sheaths I had left laying around on the kitchen table. As you can see in this pic, stamping in the first column (1) is not as straight (not on purpose mind you).


You can see what I can only describe as a very slight wobble from one stamp to the other. The thing is, it makes it seem a little more real. Like if when the eye goes over the perfect section it doesn't “catch” on anything because of said too perfect geometrical pattern. Sorry if that makes no sense at all but it is the only way I can describe it.

Of course you would be right to say “Patrice, you'd better spend time working on the rest of your leather work first, cause it sucks”. And you would be absolutely right. :o Especially the stitching which I pretty much gave up on. I will concentrate on getting the funds together for a sewing machine before I even attempt to make another sheath. :(

But in the meanwhile I thought I'd see if this stamping thing was just me or if any of you had noticed something similar and if you did your stamping differently because of it?
 
I don't do any leatherwork but I wanted to let you know that your work looks great. When it comes to handmade items I actually like slight imperfections. A perfectly symmetrical intricate pattern looks artificial and sterile to me.
 
I grit my teeth when I see stamping on my work list, its just way too easy to goof and the smallest wobbles show up to me like a little light bulb flashing.

That one there looks fine to me! some of the wobble you mention may be light vs heavy impressions. Consistent impacts is something I have trouble with and I started stamping leather way back in 96 as a hobby. Yea, the leather parts of the armor look pretty nifty with some stamping. I always tried to decorate everything I made just a little.
 
Pat, the actual alignment of your stamping looks pretty good. Look at the overall from vertical alignment and then diagonal alignment both left and right. If you are seeing straight lines, you are on target, and with the above example you are. Uniform impressions is another key to quality work, as mentioned by Dwayne.

Look at an actual basket weave basket and you'll see variations much more pronounced than your work.

The basket weave series of stamps gives a much more dramatic appearance when applied at an angle to the straight center line of the object. It is done with a straight vertical guide line (very very lightly scribed), and then place the fist line of stamps up or down that line at a consistent angle and fill in from there. This is demonstrated in detail in my third DVD "Tips from the Master" (Chris' title, not mine).

Paul
 
Thanks guys.

Paul, I did see you doing the arrowhead pattern on your DVD but I thought I'd play it safe for my first try at stamping. Next one will be angled for sure. I also need to purchase that 3rd DVD. Great stuff! :thumbup:
While I have you here I have a small question. I was watching your Basic Pouch Sheath DVD yesterday and when you talked about dying the edges almost at the end of the finishing process, would I also do it at that point if I wanted to dye the rest of the sheath?

Thanks
 
As Paul said this is hard to perfect. I did a lot of practice and finally got it fairly straight and now I cant do it very good because I shake to much . Here is the best I have done, KT
 

Attachments

  • IMG_5372.jpg
    IMG_5372.jpg
    101.1 KB · Views: 37
Patrice Lemée;13179929 said:
Thanks guys.

Paul, I did see you doing the arrowhead pattern on your DVD but I thought I'd play it safe for my first try at stamping. Next one will be angled for sure. I also need to purchase that 3rd DVD. Great stuff! :thumbup:
While I have you here I have a small question. I was watching your Basic Pouch Sheath DVD yesterday and when you talked about dying the edges almost at the end of the finishing process, would I also do it at that point if I wanted to dye the rest of the sheath?

Thanks

Pat, since the edges are subjected to sanding in the final finishing process after stitching, it makes little difference at what point the entire sheath is dyed. I would think it should be dyed at the point where the dying process is the very easiest, probably post tooling but while the sheath is till flat. The edges are going to have to be dyed again regardless.

Paul
 
Thanks Paul, I'll do them both at the same time then for these since they are already stitched.

Kid, that sure is a lot of stamping right there. Looks great.
 
Still very nice Patrice, and Yep, I cringe at times as you know you've already spent a bit of time before you might possibly ruin something by a miss hit or twist of the tool. I'll have to get some new stamps, that arrowhead pattern sounds interesting, I'll admit I've not availed myself of Paul's dvd's yet, some day, maybe when and if we move and we have a basement that I can use as a 'real' shop ;)

My fav stamp is what I call the dragon scales, it's the tri-corner basket weave stamp and can also be tricky to use, comes in two sizes, while my sheaths are folders only, I often just add some embossing to add some contrast/character and not try to do the entire area, in this example it was a little trickyier (real word? :) ) as I dyed around it with burgundy and did the dragon scales in saddle tan and then applied HiLiter to bring out the details of the stamp's corners, it was for a large Sebenza without it's clip

bobby-g.jpg


and a recent one with black surroundings

Dragon_13.jpg


These work pretty well, as you can set the corners locked into the previous ones, but you still have to be careful not to miss.

with the regular basket weave stamps, I know some folks will lightly draw a pencil line diagonally to provide a reference?

G2
 
Thanks for the tip Gary, that “dragon scale” stamp looks really good. I'll have to get me a couple of those next trip to Tandy. I also like the selective dying. I'll surely play around with that in the future.

The arrowhead pattern was achieved by Paul with a regular basket weave stamp at an opposite angle. As for the line, that what he advocates in his DVD although not with a pencil but a VERY light scribe mark. That's what I did and if you add the fact that this was my first try and that I may have rushed some parts I think it works really well.

On a side note, I would highly suggest getting Paul's DVDs. Of course you ain't no beginner like me and surely have your way of doing things but even then, access to such a great craftsman is priceless and I am sure you would still get a lot from them. I've watched them multiple times myself and even if I know almost by heart the steps he goes through by now, I still watch them cause it makes me feel like Paul is my Grandpa teaching me in his shop. ;)
 
Pat, Gary is being a little modest with the Dragon Scales stamp. It is a SOB to run properly although Gary's photo is an example of properly. If you buy it be aware, it's not a beginner tool. It allows NO room for error without putting out a tall tale sign for all to see.

Gary, about all you could learn from my DVDs might be a few "different" ways of what you already do better than anyone I know. That is the best use and display of that Dragon Scale tri weave I've seen also. It is kind of a bastard to master, no?

Paul
 
Last edited:
Thanks Patrice and Paul, that one can be a lot tricky for sure! one slight misstep and you have them angled and too close together, really hate when that happens!! But the thing I was trying to bring out is you might not need to do the entire sheath, especially where it folds as the embossing can smooth out and not look as crisp sometimes.
My rule of thumb is, DO NOT attempt anything tricky either late at night or early in the morning, both times of day you are not as wide awake and mistakes can occur, embossing especially pattern style needs your full attention, take just a slight bit more time in setting your stamp down, may take a little longer but you'll be happier with the results.
and thanks Paul, I still may pick up that dvd from you once we move, an awful lot about fixed blades info would help if I decide to open that line of work up again!

And Patrice, on the dyeing, I use a very fine paint brush to get the outer borders dyed, just taking care not to let it 'flick' dye to where you don't want it to. I've heard of people putting some resist on the area but you can still get the dye to weep beneath if you are not taking it slow and careful.

G2
 
Paul, thanks for the heads up. I was pretty sure that that Gary was being modest. I'll practice some more with the regular weave stamp before I try my hand at that Dragon Scale.

Gary, I was planning on doing a plain dye job but after seeing your work I'll try some selective dying on a few scrap pieces first. Thanks.
 
Can I ask the experienced contributors here is there a way of marking leather that is not permanent . Is there some kind of special pencil or pen that allows fine detailed marking that can be removed later ?


Ken
 
Ken, a lightly marked line in pencil can be erased pretty easily, try on some scrap leather

And remember, an old leather smith never dies, he just makes a 'lasting' impression :)

G2
 
Back
Top