Is there a shortcut to a non-tapered tang hole?

Joined
May 31, 2020
Messages
72
I'm used to filing out holes for hidden tangs that taper from the shoulders to the end, which also tend to have edges that become rounded a certain distance from the shoulders. This is the quickest example I can find; it's not spectacular quality but it does illustrate what I'm talking about -- a lot of older blades have a similar shape. I just drill the grip blank from both ends with a bit that's the same size as the top end of the tang, then use various small files to widen the hole, mostly from the blade end.

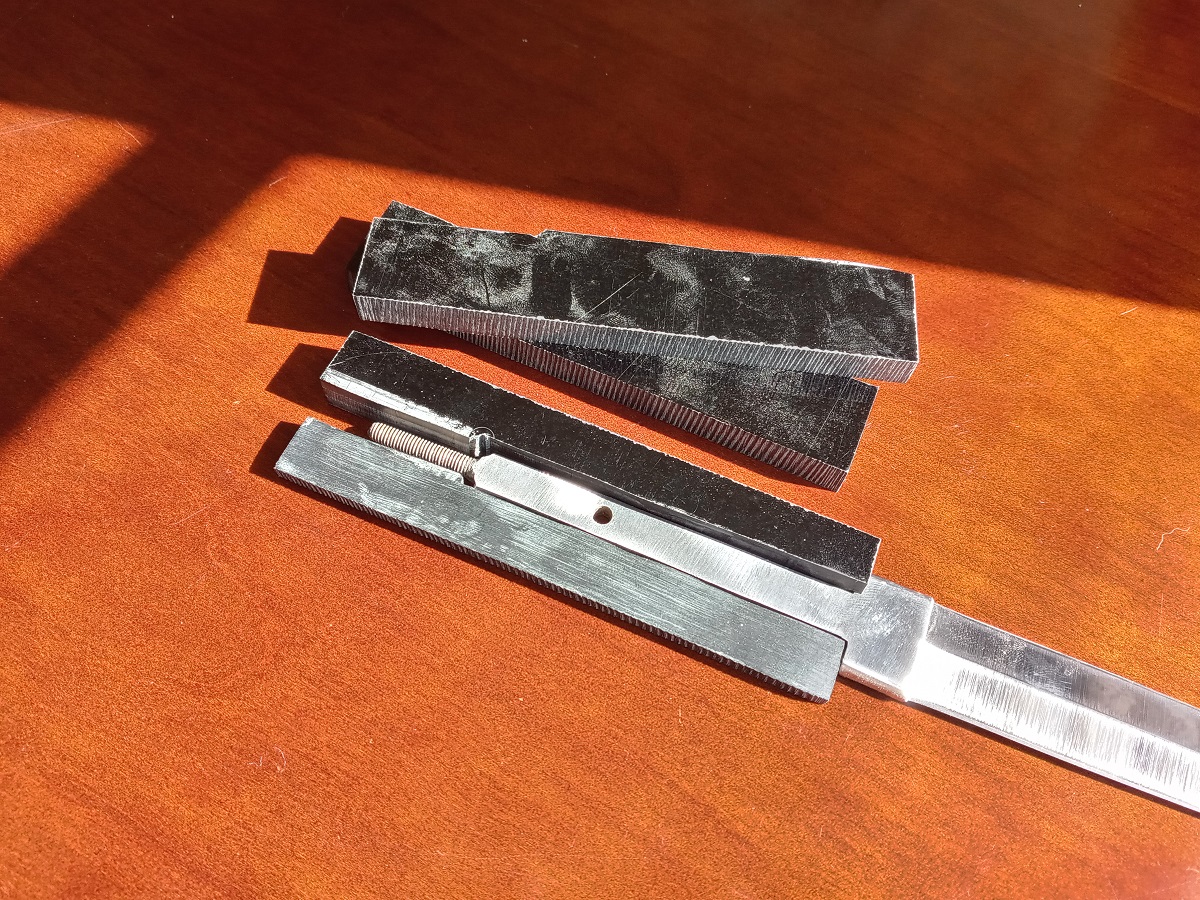
I've recently bought a couple more modern-style blades with hidden tangs that are rectangular in cross section and remain the same width from the shoulders until transitioning to the threaded end. One is a Solingen blade similar to the one used on a standard Linder dagger. Filing out the holes for them is taking much longer and is very frustrating, even working from both ends of the grip. Is there a faster way to do it? I would guess the factories use a mechanized process, maybe with something like a large tabletop jigsaw but using a file instead of a saw blade. But the best idea I can come up with for how to do it at home is to drill two holes side-by-side and then file them together into a rectangular shape.
 
What are you making your handle out of? Why not use a fine jigsaw blade instead of a file?

I've made wood handles by gluing three pieces around the tang. Basically two scales with a thin piece, the thickness of the tang, sandwiched between them. The thin piece is cut out to fit the tang. If you don't like seeing glue seams you won't like that method.

O.B.
 
I generally use just solid wood blanks. The most recent one, which I chose for a Bowie blade, is rhododendron.

Unfortunately I have only a small scroll saw suitable for pieces no thicker than an inch. (Technically it should work on somewhat thicker pieces, but it kicks up like an angry mule if I give it anything thicker than one inch or so.)

Multiple pieces sounds like a sensible idea, assuming I can get the middle pieces even in thickness. My plan for the dagger is something like a Linder dagger with a black grip, spiral groove and wire. I don't know how obvious the glue seams would be; ideally the grip should look pretty smooth.
 
I forget the proper name of mini-rasps for this purpose, instead of files, but you can make one by cutting a jigsaw blade into 3 sections and gluing them together with JB weld
 
Here are two I did. All the shaping was done after the glue up, with some high quality wood rasps, and then finished with sandpaper.

ACtC-3dYNcRryTHWClWR2fwnefIA0Ss7XZGkIjwwWpf6Iplb80OC1QkvXBlP8LBpE8i7Q6zgvmK_dVRqGpcDwG8LkTmwVj7FM1owkqbR1CmO9Dw3sivvsmXQuoce-h6orwbGxfLQNnRuLOhP8JnqL29NCKbo=w1024

ACtC-3elTNszjh-ojfUtR_s4fspQb2QQpb87xKcVOF4fT8GkU-ece3jVf5ozwT1XK50iUI0uZeuI5xv8w-cdplaB2pFbET6U3OQlOr0Vkn1JCP8qrlvs7bT5MZwkHhn0LXGgWAgv_HT1a2kJ6ypRxd6hC3O4=w1024


Del Stubbs of Pinewood Forge, has instructions on making a handle making tool using a jig saw blade. Search for pinewood forge and the go to tutorials. You likely will find his ideas helpful.

O.B.
 
Thanks, these are very helpful suggestions. I clearly misunderstood what you were saying about jigsaw blades at first. The seams don't look very noticeable, so I'm leaning toward the three-layer construction.

So, I'm thinking a pair of 1-1/2x3/8" black paper micarta scales, splitting a 1/2-inch section off each one lengthwise to form the middle layer, with a little angle at the ends so they enclose the tang where it meets the threaded section, thinning them, gluing up, turning to shape, then filing the groove by hand. If I can get a good tight fit on the wire wrap, maybe it'll help prevent the layers from delaminating.
 
Finally got my hands on the micarta three days ago. The plan is progressing... more-or-less according to plan.
0910210938e_HDR.jpg


Is there a glue that I can be reasonably confident will keep the assembly from coming apart while it's being lathed? You can envision that the contact area between the layers isn't going to be huge by the time it approaches its final shape.

Edit: I do not know the manufacturer of this micarta or exactly what materials it's made of. It's sold by Crazy Crow. I could try calling them if that might be helpful.
 
Last edited:
Why don't you just use a solid block for the handle?
It's pretty simple to just drill a large hole through the handle, and use epoxy to fill the gap. You can add solid filler to the epoxy if you want.
Grinding/filing bevels on the edges of the tang will reduce the size of the hole needed.
 
Well, there are a number of reasons I'd prefer not to use a large round hole. For one, a hole that big would make it impossible to mount on my mini-lathe. Grinding down the tang would be a good option, but it's already got a hole through the middle and I don't want to weaken it.
 
What I do - and although I am a rank amateur this has worked well - is to drill several small holes next to each other with a bit slightly larger than the tang, in a line to the depth necessary to seat the tang in the block. Then file/rasp the holes out so it becomes one open hole that the tang fits in, drill the pin hole in the wood block, then glue and pin in place, then shape the handle.

This will require some sort of bolster or plate that cleanly fits the tang, to go over the hole in the wood to cover up the unsightly holes/glue, so you want to factor that in before drilling the pin hole in the handle material.


BUT - since you are trying the layered approach, I would suggest making sure the micarta on the sides is uniformly flat and only a tiny bit thicker than the tang. Drill the pin hole through the micarta Rough up the flats of the tang and the micarta then clean with acetone before applying the glue (I use JB weld a lot). Glue the pin in and clamp for drying.

Once cured you could try the lathe method and hope it doesn't blow up. Or you could drill smaller pin holes to pin the 3 micarta slabs together on each side of the tang and glue pins in for extra strength, and then sand the handle to shape.
 
Last edited:
Thank you.

Do you have a preferred type of JB Weld? I've got the 5-minute on hand but I gather that a shorter curing time tends to mean a weaker epoxy.
 
Drill the hole after shaping on the lathe. Use the tailstock to drill it.
 
Well, the epoxy wouldn't hold the micarta. I put it on the lathe, and as soon as the chisel touched it (or maybe even before) it just exploded.

I wound up using a solid block of walnut, drilling a narrow hole and filing it out the slow way. Annoying, but it's done now.
AVvXsEghbE9klNNGXXfI5jCsyEsfB6bqBlSbj1EKkdUB6TfuqG95vEdg-dfSA2nuwPnJDc9D2dTUb1pOCQI89KVacw4fo5FTASLkjfG_45duItiuUmmH9xkOlJJucT9-ZjQpnINbk2cVofl8dEfJ-ndCKevqtbzky-5UtkbK1Ig9bGOOU2EQjgIkI_YDpFZA=s1200
 
Last edited:
Dan, have you ever made a broach? It’s a blacksmith tool for reaming square holes in plate steel. Basically it’s a tapered square/rectangular “file” that has a series of large step teeth, small at the starting end and bigger at the top.

If you use the same taper on your tangs, and tapered the bored hole with a reamer, you could drive the matching broach in til you filled it with chips, then drive it out backwards to clear them. Repeat until reamed out to your satisfaction.

If every tang has a different taper, then you’d need different broaches or get them close enough, then file or riffle.

I feel your pain about trying to fit a square tapered tang in a round hole. My last one, I cracked or outright busted 3 handles trying to fit one. I finally followed Bill’s advice and step-drilled the hole way big, and filled a third full with epoxy. The yew wood was medium brown, so after I oiled it, the look wasn’t terrible.

Parker
 
Last edited:
Another idea that comes to mind is to lathe turn the shape, bore the center hole, and then bandsaw it in half lengthwise. Chisel out your tapered channels, then epoxy it back together, perhaps around the tang. Losing the kerf will make your hole just slightly flattened, but that could be adjusted for easily.

Parker
 
Back
Top