Is there any trick to edge bars?

Joined
Jul 17, 2019
Messages
319
I've been wanting to do some edge bars but I've never done any before. Do you just stack two bars on top of each other and forge weld, or should I try to forge/grind an interlocking tongue and groove type thing in the middle? Should the spine bar be shorter than the edge bar to make sure the HC edge bar also curves around the point of the blade?
 
Edge is smaller than the spine, weld parallel, draw out, forge to shape. Remove some material by cutting back at an angle above the tip/edge before forging to shape. No need to make any kind of interlocking joint before welding.

Or just do san-mai.

Hoss
 
If the term edge bar is the same as ni-mai, then it is as simple as forge welding two bars together. Do what Devin said.
 
If the term edge bar is the same as ni-mai, then it is as simple as forge welding two bars together. Do what Devin said.

The way I've seen it used is usually to refer to a square monosteel bar welded onto the edge of either a pattern-welded billet or something non-hardenable like wrought iron. You get a nice clean line between the two types of metals, as opposed to san mai in which the boundary tends to be more jagged (which is also a cool look, just different). My understanding of ni mai is that it's two pieces welded together so the right side of the knife is piece A and the left side is piece B, usually chisel-ground. Edge bars are two pieces welded so that piece A is the spine and piece B is the edge.
 
Last edited:
Sounds to me like you're just talking a multi-bar construction.

Do you just stack two bars on top of each other and forge weld
This. Keep the pieces equal length so that after the forge weld, you basically have a piece of flat bar that you then forge into the blade profile.
 
From a rookie, what’s the purpose/advantage of doing this? I’m picturing it as San mai, minus one of the outside layers. So your edge is one type of steel on one side and a different steel on the opposites side? Am I thinking about this wrong?
 
From a rookie, what’s the purpose/advantage of doing this? I’m picturing it as San mai, minus one of the outside layers. So your edge is one type of steel on one side and a different steel on the opposites side? Am I thinking about this wrong?

What I'm talking about is rotated 90 degrees from that. So ni mai (or san mai minus one of the layers) looks like this:
ll

Whereas a billet with an edge bar looks like this: =

It's essentially just a different look from san mai for a similar purpose, but also I always have a hard time keeping the core in my san mai centered, and this solves that problem (though I've recently been told it might help to forge the san mai blade to shape but grind in the bevels, so maybe I'll try that next).
 
Gotcha. I don’t know why I didn’t think of it that way. I really want to start tying San mai and Damascus, but I don’t have a press or power hammer, and doing it by hand seems daunting.
 
From a rookie, what’s the purpose/advantage of doing this?
Nowadays, it's mainly for the look or just because.
Historically, (in my understanding of things) it was done for 2 reasons: First is economics: tool steel was more expensive than iron so having tool steel only at the cutting edge would save the smith material costs. Second is tool strength by having a hard and brittle cutting edge backed up by a non-brittle body and spine would help prevent the tool from cracking/breaking during use.

L Leon Husock : I'm not sure if you saw an earlier thread I did about a project that I think is basically what you're trying?
https://bladeforums.com/threads/butchers-knife-for-a-friend-wip.1701478/page-2

If so, here's a post that kinda shows the billets in progress. The piece 2nd from the left is what I think you're talking about ending up with and the middle 6 pieces are before welding the "edge bar" on.
https://bladeforums.com/threads/wha...bout-your-work.1115736/page-538#post-20024796
 
Last edited:
L Leon Husock : I'm not sure if you saw an earlier thread I did about a project that I think is basically what you're trying?
https://bladeforums.com/threads/butchers-knife-for-a-friend-wip.1701478/page-2

Thanks! This is helpful. Looking at your blade you've got kind of a sheep's foot design, so your cutting edge is all the edge bar. I guess my concern is that if I wanted to do something more in the way of a knife where the point is centered or in line with the spine, I'll end up with a blade where the point and the last inch or so of the edge as the belly pulls up to the tip are composed of the spine bar instead of the edge bar, which is no good if I'm using something like wrought iron.

I really want to start tying San mai and Damascus, but I don’t have a press or power hammer, and doing it by hand seems daunting.

Damascus by hand is a bit of a bitch (though if you start with a billet that's like 1x1" or so you can do it by hand okay), but san mai is very doable by hand, particularly if you're doing it with a softer cladding as opposed to 15n20 with a 1095 core or something like that. My best advice would be to make sure you have good tongs that fit your billet, unless you're really good at welding handles on. I find every time I weld a handle on something and go at it with a hand hammer it bounces around on the anvil so much that the handle comes off after one or two heats.
 
Last edited:
guess my concern is that if I wanted to do something more in the way of a knife where the point is centered or in line with the spine, I'll end up with a blade where the point and the last inch or so of the edge as the belly pulls up to the tip are composed of the spine bar instead of the edge bar, which is no good if I'm using something like wrought iron.
If you forge the profile, this shouldn't be an issue.
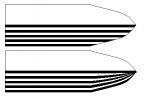
There's a couple of ways to do this, depending on the look you want. The top would be stock removal after forge welding the bar and the bottom one is what should happen with forging, so your worries about keeping the tool steel on the edge should be a non-issue.
Untitled.png
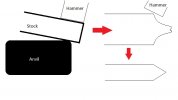
If this helps, here's how I approach forging the tip on a blade (I only showed forging from one side of the blank, you'll need to forge both sides to whatever profile you are looking for.

Untitled.jpg

Playing with plasticine/clay is a good way to figure out the forging steps.
 
Interesting, that's totally different from how I forge the point in! I go in on the top front corner of the bar and forge that in, then gradually work back towards the heel and forwards towards the point until I've got the taper as gradual as I want it. Anyway, sounds like the best way to figure this out is to just play around with some steel. Thanks for all the help.
 
Anyway, sounds like the best way to figure this out is to just play around with some steel.

Like weo weo said, get some modeling clay in black and white. Roll it out in sheets, stack them and then layer them.

You can then use your hammer and anvil then very, very gently forge your "billet". That way you can see "exactly" what your forged in results will be!
 
Interesting, that's totally different from how I forge the point in! I go in on the top front corner of the bar and forge that in, then gradually work back towards the heel and forwards towards the point until I've got the taper as gradual as I want it. Anyway, sounds like the best way to figure this out is to just play around with some steel. Thanks for all the help.
Actually, it's not that different, and I do what you describe a lot too (that would have been quicker to sketch....)
What i drew comes from my blacksmithing background and is a way to speed up drawing a point on larger square stock. And lately ive been playing with starting my recent blades by forging the point when the billet is ~3/4 × 1 1/2 then drawing out from there.
 
Back
Top