Is this good or bad reply thread.

Joined
Aug 21, 2001
Messages
397
Since the big change I can't figure how to find my old thread, so here is a reply to it since I said I would.

My orginal question was if the unusual figuring/banding/ damascus look I saw after etching an 0-1 blade was good or bad. I cleaned it up better with 1200 grit, and all the wierdness disappeared.

As I stated in my other thread, the edge passed the brass rod test fine and it also chopped spruce well for the blade size. I did some cutting tests on manila rope, and it did better than an ATS-34 blade at RC 60 of the same size. The grind geometry is different though, which of course invalidates everything, but does let me know that at least the 0-1 heat treat seems O.K. .

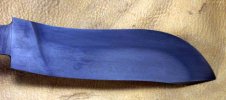
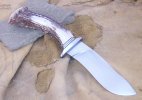
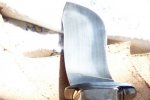
You can't see the hardening line unless the light is just right, as demonstrated in the pics below. Hamon pic is just out of etch and rubbed down with steel wool, 0-1wapati pic is finished knife and 0-1zoneharden shows the hardened zone after finishing in sunlight.

Clint Chisan

www.chisanknives.com
 

Attachments

  • hamon1.jpg
    hamon1.jpg
    32.5 KB · Views: 48
  • 0-1wapatix11.jpg
    0-1wapatix11.jpg
    46.3 KB · Views: 60
  • 0-1zoneharden.jpg
    0-1zoneharden.jpg
    15.2 KB · Views: 49
well you have asked for my view,,,so here it is..

Photos 1 and 3 are great. the etch shows the type of thing that a guy wants to see.

However, photo 2 is a mess....Im not even sure that what i see is on your knife, or is a flaw on the camara, or is on my computer screen...but all i know is that something is not right....I will look again and see if I notice more....

(What is looks like to me is, that there was some oil on the blade during the etch?....or there was too much of the etch stripped away by a buffer?)
 
I have re-read your post and now Im not sure what knife you are talking about...

I took a 2nd look at your middle knife photo, and now I believe that the etch is okay, but that the photo thumbnail blows up too big and plays tricks with the pixels.
 
The kind of light figuring in the steel shown in photo #1 is characteristic of insufficient austentization. The blade needed either more time at heat or higher heat. Not really bad but also not the best. The results will be a slightly softer tougher blade lower in wear resistance.

Daniel
 
knight.

I sure thought that the knife in Thumbnail #1 was cool looking....what do I look for to see what you see?

The etch seems to show a good use of the heat-treating O/A torch all along the curve of the cutting edge ....

What is the "characteristic of insufficient austentization." that you have in mind, I wish to know so that I understand what you see...

help me understand this
 
Sure, it IS cool looking! The differential quench is good too. I was commenting on the figuring/banding/grain flow "weirdness" that is seen in the first photo. It isn't a real problem, but greater uniformity could probably be achieved through better austentization.

Daniel
 
Kight...

okay.......umm,,still in the dark over here...

Lets see if we cant find a way to both be looking at the very same points.

(Yes I wish we could have a pointer that you could place on photo #1...LOL)

Knight, when I click on photo#1 the thumbnail blows up to 7 &1/4 inches wide by 3 & 1/4 inches tall...okay?

Now if we make the lower LEFT corner the starting point:
how far to the right, then how far up, do I go to see the points on the blade that show the effect of figuring/banding/grain flow "weirdness"?

----------------------------

I hope you understood that, Im just searching for a way for you to teach me the important things you are talking about. it would be so much easyer if you could somehow click on a spot and say "Right there, see that?"
 
DaQo'tah, the banding etc. is very hard to see in the pic., and perhaps I shouldn't have posted it since it seems so confusing. It is mostly concentrated above the quench line, and is sort of visible right where the plunge cut is.

I suspected this was result of not "soaking" long enough to fully austinize, ie. get all the alloys "liquified" befor freezing them in place during the quench, as Knightsteel suggested.

Quenching as soon as the blade reaches non-magnetic is not sufficent, as all the alloys aren't austinized at this point, so you've got to keep heating for a few moments more to achieve this.

I figured I'd ask here for opinions in an earlier thread a week or so ago. I said I'd let others know how the blade performed at a later date, and TADA!, here we are. Also, the hardening line is a result of a clay back heat treat, not the torch method, just so you know.

Clint
 
Clint....

Actually I should thank you for posting your work. I need to learn this stuff,,,clearly I dont understand, and I dont see what you are looking at.

I would just ask you to ....well....could I ask you how big the thumbnail blows up for you on your screen...AND,....when you do click on it and blow up the photo of the blade, could you take a tape line and mark the distance to get to the spot you are looking at?

Counting from the LOWER LEFT HAND CORNER, as our starting point...how many inches to the right do I go?...then how far up?

(I have been looking at that photo of the blue tinted blade, and I do notice something odd,,,there is a weird box looking thing right next to the plunge .,its at Right 1 &1/2 inches, and UP 1 & 3/4 inches)


But if you are talking about the banding as in, the cool looking curves that show up in the etch?..well...I like that part the most, whats wrong with that?
 
Back
Top