oldschool45
Gold Member
- Joined
- Oct 15, 2007
- Messages
- 1,211
Here is one way to do a Khukuri Sheath.
I am going to go through the basic steps here and show where they vary for the Khukuri because it is bigger at the nose than the bolster from a "normal" straight blade fixed knife. For a much more in-depth information on the mechanics and tools nick681 did an awesome job of a tutorial here http://www.bladeforums.com/forums/showthread.php?t=765547 :thumbup:
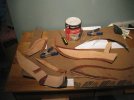
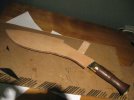
Pic 1, lay your blade out onto either heavy cardboard or your actual working leather. In this case it is a Santosh 20" Ang Khola. If you have done this before you know what I am talking about if you haven't "prototype" it a few times with heavy cardboard(the heavy paper they pack cases of canned beer in) or corrugated cardboard (heavy box cardboard). It will keep you from making big mistakes with expensive leather and may show you some neat integrated things you can do with the design.
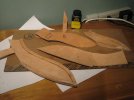
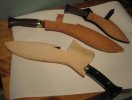
Pic 2, shows most of the pieces in they layout; front(face), back(where you would attach a belt sheath or baldric loops) and the welt (what keep the blade from cutting through your stitching) and I have 2 more spacers for the top of the welt to get the thickness up to meet the 7/16" thickness of the AK's spine. I actually sanded the "tip" part of the welt to match the taper of the tip. When these sheaths were finished you can actually feel the chirra's through the 9oz leather.
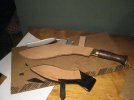
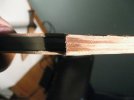
Pic 3, shows the pieces with the "contact" edges glued up. Usually Barge Cement is used for leather but any contact adhesive will work. I've used Gorilla Glue before but you have to remove it from the blade "pocket" and compress it right or it expands too much. I have made sheaths for kitchen knives that are all glue and no stitching. If your choice is to only stitch or glue. Glue! It prevents the blade edge from finding your stitches then opening up your sheath then your hand.
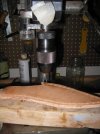
Pic 4, after half of the sheath is glued up, I take a tool and make a groove to hold the stitching then use another tool to evenly space & make the holes for the stitches. This line is as close to the middle of the welt as you can make it. You don't need special tools to do all of this. A good eye with a ruler and a pencil will do almost the same thing. What you see here is me using a drill press to drill the holes. I drill the holes before the sheath is done because it is easier to get them "squared" up and not uneven if you wait till its all together.
Pic 5 is after the holes are drill waiting to glue the rest of the sheath together.
I am going to go through the basic steps here and show where they vary for the Khukuri because it is bigger at the nose than the bolster from a "normal" straight blade fixed knife. For a much more in-depth information on the mechanics and tools nick681 did an awesome job of a tutorial here http://www.bladeforums.com/forums/showthread.php?t=765547 :thumbup:
Pic 1, lay your blade out onto either heavy cardboard or your actual working leather. In this case it is a Santosh 20" Ang Khola. If you have done this before you know what I am talking about if you haven't "prototype" it a few times with heavy cardboard(the heavy paper they pack cases of canned beer in) or corrugated cardboard (heavy box cardboard). It will keep you from making big mistakes with expensive leather and may show you some neat integrated things you can do with the design.
Pic 2, shows most of the pieces in they layout; front(face), back(where you would attach a belt sheath or baldric loops) and the welt (what keep the blade from cutting through your stitching) and I have 2 more spacers for the top of the welt to get the thickness up to meet the 7/16" thickness of the AK's spine. I actually sanded the "tip" part of the welt to match the taper of the tip. When these sheaths were finished you can actually feel the chirra's through the 9oz leather.
Pic 3, shows the pieces with the "contact" edges glued up. Usually Barge Cement is used for leather but any contact adhesive will work. I've used Gorilla Glue before but you have to remove it from the blade "pocket" and compress it right or it expands too much. I have made sheaths for kitchen knives that are all glue and no stitching. If your choice is to only stitch or glue. Glue! It prevents the blade edge from finding your stitches then opening up your sheath then your hand.
Pic 4, after half of the sheath is glued up, I take a tool and make a groove to hold the stitching then use another tool to evenly space & make the holes for the stitches. This line is as close to the middle of the welt as you can make it. You don't need special tools to do all of this. A good eye with a ruler and a pencil will do almost the same thing. What you see here is me using a drill press to drill the holes. I drill the holes before the sheath is done because it is easier to get them "squared" up and not uneven if you wait till its all together.
Pic 5 is after the holes are drill waiting to glue the rest of the sheath together.