-
The BladeForums.com 2024 Traditional Knife is ready to order! See this thread for details: https://www.bladeforums.com/threads/bladeforums-2024-traditional-knife.2003187/
Price is$300$250 ea (shipped within CONUS). If you live outside the US, I will contact you after your order for extra shipping charges.
Order here: https://www.bladeforums.com/help/2024-traditional/ - Order as many as you like, we have plenty.
You are using an out of date browser. It may not display this or other websites correctly.
You should upgrade or use an alternative browser.
You should upgrade or use an alternative browser.
Knife photography
- Thread starter golok
- Start date
- Joined
- Jun 10, 2003
- Messages
- 15,288
This subject has been covered before so do a search. The basics are use a good camera, use the highest resolution ,use a tripod. Since you are photographing shiney surfaces do not use the flash or any direct lighting.Instead use light reflected from a white cardboard or other material or use diffused lighting by shining light through something like translucent white plastic.
- Joined
- Feb 28, 2002
- Messages
- 13,348
Have a look at this most informative thread:
http://www.bladeforums.com/forums/showthread.php?t=240994
For best results - tripod, neutral background and diffused light. This is the set-up of fellow forum member Murray White (yeah, that's him in the pic). It works very well indeed (and it's where I do all my knife shots.) There are many variations on this theme which work just as well.

Cheers,
Roger
http://www.bladeforums.com/forums/showthread.php?t=240994
For best results - tripod, neutral background and diffused light. This is the set-up of fellow forum member Murray White (yeah, that's him in the pic). It works very well indeed (and it's where I do all my knife shots.) There are many variations on this theme which work just as well.
Cheers,
Roger
- Joined
- May 9, 2000
- Messages
- 29,205
Talking about Murray, where the heck has he been? I haven't seen any posts by him in months.
Sorry for the detour.
Sorry for the detour.
- Joined
- Feb 28, 2002
- Messages
- 13,348
Keith Montgomery said:Talking about Murray, where the heck has he been? I haven't seen any posts by him in months.
Sorry for the detour.
I'll be seeing him later tonight for the pre-CKG show get together. I'll ask him where he's been hiding.

- Joined
- Jun 5, 2002
- Messages
- 2,761
Yes, a good camera and accssories are somewhat important, BUT, it's my belief that you can take a pretty decent picture without anything more than a $250 3MP camera and no accessories. Sound impossible?
The things that I feel are way more important are:
Your patience. I will often take literally 50-100 pictures of the same knife, go through them carefully, edit them in my 5 year old, primitive photo program (yes, i should get Photoshop) and pick the 3 or 4 I think are good. If you think pro photographers take one or 2 shots of their subject, you're wrong.
Next, LIGHT!!! It's been said before, it bears repeating. Lighting is nearly everything if you want a really good picture. Its the only way to have the entire knife lit evenly, without bright spots, reflections, etc. And, outdoor, natural light is by far the best IMO. Not direct sunlight, just ambient light. I am now in the habit of going to Starbucks, where I go anyway for my daily caffiene fix, I take knives with me, background paper, camera, sit outside on their patio tables, and at my leisure, drinking coffee take usually about 100 or so pics. I acually find it relaxing. Yes, I believe I have seen a few people staring at me oddly, screw them.
Thirdly, you do need to develope a good eye for balance and angles in your pictures, that can be helped by taking lots and lots of pics from all sorts of angles, but you still need to learn to take a nicely balanced picture and that comes with a little practice. I'm not a pro by any stretch, and use low-end equipment, but I feel my pictures, especially lately, are pretty decent.
I admit that now, i want to get a better camera and get that last little edge, but again, that is the least important thing.
Here are some pics I took recently, remember, $250 3MP Sony camera my wife actually got for free, and no tripod, no photoshop, nothing really, except light, and a willingness to stick with it until I think it's right.
- Joined
- Sep 14, 2002
- Messages
- 4,135
Nice shots Megalobyte. All I need to try is a digital camera!!
- Joined
- Oct 8, 2001
- Messages
- 12,336
I'm NOT a knifemaker, so his original question isn't directed at me. But I've been around the camera and knives for awhile. I'm always willing to share.
There isn't a professional knife photographer or good maker who doesn't use diffused lighting of some form to get great images. Diffused lighting can be outdoors on a cloudy day, or under a sheet on a sunny day. I've seen both of these cheap and fail-safe methods work. Witness Meg's above.
I need to work in the evening and with consistency. So I use a verson of the tent system shown above that is broadly used by Point Seven, Murray White, UW Mitch, Blade Gallery, and many others. I am fortunate in that I have a powerful strobe flash setup, and it allows me to be able to REALLY get a lot of light. Doing so gives me the benefit of closing my aperature down, so can get good depth of field, and I use a shutter speed of 125-180/1000 sec so I can hand-hold my camera with a rock-steady grip. Works for me, but it's a little unorthodox. So be it.
Unless you want to print out quality 8x10's, a good 3mp camera is a perfect choice. Web photos need to be reduced down to less than 1mp, anyway. The glory of digital files allows me to take LOTS of photos to work with a final choice. I will give you an example below. After I was done experimenting with various backgrounds and insets, I had taken 41 images of this knife and it's details, in various angles of attack.
Golok, for the life of me, it still has a little 'voodoo'—no single setup works best and repeats itself all the time. You have to try different angles and positions and choose from there. (Sometimes you pray...") )
)
Here is a look at my basement studio:

Notice there are two strobes (one's hidden) AND the two 500w (equivalent) fluorescent lamps. 85% of my lighting is from the strobes (thankfully). The fluorescents really help me work in clarity setting up. Also notice the triangular posterboard reflector I position behind my subject for fill-in lighting.
Even still, after getting a great core image, I use the power of PhotoShop to enhance and clarify things further. As mete mentioned, you NEED to start out clean. (Photoshop is a whole 'nuther thread....!)
Here's a final image of that knife under the tent:

As you can see, it's a good method. Disregard the insets and look at the core image. Lots of shadows and highlights giving it dimension, and with lots of clarity. There is a little ball of rolled up masking tape under the knife propping it up a few degrees. (One of my little 'tricks')
It's not enough to be a great knifemaker. You have to be a website developer and a good photographer and a good promoter and have a personable attitude to survive. And then again you can job out those skills you aren't good at...
Coop
There isn't a professional knife photographer or good maker who doesn't use diffused lighting of some form to get great images. Diffused lighting can be outdoors on a cloudy day, or under a sheet on a sunny day. I've seen both of these cheap and fail-safe methods work. Witness Meg's above.
I need to work in the evening and with consistency. So I use a verson of the tent system shown above that is broadly used by Point Seven, Murray White, UW Mitch, Blade Gallery, and many others. I am fortunate in that I have a powerful strobe flash setup, and it allows me to be able to REALLY get a lot of light. Doing so gives me the benefit of closing my aperature down, so can get good depth of field, and I use a shutter speed of 125-180/1000 sec so I can hand-hold my camera with a rock-steady grip. Works for me, but it's a little unorthodox. So be it.
Unless you want to print out quality 8x10's, a good 3mp camera is a perfect choice. Web photos need to be reduced down to less than 1mp, anyway. The glory of digital files allows me to take LOTS of photos to work with a final choice. I will give you an example below. After I was done experimenting with various backgrounds and insets, I had taken 41 images of this knife and it's details, in various angles of attack.
Golok, for the life of me, it still has a little 'voodoo'—no single setup works best and repeats itself all the time. You have to try different angles and positions and choose from there. (Sometimes you pray...
)Here is a look at my basement studio:
Notice there are two strobes (one's hidden) AND the two 500w (equivalent) fluorescent lamps. 85% of my lighting is from the strobes (thankfully). The fluorescents really help me work in clarity setting up. Also notice the triangular posterboard reflector I position behind my subject for fill-in lighting.
Even still, after getting a great core image, I use the power of PhotoShop to enhance and clarify things further. As mete mentioned, you NEED to start out clean. (Photoshop is a whole 'nuther thread....!)
Here's a final image of that knife under the tent:
As you can see, it's a good method. Disregard the insets and look at the core image. Lots of shadows and highlights giving it dimension, and with lots of clarity. There is a little ball of rolled up masking tape under the knife propping it up a few degrees. (One of my little 'tricks')
It's not enough to be a great knifemaker. You have to be a website developer and a good photographer and a good promoter and have a personable attitude to survive. And then again you can job out those skills you aren't good at...
Coop
- Joined
- Jun 5, 2002
- Messages
- 2,761
Jim's so humble, he's been around photography...! ") I am always amazed at his pictures, and I would be thrilled to one day take pics 80% as good as his, i'm not there yet, but working on it over the next thousand cups of coffee...
I am always amazed at his pictures, and I would be thrilled to one day take pics 80% as good as his, i'm not there yet, but working on it over the next thousand cups of coffee...
I have a ton of pics on my laptop currently, waiting to be edited, i keep taking them, but dont seem to process/edit them as fast as i take them, hmmmm, this makes for a lot of pictures on my computer doing nobody any good.
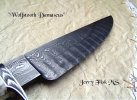
Well, here's one i got to today, a closeup of the fit of the blade to the guard on a Fisk Sendero, I like the way the patterns in the damascus reflect onto the face of the guard. And, you can also see that Jerry's fit aint too bad either...

I am always amazed at his pictures, and I would be thrilled to one day take pics 80% as good as his, i'm not there yet, but working on it over the next thousand cups of coffee... I have a ton of pics on my laptop currently, waiting to be edited, i keep taking them, but dont seem to process/edit them as fast as i take them, hmmmm, this makes for a lot of pictures on my computer doing nobody any good.
Well, here's one i got to today, a closeup of the fit of the blade to the guard on a Fisk Sendero, I like the way the patterns in the damascus reflect onto the face of the guard. And, you can also see that Jerry's fit aint too bad either...
- Joined
- Jun 5, 2002
- Messages
- 2,761
Dylan, it's actually just a sheet of paper i found at a craft store, 50 cents. it looks like its textured, ro almost like stucco cement, but its not, just smooth paper with a pattern that looks like texture. Frankly, id stick a Sendero in my eye before id let it touch anything hard, or textured...
Here's an angled shot I like, one out of maybe 50 I took that day I liked.
it looks like its textured, ro almost like stucco cement, but its not, just smooth paper with a pattern that looks like texture. Frankly, id stick a Sendero in my eye before id let it touch anything hard, or textured... Here's an angled shot I like, one out of maybe 50 I took that day I liked.
Attachments
- Joined
- Jun 5, 2002
- Messages
- 2,761
Here's pics of a large damascus TnT I took the other day.


- Joined
- Dec 29, 2003
- Messages
- 339
Blade747 said:There is a little ball of rolled up masking tape under the knife propping it up a few degrees. (One of my little 'tricks')
Coop
Great post Coop. I aspire to take photos half as good as yours someday as well. Per your quote above, I do the same thing with a piece of paracord (approx 2" long) tied in a knot. It's just enough to prop up an object for a better angle and it's soft. Thanks for sharing your setup.
-pb


- Joined
- Oct 18, 2001
- Messages
- 20,978
Good pics =
1 - diffused light
2 - "quiet" background material
3 - tripod and timer
I'd add one more thing about digital point-n-shoots. 3 megapixels is enough pixels for the web, but in general, there's a large leap in quality between 3 and 4 MP cameras. That seems to be the breaking point. I've read it dozens of articles. 3 MP is a stretched 1 MP camera. 4 MP is toned down 5 or 6 MP camera. CCD quality is much better.
I have a 6 MP camera that I shoot mostly at 1 or 3 MP on "fine". That seems to be the sweet spot. I rarely use 6 MP unless I know I'm going to blow it up to 8x10.
Scanners do pretty good, but paint a strange picture. It always looks scanned to me...even if the detail is great (like the one posted)