Koster Knife Kit Pic Thread

Joined
Jan 6, 2007
Messages
955
Alright folks, most if not all of us who ordered knife kits should have them by now. Let's start posting pics of how they turned out. I got a #2 Bushcraft and am about 1/4 of the way done. I should be finished up in the next week or so. When I'm done I will be sure to post pics of how it turned out. Everyone else please do the same!
 
I guess I'm the only one working on my kit!!!

I've got it most of the way there. It needs another few coats of linseed oil and a good stropping to remove the burr, but after that, she's done!!! There were a few times when I thought I would never make it look good, but for being a not-so-artistic or eye-for-detail kind of guy, I think it turned out pretty good. It's getting late but I will snap some pics tomorrow night and post them to this thread. Stay tuned!
 
Check it out....

There were a few times during the process when I thought it would never turn out ok. I left the handles a bit on the thick side, just because I figure that if I want them slimmer, I can always go back and thin them out, but I could never make them thicker. The belt sander bit the blade once so there is a mark across it, but not really a big deal. I gave it a couple coats of boiled linseed oil, and it really brought out the shine of the cocobolo. Any suggestions on how to give it a somewhat protective finish. Will Briwax do it? What is Briwax? Where can I get some? Thanks for looking guys, I'm anxious to see what the rest of you did with yours.
 

Attachments

  • PB130001.jpg
    PB130001.jpg
    51.7 KB · Views: 180
  • PB130002.jpg
    PB130002.jpg
    57.6 KB · Views: 103
  • PB130003.jpg
    PB130003.jpg
    64.5 KB · Views: 96
  • PB130004.jpg
    PB130004.jpg
    15.6 KB · Views: 124
I like the way the handle turned out. I'm no expert on finishing wood but I think that boiled linseed oil has natural polymers in it that will give it a protective finish. I don't think that the protection goes to far below the surface though. This means that on ocassion you might want to re apply small amounts of boiled linseed oil to the wood. some people add beeswax and turpentine to the mix as well I think the turpentine helps to thin the mix which allows it to penetrate the wood further.
 
Check it out....

There were a few times during the process when I thought it would never turn out ok. I left the handles a bit on the thick side, just because I figure that if I want them slimmer, I can always go back and thin them out, but I could never make them thicker. The belt sander bit the blade once so there is a mark across it, but not really a big deal. I gave it a couple coats of boiled linseed oil, and it really brought out the shine of the cocobolo. Any suggestions on how to give it a somewhat protective finish. Will Briwax do it? What is Briwax? Where can I get some? Thanks for looking guys, I'm anxious to see what the rest of you did with yours.

Very nice job Abiggs! I would rub it down with 0000 steel wool and then put a regular paste wax on it. You don;t need Briwax or Renaissance though either will be fine IF you already have them. I recommend Minwax which can be found at Lowes or Home Depot, and other hardware stores.

The only thing I don;t particularly care for is the "Koster Knife Kit" logo on the blade. Can you get them without that?

Nice work :thumbup:
 
I too like the idea of keeping the handle thicker..I think the only thing I might do differently is contour the handle for a thumb ramp....now if mine only comes out as half as nice as yours.


Jim

__________________


"Hold Fast"
 
Hey guys,

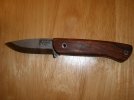
I thought I'd share my attempt. I got both bushcraft and nessmuk, only the bushcraft is done now. My blade arrived with a little imperfection at the tip, it's bent or burnt a little , I don't know, but of course it's not a big deal - these are supposed to be knife kits, right?

I went with a piece of Black Ash Burl I had lying around for some time, I bought it from knifekits.com and was a bit surprised how small they were (yep, I guess I didn't pay attention to the description), but for this project they were perfect. Only the lanyard hole is done obviously, I was thinking of putting a corby bolt in the front hole, but since the scales were quite thin and I don't have the right drill bits for my bolts, the hole ended up covered.

P1000560.JPG


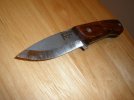
Hopefully you can see the palm swell
P1000559.JPG


P1000558.JPG


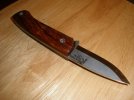
Detail of the tip - not a cool photo, yes, hope you can see something
P1000561.JPG


Well, I'm off to a sharpening stone to get this knife sharp and repair the tip. Thanks Dan for making this project happen, here is hoping to see more in the future!

Take care

Pavel
 
Last edited:
Very nice Pafka. Did the ash come that color or did you stain it?
My bushcraft had that tip damage from the postal service,
(punched a hole in the box). Dan fixed it no charge.
 
Thanks guys!

Did the ash come that color or did you stain it?
My bushcraft had that tip damage from the postal service,
(punched a hole in the box). Dan fixed it no charge.

It is supposed to be stabilized wood with natural color, I only applied some teak oil to it. Yep, I thought the tip damage might be from transport, I also had a small hole in the box.
 
Great pics, guys - thanks!!!

:thumbup:


Pafka - International Shipping must have been brutal! :(

I thought I had yours packed well....but guess not.

If you are unable to "sharpen it out"...I will replace it FREE of charge, ok?!

Let me know.


You guys feel free to post more pics! :D


Dan
 
Dan, thanks a bunch for your offer, I appreciate it - but I think I managed to repair the tip with a passable result. Let's see how others are doing with their blades!
 
Question for those that have worked their knife kits so far...

Nevermind... I found it in the sticky above... Would help if I looked around more... :o
 
I currently have two glued up. One is wearing cocobolo and the other has some fiddleback maple. Dan if you see this! What kind of finish do you find works best for figured maple to really get the figure to pop.

I will post up the end product after I finish them.

Paul
 
valcas1 - if the maple is stabilized, all you need is wax..can even buff it by hand.

if it is dry (unstabilized) then there's lots you can do to it. Maple readily accepts many stains...including the antiquing dyes used on leather that some folks also apply to antler.

Then seal afterwards with a good glossy wipe-on polyurethane finish or similar blend.


Jeepnut -I use Devcon 2-ton epoxy. Easy to find...at about any hardware store and works great.

2TON.jpg


Best of luck guys!

Hope they turn out great!!!

Dan
 
To really make the grain pop, a lot of guitar makers first stain the wood with a light coating of black stain. Then, they sand most of it off, leaving the black to remain only in the pores of the grain. Lastly, they coat it with the original stain color they want. It really highlites the grain of figured maple. PRS employs this process.
 
Back
Top