Lava Flow, Ironwood Peacock

Joined
Dec 17, 2003
Messages
597
O.K. so you have to see it in person to see the lava flow, because of the chatoyant effect of ironwood when you turn the handle in the light it looks like there's a river of fire running though the wood.

Just finished this 3.25" peacock damascus blade, copper bolsters with black micarta, copper and brass spacers, desert ironwood burl scales.

Thanks for looking, Dave

orig.jpg

orig.jpg

orig.jpg
 
:eek: :eek:

Absolutely stunning. How is that bumpy finish achieved on the copper?

Kenny
 
Hot dayum. . . . .talk about perfect execution and flow ( pun intended :D ) ! :eek:


Very very impressive ! :)
 
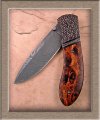
Thanks Kenny, This is the way that I textured the bolsters of this knife, remember there are many different ways to do it and it's a lot of fun playing with the different methods.

After profiling the bolsters and scales I contour and shape them close to finish up to about 600 grit, remove the bolsters and place them on a secure surface, I have a piece of 3/8 x 1 1/2 x 6 micarta that I put in my bench vise and I use double sided tape to hold the bolster secure.
Before actually texturing the bolster, practice your pattern on a piece of scrap of the SAME material, copper is soft and will machine easier than steel. On this one I did kind of a V shaped layout but get creative and do straight, random, patterns, whatever.
Once you have your pattern draw it on the bolster with a marker, pencil or color the whole bolster with ink and use a scribe. I used a small round burr in a flex shaft dremil with adjustable speed. If you want highs and lows just apply more downward pressure in some areas, be careful towards the edges as the burr wants to roam so hang on tight, use short strokes with the burr then overlap and blend as you work your way down the bolster
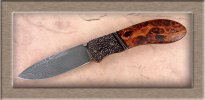
Once you finish texturing with the burr take a small dremil wire wheel I use brass wire on this one and wire wheel the entire textured area. I then reattach the bolster to the frame with scales and I sand with the same 600 grit to blend the bolster / scale joint and you can apply more sanding pressure to the texturing to flatten the highs some, depends on the look you're trying to achieve.
Take the bolster back off and put it back on you're steady rest, now you can apply different patina's, on this one I used a browning patina over the whole area. Once you achieve the color you want stop and rinse it off with hot water and LIGHTLY 4 / O steel wool the texture. Dry it off and I did an oil rub on this one to give it a more soft burnished look. I used gun oil and a stiff backed very fine sanding cloth and rub it until you are happy with the results. I finished with a couple of coats of ren wax.
That's it, hope it helps and have fun trying different methods, Dave

Thanks GigOne, Nice pun. :D
 
Dave-

As always, terrific job.

In such a short time you've achieved a very distinctive look. You are to be congratulated as that is no small accomplishment.

Ironwood is one of my favorites...and you've obviously got a great set here. As you described, I love it when it gets that fantastic chatoyant (tiger eye) effect. Gives it that wonderful, almost iridescent quality as it seems you can peer right down into the wood (especially when viewed in sunlight).

As I've mentioned in the past, I really like your use of spacer inlays. How are you affixing them? I seem to recall you were doing some sort of blind tap to the liners...yes?

Great combo of materials...beautifully executed knife.


Dennis Greenbaum
Yeah Baby! :cool:
 
Superb..................the materials, design, fit, finish, details, etc., IMHO, are beyond reproach. :eek: :)
 
Really nice. I think this might be my favorite one you've posted. Great lines, and everything just fits together well :cool:
Whats the thumbstud made of?
 
Hi Dennis, there may be a better way of attaching them but I use thin material sometimes and I don't want to rely solely on epoxy.

First cut out your bolsters, get them flat, drill the holes, profile them to the finished shape but no contouring, leave them flat.

Next cut the spacer material .050 to .125 wider than the bolster is thick so when you lay it up next to the bolster it's taller, make sure they're flat, use your disk or flat platen with a work rest and finish one of the edges nice and square so it closely matches up to the bottom of your bolster, you don't need to get it perfect, it's just an alignment guide at this point.

Next clean the face of your bolster and spacers with acetone or alcohol have your super glue ready, I like to use Zap A Gap CA+ (I've tried a number of tapes and adhesives and found this to be the best so far) to give me a little more time lining things up, put the bolster back edge up and parallel in a drill press vice (I find it easier to see if you have the bottom facing you with about a 1/2" sticking up above the vise jaws), I use a cross sliding vice for this, it just makes it easier to accurately drill both holes in line, chuck up a NEW #56 drill bit lower it to the bolster on top of the first hole location (I divide the bolster width in 3rds for the two hole locations, MAKE SURE YOU POSITION THE HOLES NEAR THE BOTTOM OF THE BOLSTER TO LEAVE ROOM FOR CONTOURING OF THE TOP AND THE LOCATION OF THE PINS WILL NOT INTERFERE WITH THUMB STUD CUTOUTS ETC.), slide the vice table to the next hole location, you're trying to get the vice lined up front to back so both holes are at the same location near the bottom of the bolster, side to side isn't that important right now.

After you get everything lined up (DON'T MAKE ANY MORE ADJUSTMENTS TO THE DRILL PRESS OR VISE AT THIS POINT), put the glue on the bolster edge and carefully and securely start stacking your spacers making sure that the bottom of the spacers at least completely cover the bottom edge of the bolster, glue in between each spacer.
Let the glue COMPLETELY dry, lower your bit and slowly drill your holes (depends on the materials used for the drill speed and if a center point drill is needed first), drill through the spacers and about a 3/8" deep into the bolster. Remove the sandwich from the press and take some #56 drill rod or a couple of old drill bits and insert them into the holes. Leave it glued up with the pins in place and surface the bottom so everything is completely flush (be careful not to get it too hot or you'll lose the glue bond), I use side cutters to clip the pins close and using a disk sander carefully grind the pins flush to the last spacer, at this point you want to unglue the sandwich and clean up all faces so when you fit the handle scales there will be a nice tight fit.

Next screw the bolster sandwich to your frame, fit your handle scales, contour everything to finish. After it's pretty much finished you can now remove the spacers to do file work or whatever you want to do to them. When I'm sure everything is done I epoxy the sandwich together.

Dennis with your artistic abilities, the spacer possibilities are endless. B.T.W. Where the heck is your next knife, it's been far too long waiting to see it.


Dawkind, Andrew, Matt, Thank you

Matt, the thumb stud is torched and etched stainless steel to better match the damascus color and feel
 
That's a great looking knife.

I noticed your picture had a fairly strong color cast, which I find masks some of the fine detail, so, I hope you don't mind, I took the liberty of saving the picture, and editing it in Photoshop, removed the yellowish cast, and a few other minor tweaks, added a frame, here's the result. Feel free to use it if you want, or, not, up to you. I used to not even notice these things until Coop started teaching me some of the finer points, now I see, good, but still correctable pictures everywhere, only rarely do I feel the need to experiment with them though, but, like I said, I like the knife, so, I wanted it to look its best. :)

attachment.php


attachment.php
 

Attachments

  • orig copy.jpg
    orig copy.jpg
    57.1 KB · Views: 213
  • orig copyov.jpg
    orig copyov.jpg
    62.7 KB · Views: 214
Thank you Ari,

I don't know how you guys do it, I held the knife up to the second picture (because I think that one was originally shot better) and it's looks just like it only much bigger :) you nailed the coloring, the only thing is the small grouping of light spots on the lower left dark section of the handle, they are not as pronounced in real life.

Thanks again, they are saved and will be used on my web site (when I ever get one) with a courtesy of Megalobyte note
 
Hey they're gone, I gotta get my eyes examined. Exchanging the last pic you did with this one. It seems this knife will be photographed by quite a few pro photographers soon, it'll be interesting to see what they come up with. Thank you very much again.

Paul, I thought I was the only wierdo that thought ironwood was sexy
 
Hey Dave-

Thanks for that generous and detailed description of how you use the pins...clever idea...and so simple!

Very kind of you to inquire about my knifemaking...I've been working on two knives for awhile. Unfortunately progress has been slowed down substantially... I've been fighting with a difficult health problem for several months, which has greatly limited my time at the bench.

One of the two knives is a balisong...albeit a small one. It'll be heavily embellished (of course). The other is a fixed blade (forged 5160). I'd say it's a "Persian Fighter." Also heavily embellished and part of the reason for my asking about your spacers. The spacers I'm using on this one are carved 416 SS, and the carving may be too deep to use your pin method. I was planning to blind-tap them to the fileworked and anodized Titanium liners (alongside the blind-tapped bolsters)...but I like the way your method guarantees a good snug fit to the bolsters. I'll see if I have enough room to pull it off...thanks for the cool idea. :D

My health finally seems to be improving...so hopefully I can have these done in the next month or so.

Sorry, didn't mean to hijack your thread. Thanks again for asking.


Dennis Greenbaum

Yeah Baby! :cool:
 
Dakcon said:
Hey they're gone, I gotta get my eyes examined. Exchanging the last pic you did with this one. It seems this knife will be photographed by quite a few pro photographers soon, it'll be interesting to see what they come up with.
Yup, Dave's right. This knife is a Supermodel! We are having a contest in another forum and there will be eight different (count that nine, with Ari's work) versions of this knife by eight different photographic artists. Kind of a 'passaround' model. What a subject!

Coop
 
You make outstnading folders, and this one is again outstanding amongst those ! Yes, I can see the lava flow, and I didn't even need a few drinks first. Most generous of you for your great descriptions of your techniques. I don't know how you pull it off. Despite the immense detailing on that knife, your works never look busy at all... Jason.
 
Detailed, distinctive, beautiful!

Congrats on the great job!

-Michael
 
Wow, grain in that wood is simply stunning! :eek:

Oh yeah, the rest of the knife looks good too. ;)
 
Back
Top