Leather D-Guard

Joined
Aug 3, 2001
Messages
585
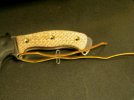
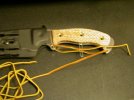
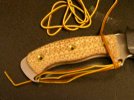
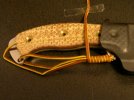
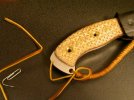
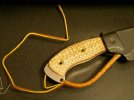
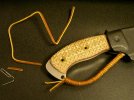
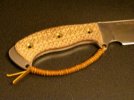
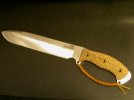
There are definitely D-guards that are nicer (for the big blade knives)but for me the K.I.S.S. rule is always in effect, so that rules out those cool fancy D-guards. Plus, I think they may be too much for the smaller blades like the badgers and the basic 5. So I have become quite enamored with a D-guard fashioned with a Chris Reeves coil knot and just this week successfully fashioned a nice leather coil knot D-guard.

Here is a step-by-step how to. It is VERY simple and the first time you try it will take you 15 min and I can do one now in about 5 min.

Now you have to promise that if you do one you'll post a pic or a scan. Come on, cross you're heart and hope to die, put a Busse
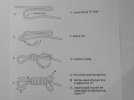
 :eek: in you're eye??? OK good.;)

First, here is the coil knot diagram from Chris Reeve's web site
here's a link to it on his site http://www.chrisreeve.com/righthandcoilknot.jpg

and if it's easier here's a pic of it (just not a very good pic, but you can see the diagram)
 

Attachments

  • diagram.jpg
    diagram.jpg
    31.9 KB · Views: 129
I found the leather to make this with at Michael's (that chain of craft stores). It cost about $4 for 4 yards and they have a number of different shades from tan to burgundy. I used 5' to make this D-guard and ended up cutting off 14" of tail when it was finished. When I make one for a basic I use 6' because you have to use the lanyard hole and so the coil goes all the way around the butt. Obviousely para-cord works great too, but the leather's kinda cool I think. It feels great, quite a lot different handling than the para.

Here's a pic of the leather I used.
 

Attachments

  • 101 a.jpg
    101 a.jpg
    38.4 KB · Views: 116
Start the cord up through the FRONT talon hole and bring it down to the rear talon hole, but DON'T feed it through, just lay it across, leaving some for a little tail
 

Attachments

  • 101 b.jpg
    101 b.jpg
    41.3 KB · Views: 116
now feed the long end up through the rear talon hole and move the pile of extra cord toward the front
 

Attachments

  • 101 c.jpg
    101 c.jpg
    44.8 KB · Views: 107
well, I was trying to keep everything in the same direction as the diagram, but when I do the coiling, I needed to flip it over in the other direction, 'cause I hold everything together with my left hand and coil with my right (your mileage may vary :D )

Anyway, now hold the three lines together with one hand and start wrapping TIGHTLY down toward the rear.
 

Attachments

  • 101 d.jpg
    101 d.jpg
    46.8 KB · Views: 107
A couple of things to keep in mind as you coil. Keep it as tight as you can. Also in order to keep a uniform diameter of the finished guard, try to keep the same position of the three strands underneath that you are wrapping over. Otherwise you will get thick segments and thin segments. With the leather you can stack the three strands on top of each other and wrap around that and it is easy and very uniform when finished.
 

Attachments

  • 101 f.jpg
    101 f.jpg
    45.1 KB · Views: 97
at the end, I coil all the way down to the talon hole and then loosen those last two coils back up till there is enough room to poke the end through the talon hole and once the end is through, then cinch those last two coils back up tight so they are right against the end and it holds securely.

I find the best thing to use to poke the end through the loop is the tip of a battle mistress :eek: of course I would show that technique to you but this IS my battle mistress, so I was forced to use a paper clip. So I guess actually either one works :D ;) :p
 

Attachments

  • 101 h.jpg
    101 h.jpg
    54.5 KB · Views: 97
and since it is sunday morning, here's a pic of what it looks like when it's finished and you're hung over (you know who you are )

What CBL???? :eek:
 

Attachments

  • dscn0437.jpg
    dscn0437.jpg
    29.3 KB · Views: 91
you know if you look at that pic long enough when your hung over, it'll make you puke :barf: :barf: :barf:
 
I've heard CBL will do that to you!!:D


Thanks Hunter for the step by step!! Great pics.
 
Excellent thread Utah!!!!

BTW, yep, thats what it would have looked like when I woke up on Sunday morning....oh my freakin head....Wild Turkey Baby, yeah!:barf:
 
Back
Top