Leather Sheaths and Gear

Joined
Apr 8, 2016
Messages
7
Hello! I've been trying my hand at making different things and trying to push myself to create new designs for gear etc. Feedback is always welcomed and I'm always wondering what people actually go for and combination styles (I.e. flashlight and knife combo sheath) so please feel free to say what you'd like as far as leather goes. Thank you and I'll post some of my recent creations and some of my older ones.
 
Nice work. Love those carvings, especially the campfire and the on fire thread. Lol. [emoji41] like the octopus too.


Sent from my iPad using Tapatalk
 
Very nice


••••••••••••••••••••
People are Strange, When You're a Stranger....
 
I'm always wondering what people actually go for and combination styles (I.e. flashlight and knife combo sheath)


d2a5bf238484fff0b6b274d9de766f5b_zps57c02c60.jpg


Ken
 
Ken, do you have a tutorial or thread on those combos? I tried getting the top piece of leather formed around two things and quickly gave up, I figure I must be missing something.

GiraffeHooves, I assume the first pieces you posted are your most current work? They show a lot of improvement over the stuff farther down. Only thing I can recommend is to finish your edges, looks nicer and will prevent the leather from getting beat up.
 
Ken, do you have a tutorial or thread on those combos? I tried getting the top piece of leather formed around two things and quickly gave up, I figure I must be missing something

Sorry , I don't have any tutorials of any kind and certainly not for the combo sheaths .
Gary Graley is the man to ask , because I first saw the idea in one of his tutorials .
The order of construction is the key , and I believe he does his differently than my attempts .
His combo sheaths leave mine dead on the water in terms of quality .
I must admit the handful of combo sheaths I made were probably my favourites though , and it's only because I stopped carrying knives that are suitable for them that I didn't make more .
If Gary is watching , I'd be interested to hear his thoughts and advice .
As I said somewhere else here recently , I'm surprised that more people here haven't made them and posted up their work.


To the OP , there are some really cool designs and ideas in your work , keep them coming :thumbup:

Ken
 
Ken...thanks...lol, but yes as WhiteKnuckle has found out, trying to form around two objects at the same time can be challenging, several factors play into it, leading one is how thick a leather you are using (also who's leather is key too) I stopped taking combo orders as they are labor intensive and just a pain to make as well, frankly.

For some other tips that you may want to consider to use in this build, check this tutorial I made a while back

So there are no tutorials regarding making them, but here's a rough idea on the process;

I take some bubble wrap, small bubbles, to use that to figure out how much leather I'll be eating up, the bubble wrap will provide a close approximation to the leather thickness and you can easily bend it around your objects, usually a knife and a light.

Now my sheaths also have the belt loop folding down behind the sheath, so it's part of the main piece of leather you would be using.

Then the side that wraps around the knife and light will be wide enough to reach around and over the two items, AND end up wrapping all the way around the back where it will be glued and stitched behind the knife.

I form the knife first, leaving the one side to just extend out, and deal with that after I have the knife portion formed. Once the knife side is formed, I will glue it down to the back side, punch in my stitching holes down the center and around the bottom and stitch down the center, stopping near the bottom.

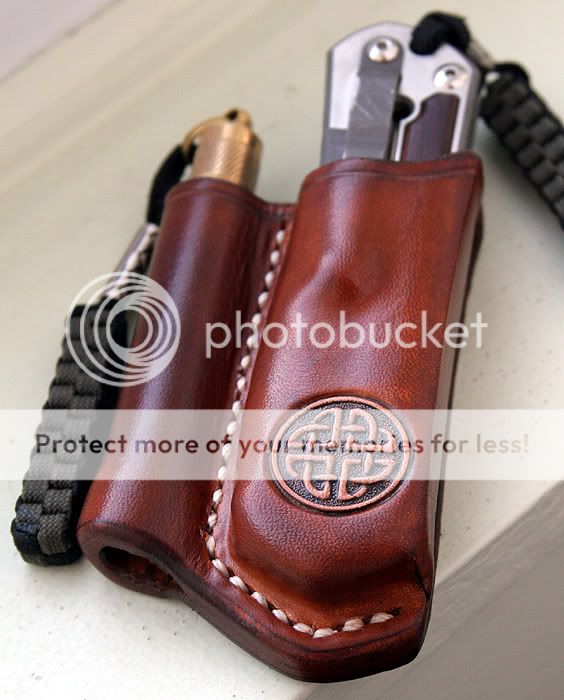
That is just to HOLD the leather in place while I then start forming the light section, it will wrap tightly around the light, pulling the 'tube' around to be close to the knife, keeping things nice and compact as possible. A lot of the smaller lights have no contour, so on the one shown below, I glued in a small piece of leather so the light comes down and hits that and can go no further.

Once the light side is formed, I'll rough up the leather on the back side, removing the stitches first as they did their job keeping things together up to this point. I'll glue the light's wrapped around piece to the back side, and then punch in my holes yet again, just through the same holes that were there and THEN do a final stitch down between the knife and light. When I get down to the end of the light's holder, I'll stop and fold the belt loop flap down behind the knife sheath so that it can be glued to the bottom of the sheath, then punch in those holes and finish sewing around the bottom with a couple back stitches to lock it in place.

hope that helps and makes some sense, but as I say, it's a time consuming thing and often tricky in nature, I'd recommend leather about 6/7 oz thickness and of course I would suggest Wickett & Craig leather, just good stuff.

DC.jpg


G2


Edited to add: Welcome to Bladeforums GiraffeHooves, those look like a lot of work as well, something more suited to a sewing machine but those can be pretty pricey. One thing I'd recommend is when you end your stitches to just back stitch two or three holes and trim the thread off, it will lock in place pretty well by just that.
 
Last edited:
See what I mean about the quality of Gary's combo sheaths .

I made mine differently , because I used two pieces of leather .
I formed the knife first with excess leather out to the side .
Then I glued it onto the second piece of leather which is both the backer for the knife and the belt loop .
Then I formed the flashlight tube and glued it onto the back of the second backer- belt loop piece .
Then copying Gary , I stitched down each side about 2/3 rds of the way , folded over the belt loop and continued stitching .
This is the only photo I could find , but it sort of shows the different layers and order of things .


cc3997c3ac2258d9dd23587ce788f263_zps15894424.jpg


Ken
 
^^^How do you guys do such nice stitch grooves between the knife and the light. ^^^ and that curved groove on bottom. How did you do that? My groover has the side guide that is in my way when I try to free hand a groove. Do I need a whole different tool?


Sent from my iPad using Tapatalk
 
I don't use a stitching groover tool for the sewing, just as a frame line across the opening area of the sheath to anchor the opening.

I will use a pencil to mark the line I want to follow, straight down and around the bottom, for the straight parts I use a 4 prong stitching tool and around the curve I have an old 4 prong that has two prongs broken off and ground the one side so now it is a two prong, which allows you to work your way around a curve easily.

you could also probably use a fork to mark your holes, depending on how far apart the tines are, and then take a small screw driver, like for tweeking trim pots on circuit boards, and grind down the flat bladed end into a nice ice pick shape and then hammer down through the leather using the marks from the fork. Just be sure to keep the screwdriver straight up and down so the holes come out in line on the back side.

G2
 
My kraken book


A tiny black sheath
A small altoids tin sheath


A cigarette and zippo sheath combo


A medium black sheath
Jon's 3 piece sheath


Jon's brown wallet


A brown knife and light combo sheath


A little black zippo sheath


I created my first bushcraft journal. You can switch out the tools and such, but I used known items for size reference.*


Nice work. Have you tried using an edge beveler. That might add a polished look on some of those edges. What are you carving with. I really like some of your carvings.


Sent from my iPad using Tapatalk
 
My husband gave me a burner, so I've been trying to use that for the edges, is that what you mean my it or to make my edges a cleaner cut? I got this engraver tool at harbor freight that I've been using and I've been doing my carvings free hand :) Thank you for saying it looks good!
 
Fresh off of the Hooves line of leather are themed sheaths. Top left to start is: Darth Vader, Bobba Fett, A Dalek, A coffin, A mini skull, a skull, and a zombie. I'll add the details and colors to them along with the trimming this week. *
 
Back
Top