Let's build a forge!!

Joined
Feb 18, 2016
Messages
2,209
I've been stalking this forum for a couple of years now. Obsessively reading, annoying everyone with questions. And I'm honored to try and give back so, here we go!

First here's what were building
I82KRNg.jpg


First: but something to hold everything. This is what I bought
VHjigpA.jpg

It has a handle and feet on what will be the front.

2nd step: take and angle grinder and cut the front off right behind the weld. Dont worry you'll see it. Then measure 12in back, make a line cut again. It should look like this:
ahJeT9M.jpg

Cut the brass air outlet out or if you can just unscrew it.

3rd: cut a hole at about 2oclock going almost straight in so it the flame will swirl. The hole should be half an inch bigger than whatever your burner pipe is. In this case my burner is 3/4 in so I cut a 1 1/4 hole. (10 Bucks for a hole saw at home depot)

4th: insert a 2in piece of pipe the diameter of your hole. And weld in place. (If you dont have a welder forget the 2in pipe and buy this:
aEfBdNn.jpg

Put it in upside down and screw it on)

5th: buy some 2in thick 12x24 kaowool i got mine from iyaknowsbest on Ebay. Really fast shipping and hes a good guy. Link to his Ebay store: https://ebay.com/usr/iyaknowsbest (with my particular air tank, the kaowool was just a couple inches too short In diameter. Luckily this guy also sells 2in sections. For this reason so just go ahead and get one while your at it.)
Put on some gloves and probably a respirator. Roll up the kaowool and shove it in your forge.
Now you got something like this
ifdkUfV.jpg

(Note the gap on top, not good)

6: take your refractory cement (Mizzou, satanite, greencast, kast-o-lite) and coat the kaowool. (I suggest buying a rigidizer to saturate the wool first. I didn't and I regret it. Learn from my mistakes)
I used 5 lbs of kast-o-lite and got it from here: https://hard-luck-forge-supply.myshopify.com/ they also sell rigidizer. Best prices I saw and free shipping. (Refer to their website on how to properly mix and apply your refractory)
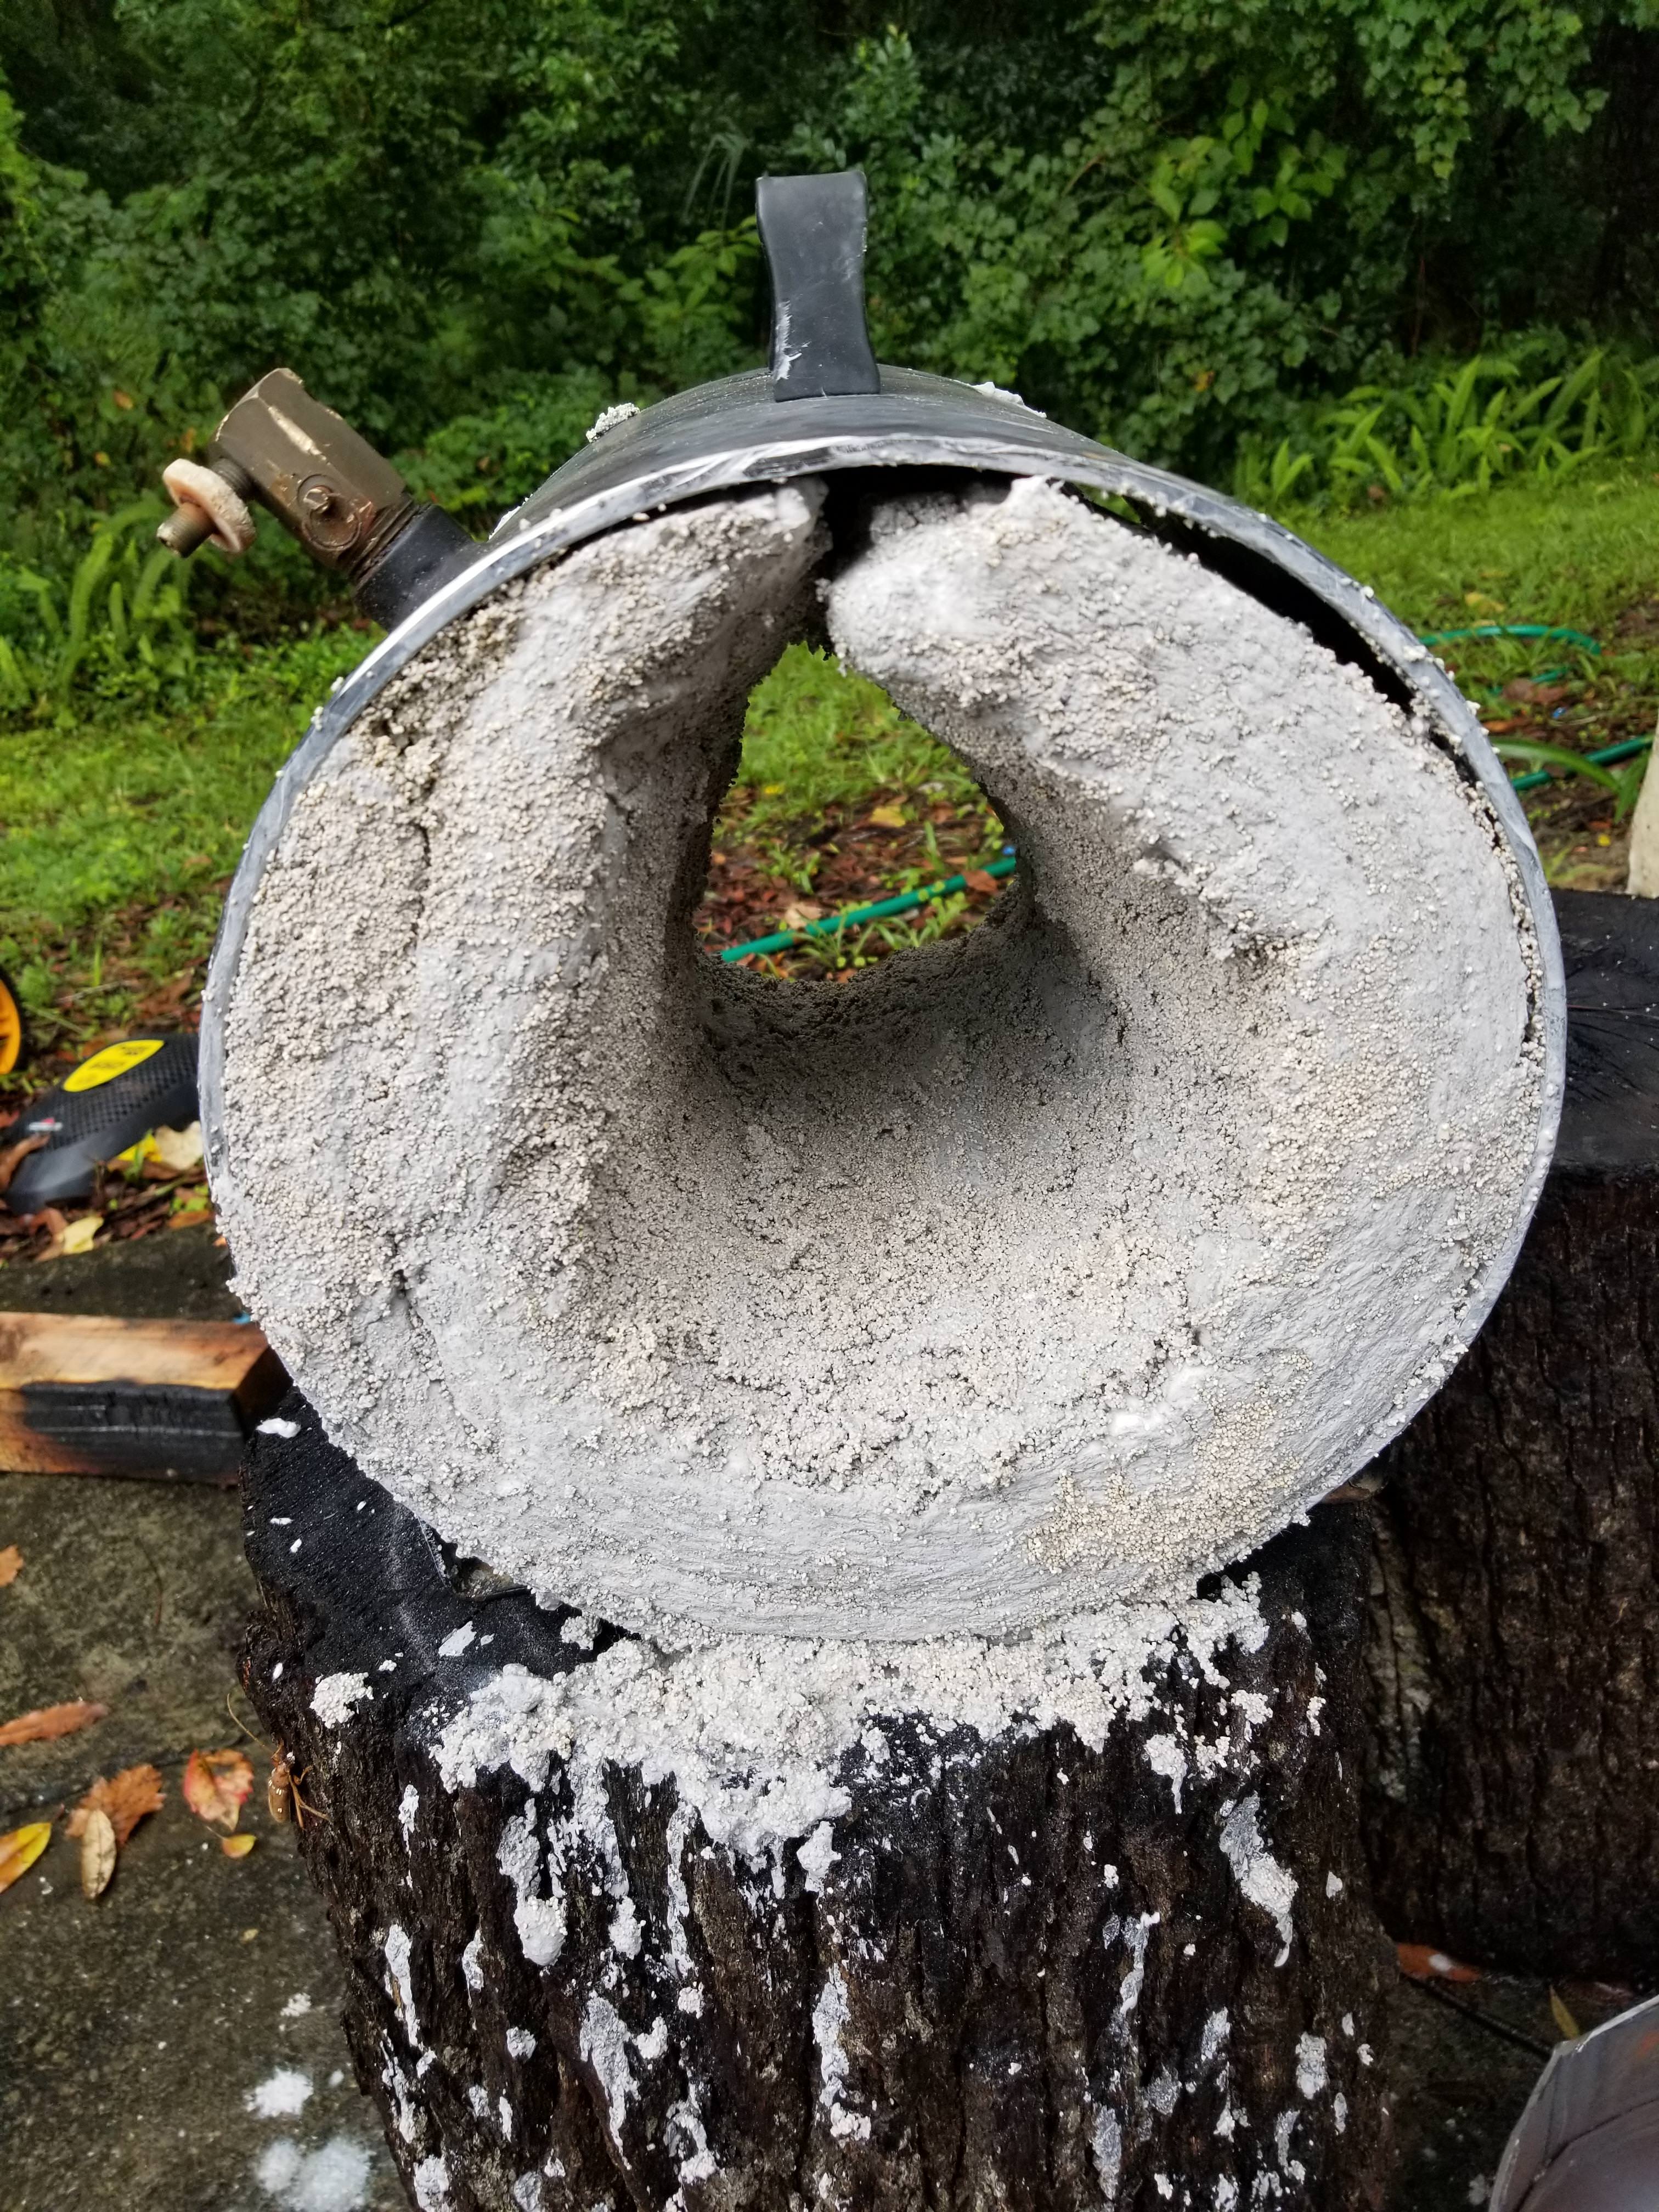
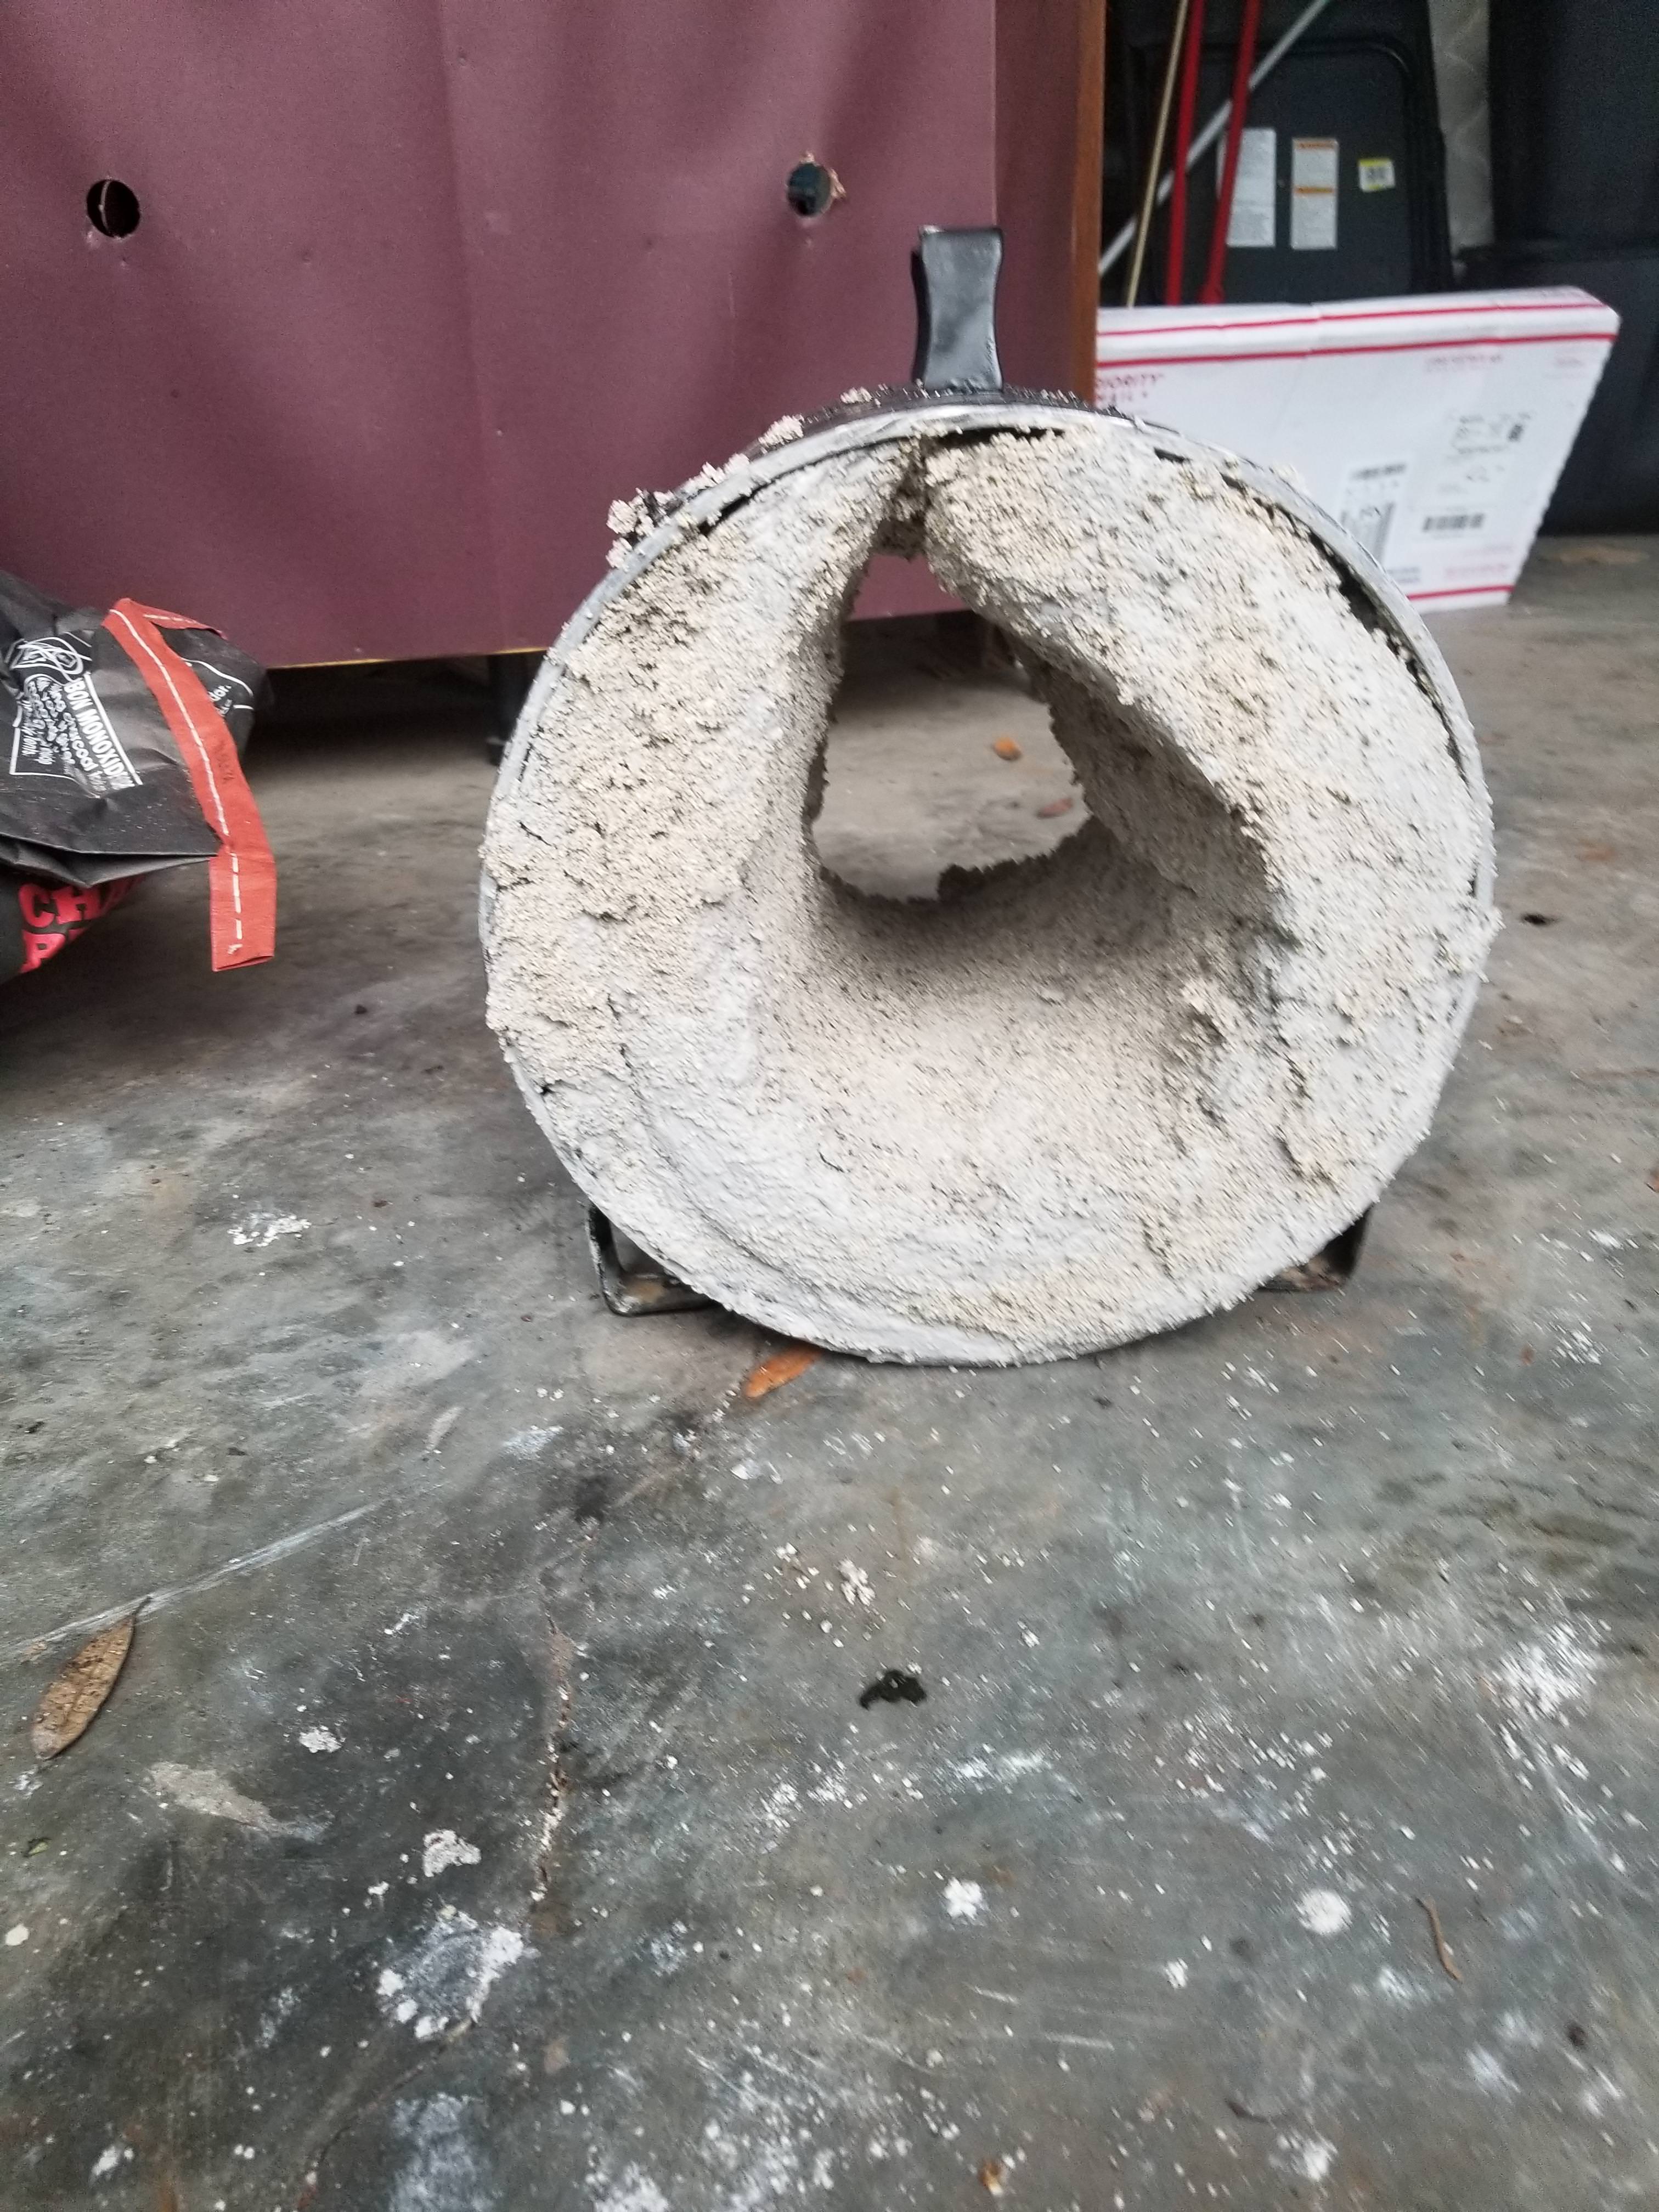
Now we have something like this
CwokajE.jpg

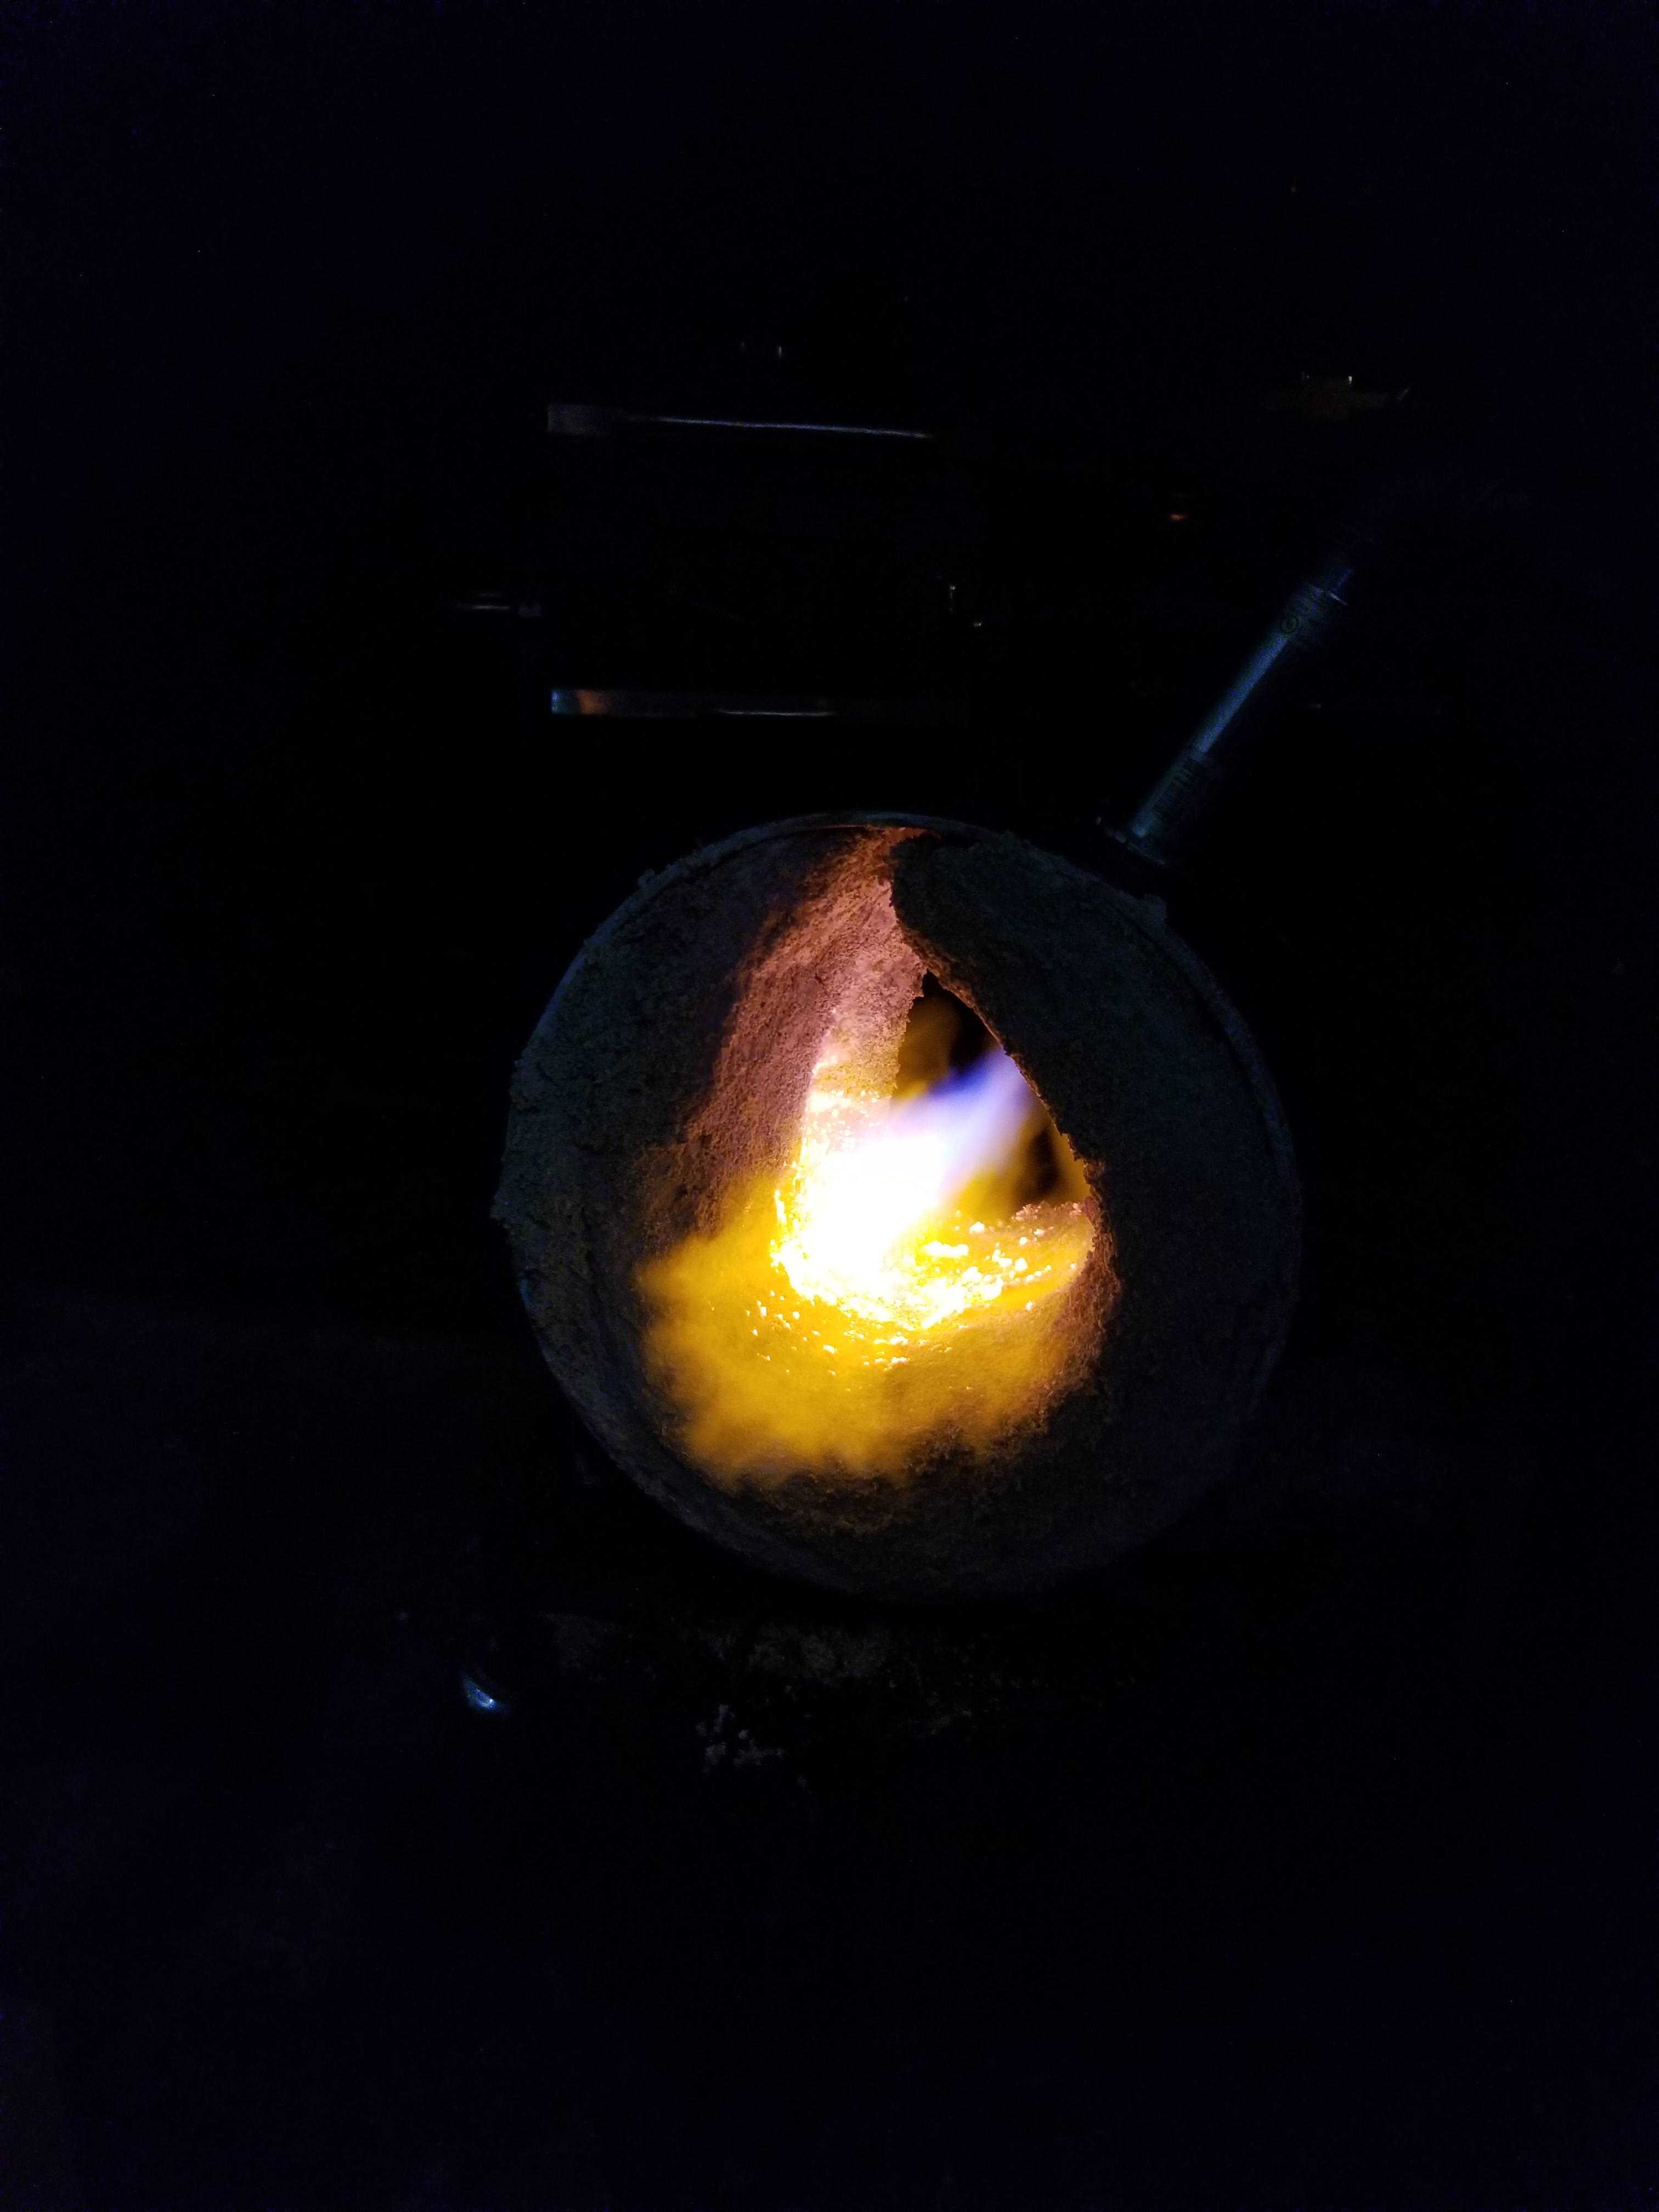
After you make one decently thin coat let it sit for a couple of hours. Then crank on the forge for a minute or so and "bake" it on.
2nd coat:
wsO4j5Z.jpg
do this 3 times.
I'm about to go in the shop and apply my 3rd coat, let it sit overnight (its 1am here) and turn on the burner for the final "bake" tomorrow.
If you plan on heat treating in your forge I suggest buying a muffle, thermocouple and pyrometer.
Muffle is just a pipe that fits in the forge. Blade and thermocouple go in pipe. Pipe gets hot and evenly heats the blade. The thermocouple is sitting next to the blade so your getting an accurate reading on the temp of the blade. This way you can optimize your heat treating process.
Thermocouple I plan on buying: https://www.omega.com/pptst/KTSS_JTSS_chb.html?bt=cart
It's the omega type K thermocouple with their XL ceramic sheath. Part number KTXL-14U-12.
Pyrometer will be
https://www.lightobject.com/mobile/JLD7100-PID-Temperature-Controller-P44.aspx
The thermocouple and pyrometer set up was recommended by @Ed Caffrey
On his website here:
https://www.caffreyknives.net/forge_pyrometer.html

EDIT to add: I plan on buying 3 hard brick firebricks 2 to close up the back and 1 as a forge floor.
And that should do it. This is is my first forge build. I'm sure it's far from perfect but its functional. And will serve me well for years. If you see an area I can improve please let me know. I hope this helps someone.
I'm a huge proponent in giving back to this community. I've got so much information I'll never be able to repay most of it.
 
Last edited:
I know hindsight is 20/20 but I wish you would have posted about your build befor you started. I see a hand full of things that need addressing. First up is your lining. You went WAY to thick on the wool. I will say this and I hope others in the future reading this remember this. NEVER buy 2” thick wool, especially if your wanting to line a round forge with it. It’s much better to use 1” thick wool and do a few layers. This alows you to over lap the seam and have a nice round chamber. The 2” stuff just bunches up and messes up that perfect round shape you need. If what you are showing is corect you have 4” of wool on each wall. That’s way to much, 2” total per side is about perfect. I have even done forges with 1” of wool. This just requires 2 1” thick sheets and gives you plenty of room inside. With the mass of all the castable refractory you used it’s going to be difacult to get a even temp from front to back. I’m not talking for heat treating just general forging. Also I would not have cut the domed ends off the tank. I would have measured the tank diameter and subtracted 4” and cut that size hole in each end. This would give protection to the wool liner. Then weld on some angle iron to hold your fire bricks in place.

I hate to tell you this but I think that forge is going to give you nothing but problems and will drink propane like it’s going out of style especially if your wanting to weld with it. If anything you need to close up the upper section of the wool with more wool and seal it. The heat is going to go right up there and burn right through your steel shell.
 
Sadly, this isn't the perfect build for new folks to want to copy. I applaud your desire to build a forge and share the build, but there are some serious issues:

Wool to thick for one layer- I agree with JT that two layers of 1" wool would be far better idea.

While your refractory will work, Kast-o-lite is a poured refractory that is better for a cast liner on a big forge. Satanite would have been a far better choice for lining the wool. As your forge is now, it will take a lot of propane and a long time to heat it up ( fully soak).

As JT pointed out, cutting a 4" hole in the tank ends would have been neater and given a longer work area. As it is, you should pile up some fire bricks at the back to make an end … and maybe at the front as a shelf.

The gap in the top is a big problem. Filling it with kast-o-lite won't stop the problem. You should have pulled the wool out and stretched it some or plugged the gap with some extra wool. The liner needs to be tightly together with no path to the shell. That is why a double layer is better.
A double layer would also have made a rounder chamber.

It looks like you will barely have room to stick a muffle in the forge. The chamber needs to be about 3 times the muffle diameter.

It should work for forging, but I bet you end up wanting to make a new one that is better before long.
 
Now you got something like this
ifdkUfV.jpg

(Note the gap on top, not good)
Ok , I would be the one who will tell to you this......You're not serious at all.You're not serious with knife you make , you're not serious with this thing ! You should stop and think little what are you doing !Don't waste your time and money on unfinished things you try to make !After two years and zillion question I still not see even one knife from you done properly .And you obviously not take for serious advice that you get here.There was thousand of thread here how to make that forge and you do this????????? I do not know how my post sounds in English , I just try to help to you to see what are you doing . Sorry if this sound like
insult .
 
Valknut,
I know these posts seem unfriendly, but we are just trying to pint out serious problems with the forge. Don't take them as attacks, just friends telling you what it takes a friend to say.
 
Hey harsh reality is what we need sometimes.
The gap I top I addressed and got a 2in piece to fix. Guess I've just missed read everything cause I've always seen 2in kaowool. All good.
Kast o lite was what was reccomend to me by the guy I bought it from. I'll buy satinite next time

Natlek. Obviously I'm serious about this or I wouldn't be here every day and bust my butt every chance I get. I'm not the fastest learner. l

So I'll just start over. Feel free to close the thread stacy so beginners dont copy me and make the same mistakes.
 
Since its 2in thick and I only need 1 in. Can I cut it in half? Or at least peel off a couple of layers where the kast o lite is then apply rigidizer to keep the fibers down?
For the front and back I can just take some self tapping screws and a couple of hinges and the front and back plate are on and I can open it up for long work. J just dont see me needing bigger than a 12in forge.
If those things work I'll be good if not I'll toss everything and try again from scratch
 
Rigidizer is a joke in my opinion. I bought it once and consider it a waste of money.

Where you're at I think it's repairable. You can strip your coating, you'll lose a little layer of wool, then use that to form 2 hemispheric pieces into one single contiguous layer. Or if you oriented ther gap towards the bottom and enlarged it you could pour a castolite floor.

You can salvage these materials and still get this done right. I would get satanite for lining as well. I wouldn't have cut the ends like you did but building fire brick doors solves that.
 
Thanks john, that's what I was hoping for.
I have stated in the post but I know there's a gap and I have a 2in wide 12in long piece of kaowool I ordered to fill it so I didn't think that would've been a problem. But I'll use it as is till payday and get some hard bricks and satanite
 
Thanks john, that's what I was hoping for.
I have stated in the post but I know there's a gap and I have a 2in wide 12in long piece of kaowool I ordered to fill it so I didn't think that would've been a problem. But I'll use it as is till payday and get some hard bricks and satanite

I understand but since you've already applied refractory I don't know how you think you'll get that installed satisfactorily. I'm also confused now, that doesn't appear to be 2" thick wool, it appears to be 2 layers of 1" thick. Which is it?
 
Well if I can peel off the top layer of the wool with the coating then I will add In the 2in wide piece I should have enough to not have a gap.
It's a single 2in thick piece of wool.
 
This is not too far off of how we make forges. (We dont limit ourselves to knives btw.) But the gap goes at the bottom, gets filled in with cast refractory or firebrick. (I like hard floors) but unlike your hasty job, floor goes in first...
I leave open both ends, allows working from either end by two guys or heating middle of a long workpiece. Ends get closed off by stacked brick leaving whatever opening as needed to suit the task.

Good luck with your rebuilding..
 
You could take a long thin knife and cut the refractory away from the wool and remove it by breaking apart once cut loose. After placing a patch of wool at the gap ... which should be turned so it is at the bottom ... coat with Satanite. After the forge is lined and cured, apply a floor of kast-o-lite to make a flux resistant and flat floor about 3" wide.

A trick to get the wool stiffer is to mix some satanite into a slurry about the consistency of thin sour cream. Spread a good ayer of this over the wool, working it into the surface, and shape the wool into a proper round shape. If you take a rolled up piece of sheet metal, or PVC pipe the right size, oil/wax/grease it up, and set in the middle it will make a perfect round chamber ( it is best to set the forge vertical while the chamber mold is drying to keep things centered). Let it dry for a couple days before removing the chamber mold, then continue lining as above.

When you read 2" of wool, that is usually two 1" layers. I like two layers of the Hi-Z wool for welding forges.
For a simple forging forge 1" of standard wool will work, but 2" is fine if you have it. With wide open ends, the extra insulation is moot anyway.

Get a dozen firebricks ( either soft or hard is OK for ends) and stack/arrange them to make ports at the ends. You can also weld on pieces of angle iron or channel to make door slides for the bricks. Look at some forge builds to see how this is done.

On a round chamber forge the burner should enter at the tangent to the chamber, not straight in. This isn't a deal breaker, but you will have a major hot spot with it coming in straight. Normally the burner is placed at the front about 25% back and angled about 20-30 degrees rearward to cause the flame to swirl around the chamber walls.

This is all covered in detail in the forge building info in the stickys. Also, using the Custom Search Engine in the stickys will get you hundreds of forge build threads with a lot of good advice. I really
 
Took the 2in kaowool and pulled it in half. To make 1in kaowool like JTknives JTknives suggested.
Filled front and back with extra kaowool and filled the gap
h13NvPp.jpg

9VvYFZn.jpg

3O0OfRc.jpg

Now just have to wait until the 1st for payday to get satinite.

So I fixed the gap, fixed the front and back holes, removed the excess kaowool and refractory.
Anything else?

I dont want anyone to think I take their advice for granted. It's all very appreciated
 
Don't want to 'jack Justin's thread, but have a question. How is say, 3" of wool detrimental versus 1 or 2"? What are the negative effects of it being a little thicker? I ask because I either need to get a smaller pipe or add another inch of wool. I'd like to keep the 20# tank with the ends it has, vs going with a pipe with flat ends.
If this is intrusive here, let me know, I'll move it or mods please move.
Thanks

Well, more insulation is better, except, he wants to run a muffle tube inside his forge chamber for heat treating, and with the size of his chamber diminishing with every layer, any reasonable muffle tube would have had very little open space around it, so that would have been problematic.

Regarding 1" thick wool or 2" thick wool, 1" just lays down much nicer/easier. If you wanted a typically sized forge with 3" of insulation, you'd be much better off laying down 3 layers of 1" wool. In something the size of a Fogg Drum forge, you can do 2" thick wool because the large radius makes it easier.

Multiple layers of 1" can also make relining in the future less expensive, since the majority of the damage you do will only be to the inner most layer. You could likely reline a forge for a lifetime without ever touching the exterior layers.

So, 1" of wool is sufficient for a small to normal sized forge. 2" is arguably better, and the larger your forge is the better the argument for more insulation. 3" is probably over kill for just about anything. And whether you're doing 1, 2 or 3" of total insulation, using 1" thick wool in layers is the best way to do it.
 
Back
Top