Little Giant Evaluation

Joined
Feb 27, 2008
Messages
264
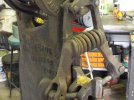
Some folks awhile back wondered about what to look for in a Little Giant hammer and since the Annual Little Giant rebuild class was last week I took some photos of what to look for when evaluating a Little Giant purchase.

The first three photos show various things that can be wrong on the front end. If you notice in the first photo where the toggle link is hitting the ram guide. Also the ram guide is repaired and cut off.

The second photo shows were a toggle arm has been repaired, also where the ram has been repaired. If you look closely you can see that the pins are all worn quite badly. The spring has actually been rewelded but it's on the back side.

The third photo shows extremely short dies and if you notice the ram guide has been cut to allow the toggle link proper clearance.

Most of these problems are caused by short dies and a weak spring.

I've got some more photos of various problems, but I thought I'd weight general interest before I get to in depth with anymore.

Dave from Diller
 

Attachments

  • hammerschool2011 002.JPG
    hammerschool2011 002.JPG
    54.9 KB · Views: 207
  • hammerschool2011 003.JPG
    hammerschool2011 003.JPG
    57.9 KB · Views: 195
  • hammerschool2011 014.JPG
    hammerschool2011 014.JPG
    74.9 KB · Views: 190
I found a 1913 Little Giant, I got her home and then ordered the re build video:eek: Looks like I will be ordering all kinds of parts. I will have a nice hammer when its done :D I need to call and find out just how much its going to cost me to get her going..
 
Color me interested. I have to go look at one soon. I was intending to research what to specifically look for/at in an LG.
 
I have a 50# LG that I rebuilt last year including pouring new bearings. First time doing that in my 65 years. Made a number of improvements including new dies. Hammer works very well now, hits hard and rund smooth. I would be interested in any pictures/info from the class. Sid was helpful over the phone, even one time right after his wife passed away.
Chip Kunkle
 
Dave,

With the current demand, we're lucky to have resources like you & Sid. Thanks for posting.

Keep up the good work.

Judging by the number of machines in the background of the pictures, you have plenty of projects to keep you busy.
 
I started rebuilding a Canadian giant a couple years ago and Sid took the time to explain how to pour new babbit bearings and what else to look for. He was so helpful and willing to share his time an knowledge. A real gentleman.
Jim
 
Thanks for sharing: you have worked with one of the finest gentlemen in the knife community, Please keep the photos coming.
 
Thanks for sharing: you have worked with one of the finest gentlemen in the knife community, Please keep the photos coming.

Ed hit the nail right on the head!

I'm proud to call Sid, Kerri and Dave friends.

Dave, do keep the info and photos coming. This is very good stuff!
 
Great Post, better timing. Last week I finally convinced the equipment dealer to sell this 50# Canadian Little Giant he had in the back of his shop. He replaced the arms, spring and other parts 5+ years ago and its has been collecting dust ever since. The only damage I can see is around the bottom die. But speaking with Sid and Kerri it is minimum and should not affect performance with a proper set of dies.

What dies do you prefer; drawing, flat or combo?


I hope I inserted these pictures right...

Dennis
 
Last edited:
Ed and Don have it figured out.

We've just returned from a birthday party for Sid's son John. One gentleman came all the way from Roswell, New Mexico and brought alien beer. Sid and John are headed for the Eugene show next week, so the store will be in Keri's capable hands.

Okay now on to the next set of photos.

The first and second photos show the lack shims in place for your main bearings. In most cases you could just remove an amount of shims and have the main bearings tight again without re pouring them. But in cases where there are no shims there's a quick way to check if they are going to need new ones. Place a board or any solid object between the top of the ram guide and the fly wheel up front and pry up. If there is any movement they will need to be replaced. Doing the same on the rear will tell you the condition. When purchasing a hammer this is an important part. Re pouring is not a complicated procedure but one that takes some studying and preparation.

The second photo also shows something that I take quite serious, but which is a minor fix. If you'll notice the gap between the clutch collar and the groove in which it sets in the clutch. In some cases I've seen that the collar has almost cut off itself off. In this case it is just from the lack of grease or oil. The clutch is constantly spinning on the clutch collar when the hammer is operating. My main reason for concern is that this can be a costly repair because new clutch casings are not being made. The easy fix is to just drill and tap the ear on the clutch collar for a grease zert and grease it every time you fire the hammer up. Little Giant originally made no consideration for this. This is one of Sid's standard additions to his new rebuilds.

Thanks for your interest. More to follow.

Dave from Diller
 

Attachments

  • hammerschool2011 004.JPG
    hammerschool2011 004.JPG
    66.6 KB · Views: 80
  • hammerschool2011 015.JPG
    hammerschool2011 015.JPG
    44.3 KB · Views: 81
Dennis,

On the subject of dies it really depends a lot on personal preference. Sid recommends drawing dies, Don I believe prefers what we call a euro style die which is a die with a slight radius (a very gradual drawing die), I myself have worked enough with flat dies that's what I like. The one thing that we all agree on is that they must be align properly in the hammer. Meaning that front to back and side to side must line up.

One thing that I did forget to mention about the first photo in the last set is when you get your new hammer home don't forget to replace the grease zert in the rear. Which that one is missing. I had a good friend from Iowa watching me work over another friends hammer and never realized there was a grease zert there. A word of caution though don't just throw a grease zert in there and start pumping. Like he found out that pushes all the old dried out grease in your clutch bearing and locks your hammer up. The clutch will not disengage.

Dave from Diller
 
Your clutch looks better than any of mine. They had a tough life before coming to the Willow Bow. I use chain saw bar oil on the clutch and the rest of the hammer where there are no zerts, just a drop or two on each side of the clutch ring every time you use it, it will throw oil off, but that is just one of the joys of the hammers.

I put some sheep wool in the oil cups on the top, this allows oil to soak through to the shaft and keeps grit out. Felt pads also work, but clog up quicker.

I absolutely agree with you about the very gradual drawing dies, if you are following my series on "Myths" in blade you will know why in a few months. The more well planned hammer blows you provide a blade at the right time and temperature the greater the performance potential of the future blade. Flat or dies with a very slight radius will allow you the opportunity to provide more hammer blows to get the blade forged.

I read one study where they compared steel worked with a hammer to steel worked down with a press, the hammer provided greater grain uniformity than the press.

Radical drawing dies can leave potential stress raisers in your blades.

That is one nice looking hammer, don't recon you will wear it out having noted your interest in taking care of her.
 
The best way to remove the old grease is to remove the whole top assembly and separate the clutch pulley and clutch spider. You can do this by yourself on a 25#er, but a 50 will take two guys and a 100 will take an engine hoist.

A side note here and I will try to come back to it later is if the clutch is located in the center it was originally set up to run on a line shaft and if the clutch is out the rear it was set up to run on an electric motor. The second option allowed for ease of belt changes.

Ed, On a note of clarification I haven't posted any pictures of my hammers yet. The photos that I've been referring to so far are all of hammers that Sid has around the shop in Nebraska City.

Thanks

Dave from Diller
 
Tonight's selection of photos show some problems and corrections that can be made in sow block area. The first photo show how much of the sow block area under the die that can be removed and how to correct it. The problem was cause by undersized lower dies. The action of the hammer literally drove the die into the sow block. To correct this Sid took his handy angle grinder (for farriers the electric rasp) and removed material until every thing was level. A simple depth gauge can be made with a piece of threaded bar stock and a bolt to control depth. Then all you have to do is replace the material removed with an appropriate size shim. No welding or drilling is needed for this shim. The die, die key and the relationship to the dove tail with hold this in place.

The second photo shows the extremes some folks will go to keep their die keys in place. Sid has a very good tutorial on his website that deals with die key adjustment.

Thanks for your interest

Dave from Diller
 

Attachments

  • hammerschool2011 006.JPG
    hammerschool2011 006.JPG
    74.9 KB · Views: 57
  • hammerschool2011 007.jpg
    hammerschool2011 007.jpg
    73.1 KB · Views: 70
Back
Top