Longitudinal striations on Hamon?

Joined
Dec 28, 2022
Messages
104
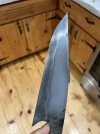
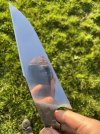
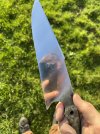
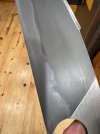
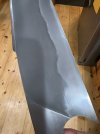
Did my first Hamon today on 1075 steel and I am very happy with the results. It’s tempered and I’ve done some post heat treat grinding up to 400 grit and did a quick dip in ferric chloride to see what the Hamon looked like. I noticed some longitudinal striations on the blade that run opposite of the direction belt scratches would be going. I have hand sanded the other side of the knife a bit to get deep scratches out and I’m still seeing these longitudinal lines. Does anyone have any idea what here are from? I have never had them on any of my knives before. thanks for any help!
Mason Ostrom
 
Stock removal only. And I’m a bonehead cuz I forgot the pictures. Here we go. To be clear, the circles are has not been sanded in that direction at all.
 

Attachments

  • IMG_3634.jpeg
    IMG_3634.jpeg
    364.9 KB · Views: 9
  • IMG_3632.jpeg
    IMG_3632.jpeg
    351.7 KB · Views: 12
All conventionally cast wrought steels have some carbide or alloy banding, depending on the forging and rolling practice from the mill, it can be pretty severe. Careful forging, normalizing, grain refining and annealing can eliminate most or all of the coarse banding. It can affect toughness sometimes but not something to worry about unless you don’t like the look of it.

Hoss
 
Those sort of look like lines from earlier grinding with a coarse grit. They can be much deeper than you think. Finer grinding makes them seem to be gone, but the bottoms are still there. Was the stock flat ground by you or the seller?
 
It was not. Plus the lines are on the bevels which I ground edge up on the belt grinder. Nothing going tip to tail as far as abrasives go. BTW Stacy, thanks for help with the Hamon. I’m happy with how it turned out for my first go.
 
Hmm, It sure looks like grinding lines. Also, you say 400 grit? The other lines don't look that fine either.

Try taking it to the hand sanding board and start at 120 grit. Take all the surfaces down to a clean look and then go 220-400-800. See if they go away.
 
  • Like
Reactions: HPD
Hmm, It sure looks like grinding lines. Also, you say 400 grit? The other lines don't look that fine either.

Try taking it to the hand sanding board and start at 120 grit. Take all the surfaces down to a clean look and then go 220-400-800. See if they go away.
The other side of the blade (in the other picture) is hand sanded completely down to 400 grit. The side in the first photo with the red circle has not been hand sanded yet. I should note also, the longitudinal lines do not catch a fingernail if you run one across them.
 
Usually when I see a post with a subject of weird longitudinal lines, even without seeing photos my mind almost always go to carbide banding.

Without hearing you mention that there was NO grinding in the tip to tang directoin, I would be right there with Stacy, it really does look like a very coarse scratch pattern. under the vertical finer polish. But, I'll take your word for it that there was no grinding/sanding in that direction.

WOW. If that's banding, I would call that extremely coarse banding. It's so often hard to tell these things in photos, tho. Alloy banding and grain size are hard to really make out with a 2d photo and not being able to hold it in hand and turn it around under different light.

I'm curious as to what all heat treatment this blade saw. I'm guessing just an austeintizing cycle and tempering?

Side note......I watch a show on Discovery called Moonshiners, produced by a fellow by the name of Matthew Ostrom. No relation, I don't suppose? I LOVE that show.
 
Yes just austenitizing at 1450. Was only in the over for 6 minutes total. Then tempering at 300 degrees.
 
New photos: I reground back to 120 on the belt grinder to start over the finish process as well as to thin out the edge a bit more. I went 120, 220, 400, then grey surface conditioning belt on the grinder. I then went 400, 600, 800, 1000, 2000 grit hand sand. It was near mirror finish before etch. I did a short etch. Only a couple minutes and the lines are back, so I’m presuming it is carbide banding.
 

Attachments

  • IMG_3650.jpeg
    IMG_3650.jpeg
    450.1 KB · Views: 7
  • IMG_3649.jpeg
    IMG_3649.jpeg
    432.9 KB · Views: 7
  • image.jpg
    image.jpg
    377.4 KB · Views: 6
  • image.jpg
    image.jpg
    343.7 KB · Views: 6
Its off topic, but that sharp tip at the heel looks unsafe for the user, you might consider removing some of it.
 
What FredyCro said. I've managed to nick myself on the heel of regular exposed edges before. I can't imagine how many times I would stab myself with that pointy heel!
 
This was pre sharpening and finishing. I put a slight radius on that heel edge to help prevent accidents.
 
Back
Top