- Joined
- Aug 27, 2004
- Messages
- 12,955
Someone asked me last night before going off to bed if I ever did a start to finish or progress picture type thread for a low rider clip and it dawned on me that I had not. I have shared what I know and do with makers and end line users privately that wanted to make their own or just wanted to know how I did mine but never have I gone through it here or on any of the other forums.
So, I guess its about time.
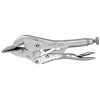
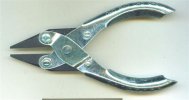
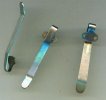
To make pocket clips is not all that much rocket science really. It requires some basic metal working tools, a dremmel, band saw, 1x30 bench sander, and for me a bead blaster cabinet and compressor. Seen below are the hand tools I use. Two pair of Duck Bill Vice Grips AKA sheet metal tools, and one nice heavy duty pair of jewelers pliers. If you have these things and some time you can make your own clips quite well actually.
Usually I just get one clip per day or sometimes a couple. Many of the ones I've made have become so redundant that I rarely post them anymore unless they are solicted off this forum directly because it just uses up picture space and seem too much repeat. But today I have three to make so I may as well use those for my step by step.
Normally I take the factory clip off because that is necessary for me to mark and drill my new holes. Its also helpful to have the actual folder or a template of that folder handy so you know where to mark the fold over but we'll get to that. I've made clips using card tracings of the knives for guys overseas that didn't want to risk shipping the knives and that will work also. I just want to stress it is critical that you mark the hole positions accurately.
To drill I most always use a #44 drill bit for this since that is the correct size for most pocket clip screws. Occasionally on a Japanese model it will need to be slightly smaller or slightly bigger so sometimes it can call for a #48 drill which is smaller than a #44 and other times a 3/32 or or number 42 that is a bump bigger in diameter.
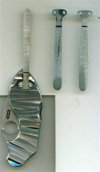
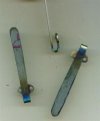
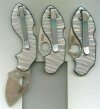
These here are all #44 holes for the little Lavas by Spyderco I have here. I make these so that they can of course utilize the existing holes already threaded into the knives whenever possible. As you may note from the picture I pay little attention to being artistic or neat here for the rough tracing of the pattern I intend to cut out. Its a rough guideline for my band saw when I cut them and most all the trimming is done by hand or with my belt grinder. A blaze orange belt will trim these down right quick on my KMG but it moves along a bit too fast even at slow speed for something this thin and it is really overkill so I use my Harbor Frieght 1x30 sander for most of this work using a nice fresh ceramic 80 grit belt on it. For some reason that sander seems better to me than the big one for these smaller projects.
Step one is to use the original clip with two screws to stick it on my titanium sheet and trace out the general shape with my sharpy. I flip that clip so its upside down because remember it will fold over so the mounting point will be opposite of how it sits when flat.
Also you may note that I have marked the grain on my ti sheet. Someone in the titanium business told me once that it was not necessary to even worry about which way the grain went with titanium because it did not matter. I believed that for about a week. It might not be a big issue which way the grain goes with titanium thicker than .040 like I use for my fold over clips. I really can't say but based on what I have learned folding over my pocket clips I know now it sure does matter which way the grain goes when it comes to a thin piece folded over like I do my clips. I have found that if I try to fold over a titanium clip against the grain that it will break the majority of the time causing me undue time and frustration. I would say based on this that you have to know which way to fold it over so it goes with the grain of the sheet you cut the blank out of. If you can't mark this ask Halpern or whoever you buy it from to do so for you before they ship it out.
Also, you can try .050 thickness titanium if you like and if you dare but I could tell you blind folded if thats what you gave me to bend. Its a night and day difference in difficulty to bend anything over .040-.044 by hand in my experience and the % of tearing and breaking increases with the thickness increase making it progressively more and more difficult to make sharp bends and particularly fold overs. With that said I have successfully used .050 thickness for standard style or non fold over style clips without difficulty and without the need for heat to make the bends.
Anyway, getting ahead of myself here. Stay tuned you see these come to fruition here the old fashioned way by hand. Is there a better way? Oh maybe so but this is how I do it and it works for me. If you have a jig or some other equipment have at it. Each of mine are one of a kind unique to themselves handmade clips though.
Thanks for watching.
Oh and Joe thanks for asking if you catch this. I know you don't post much but here it is.
STR
So, I guess its about time.
To make pocket clips is not all that much rocket science really. It requires some basic metal working tools, a dremmel, band saw, 1x30 bench sander, and for me a bead blaster cabinet and compressor. Seen below are the hand tools I use. Two pair of Duck Bill Vice Grips AKA sheet metal tools, and one nice heavy duty pair of jewelers pliers. If you have these things and some time you can make your own clips quite well actually.
Usually I just get one clip per day or sometimes a couple. Many of the ones I've made have become so redundant that I rarely post them anymore unless they are solicted off this forum directly because it just uses up picture space and seem too much repeat. But today I have three to make so I may as well use those for my step by step.
Normally I take the factory clip off because that is necessary for me to mark and drill my new holes. Its also helpful to have the actual folder or a template of that folder handy so you know where to mark the fold over but we'll get to that. I've made clips using card tracings of the knives for guys overseas that didn't want to risk shipping the knives and that will work also. I just want to stress it is critical that you mark the hole positions accurately.
To drill I most always use a #44 drill bit for this since that is the correct size for most pocket clip screws. Occasionally on a Japanese model it will need to be slightly smaller or slightly bigger so sometimes it can call for a #48 drill which is smaller than a #44 and other times a 3/32 or or number 42 that is a bump bigger in diameter.
These here are all #44 holes for the little Lavas by Spyderco I have here. I make these so that they can of course utilize the existing holes already threaded into the knives whenever possible. As you may note from the picture I pay little attention to being artistic or neat here for the rough tracing of the pattern I intend to cut out. Its a rough guideline for my band saw when I cut them and most all the trimming is done by hand or with my belt grinder. A blaze orange belt will trim these down right quick on my KMG but it moves along a bit too fast even at slow speed for something this thin and it is really overkill so I use my Harbor Frieght 1x30 sander for most of this work using a nice fresh ceramic 80 grit belt on it. For some reason that sander seems better to me than the big one for these smaller projects.
Step one is to use the original clip with two screws to stick it on my titanium sheet and trace out the general shape with my sharpy. I flip that clip so its upside down because remember it will fold over so the mounting point will be opposite of how it sits when flat.
Also you may note that I have marked the grain on my ti sheet. Someone in the titanium business told me once that it was not necessary to even worry about which way the grain went with titanium because it did not matter. I believed that for about a week. It might not be a big issue which way the grain goes with titanium thicker than .040 like I use for my fold over clips. I really can't say but based on what I have learned folding over my pocket clips I know now it sure does matter which way the grain goes when it comes to a thin piece folded over like I do my clips. I have found that if I try to fold over a titanium clip against the grain that it will break the majority of the time causing me undue time and frustration. I would say based on this that you have to know which way to fold it over so it goes with the grain of the sheet you cut the blank out of. If you can't mark this ask Halpern or whoever you buy it from to do so for you before they ship it out.
Also, you can try .050 thickness titanium if you like and if you dare but I could tell you blind folded if thats what you gave me to bend. Its a night and day difference in difficulty to bend anything over .040-.044 by hand in my experience and the % of tearing and breaking increases with the thickness increase making it progressively more and more difficult to make sharp bends and particularly fold overs. With that said I have successfully used .050 thickness for standard style or non fold over style clips without difficulty and without the need for heat to make the bends.
Anyway, getting ahead of myself here. Stay tuned you see these come to fruition here the old fashioned way by hand. Is there a better way? Oh maybe so but this is how I do it and it works for me. If you have a jig or some other equipment have at it. Each of mine are one of a kind unique to themselves handmade clips though.
Thanks for watching.
Oh and Joe thanks for asking if you catch this. I know you don't post much but here it is.
STR