Lucky find - ash root burl

FredyCro

Basic Member
Joined
Jan 11, 2019
Messages
1,484
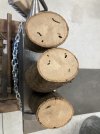
Just wanted to show off the ash root burl that I accidently picked up after visiting a neighbor of our country house. He was clearing his olive garden last couple of years, and had this dry ash root burl kicking around waiting to get thrown away.

Good parts of it look to have the prickly spots indicative of a burl but I never cut a root burl so I am really excited what will I find. Just need to find someone with a LARGE bandsaw now.

36SBfug.jpg


What do you think? Anybody split an ash root before?
 
I’ve cut oak root. It wasn’t burl, but it was a forearm-sized runner from an old blowdown. Here’s what it looked like:


IMG_1142.jpeg

IMG_1143.jpeg

IMG_1144.jpeg

Yours will probably look nothing like those, but it was interesting (and makes perfect sense) how open & fibrous the root was. Not dense oak, but more of a balsa look & texture. Ash may be completely different, and I’m sure where the “root” is on the tree affects that significantly, too. Just thought I’d share. It will be very interesting to see what’s inside of yours!
 
Interesting, I found some oak spaghetti on a oak before and it looked cool.

Yes, this is mostly in one piece which was under earth, so I am hoping for more action. Also it's hard to say from the pic but it has at least half a meter of length and probably about a half a meter diameter at the widest place.
 
It looks pretty dry.
Cut the root burl lengthwise down the center. Then cut one of the half sections down the center again, making a quarter cut. Take one of the quarter cuts and cut it into two pieces crosswise in the center. Look at all the patterns and decide which cut is best. Cut the rest into large blocks to display the patterns you liked and dry for a year or so until below 10% moisture content. If you can borrow a moisture checker or get it checked at the local lumber yard, that would be nice. Even if it is already nice and dry, let it sit for a few months.
Then cut into handle blocks, rest for a month, and cut into scales. Make sure you rubber band the scales together as you cut them, then number each set with a yellow pencil so you can keep the book-matched sets together. 1-1, 2-2, 3-3, etc.
Thats great advice as always. I was planning on cuting off the branches and then see what the best cut is to get the most scales out of the burly looking parts. I will try to document and post as I go.

I was planing to cut through the wide part first in the middle to see if slabbing it by width would give more nicer scales.

This time I will try to cut for quality instead quantity.
 
...and then see what the best cut is to get the most scales...
Not sure if this is exactly what you were talking about, but this comment reminds me of what Ben Greenberg always says, and worth reminding everyone of. Something like: 'always make cuts to maximize the figuring and not to maximize the number of blocks/scales.'
 
Last edited:
I didn't see the dimensions. How big is it - length and diameter.

I generally find that the best pattern and burl shows parallel to and near the surface. So, the cross-cut may show the least. It is also the weakest cut strength wise, as it is all end grain. I would avoid doing that.
That is why I suggested a longwise cut first. Often that is all you need to see. Slab it up from there. As you get closer to the outside the burl gets crazier.

You are right about cutting for quality. If the first longitudinal cut looks good, I would flat saw one half and see what it looks like in the last cuts. This will give you slabs with both directions of burl. One that is parallel to the outside (the last couple cuts near the outside) and ones that are perpendicular to the outside (the firs cuts from the center). Look them over and decide if you want to do the same for the other piece. From these, pick the best slabs and cut them up into blocks. Stabilize some the best ones and set aside the rest for later. After you use the stabilized ones, pick through the rest and set aside what to stabilize next and what to set aside again.
Set the others aside for now and come back later when you have used all the good stuff. Eventually you may decide that some just aren't worth spending the money on stabilizing.

I work in large batches, so stabilize the primo and nice blocks and then keep the primo blocks for myself and sell the nice-but-not-primo ones. The OK-but-not-spectacular blocks make the first fire in the fireplace in the winter. Judy and I call it our $1000 fire. By winter I usually have a trashcan filled with seconds and rejects of expensive wood. Being dry and in blocks they burn really hot and really fast.
wd6Y2mW.jpeg

Ovweyug.jpeg
OynsJ2i.jpg
RDzVoQY.jpg


Thanks! Here some measures and better pics. Does my plan to take off the branches and slab by width make more sense now or not?
 
Or should i cut by length in an angle parallel to the most burly surface?
 
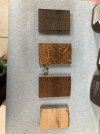
And since it is on topic I am also posting the olive root burl I split two years ago. I have two nice blocks that are dry now and I will cut the blocks from rest soon.

The story that goes with it is even better. My future wife is Sicilian and I was changing jobs, so we went on a trip around Italy. My mission was to find olive wood, so from north till south every place we passed, I was asking around for olive wood. My future wife was already desperate about it.

After reaching Sicily and her family after two weeks, I was almost ready to give up. We were calling around all the timber and wood shop places that we could find on the way and still had no luck.

But as it goes, once I relaxed and stopped hoping, in Argento on the way to beach, hottest week in European history (40-50°C), and on the very day of the national holiday (Ferraggosto), we noticed a sign saying “seggeria" on the local country road. I followed the sign and we reached the seggheria around noon.

Once I saw a heap of wood and a large bandsaw my hopes got up. After noone was responding the bell, I only had to muster the courage to enter the closed gateway and a pitbull governing the entrance. I rang the bell and a small, bulky and sun stricken man came to great me. I didn't understand his dialect and he didn't understand my Italian, but I somehow managed to explain that I am looking for olive wood. He was about to give me some straight grained wood, when I noticed the root burl on the heap of wood behind the house.

He was trying to explain me that this wood is no good, but he still cut it up in smaller pieces and didn't want to take neither money nor the beer I had in the car. I love the story and love that burl, first piece is going on a knife for myself.

GQitskH.jpg
pMDDdNs.jpg
QJ2cIkw.jpeg


Sorry for the ramble...
 
Go ahead and cut the trunk/branch pieces off. The diameter should be around 28cm/11in at the thickest part.
I still think you would be best cutting the main burl down the center from end to end into two slabs.
 
Go ahead and cut the trunk/branch pieces off. The diameter should be around 28cm/11in at the thickest part.
I still think you would be best cutting the main burl down the center from end to end into two slabs.
Sounds good, cutting the trunk/branches off should give me a flat surface to slab it lengthwise.
 
One trick in slabbing an odd shaped piece like a burl is to make a sled. Cut a flat spot where the piece will sit on the bandsaw table. You can do it with a chainsaw or on the bandsaw. It doesn't have to be perfect. Take a board or piece of plywood as long as the burl and at least a few inches wider and epoxy the flat spot of the burl to the middle of the board. Position the burl on the board so it is oriented the way you want the cuts to be. Brace it while it cures. Once fully cured, use the board and the saw fence to make clean, safe, and easy cuts. Start from the outside and make cuts toward the center. Before you get to the center flip the board around and make cuts from the outside toward the center on the other side. When done, you will have a stack of perfectly straight slabs. If it is a really odd shape, you can take two boards and make a 90° sled with a side and bottom to give more places to epoxy the burl.

I do this with log sections like olivewood/holly/dogwood/persimmon, tusk pieces, and burls. Sometimes you don't even have to make a flat spot if there is enough surface for the epoxy to firmly adhere.
The coolest use of this was to slice up a large ivory statue of an African woman's head. I bought the statue at an estate auction for almost nothing because no one wanted an ivory statue. It weighed a LOT! In the days of carved ivory, it would have been worth at least ten-thousand dollars. It was about 16-18" high and about 6" by 8" wide. Almost life size with the neck and a tall hairdo. The tusk that this came from must have been truly immense. The ivory was what I wanted. There was no safe way to cut it up as it was, so I epoxied it to a slab of plywood. I cut it into perfect 1/4" slices. Those I cut into many scales.
 
fJ2mJ9g.jpeg
37mTN7h.jpeg
CWqwWgv.jpeg
5wINqzZ.jpeg
I5qjtFQ.jpeg


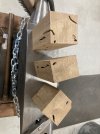
Finally got around to it. Cut of the branches/roots, and started slicing parallel to the burly part. After first slice was of, we set the fence to 4 cm and did the rest.
Unfortunately the burl was very local, but my estimate is 2 very good blocks, 2-4 good blocks and then 6-10 above average blocks (no burl, but some interesting patterns, flaming).
All things considered I am still happy. :)
 
Back
Top