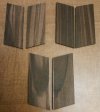
Making scales for 110 Hunter Sport

Midnight Rider

Gold Member
Joined
Mar 4, 2023
Messages
592
Good day, all. I decided to start my own "build" thread for photos and discussion of making my own custom scales for my 110 H.S. I am open to advice from anyone who has done it, especially since this is my first time. I've ordered some Macassar Ebony blanks that were described as being sold by BKI during their move from El Cajon CA. I'm planning to make some practice sets before tackling the pretty wood. My first question is, how did Buck produce the counter-bored holes that the screws recess into?
20241104_103420.jpg


I notice that the holes are flat-bottomed, thus a counter sink bit will not produce the same hole. I've searched for small forstner bits, but the smallest diameter that I can find is 1/4". Much too big. How did you guys who have done it, do it? Thanks in advance for any helpful input.
 
I'm sure that Buck, or whomever they have make scales for them, can have bits made specifically for them.

I use "pilot point" bits (example below) to produce the same types of holes. I have also ground the tips of normal drill bits flat to produce flat bottom holes. If you can't acquire the proper bits to countersink the holes, perhaps you could use longer screws and have the screw heads sit above the surface of the scale. Another option is to use V-shaped flat-head screws and use a V-shaped countersink bit to have flush screw heads.

If you go for a "pilot point" bit, make sure you get the measurements right. You need to make sure the diameter of the point (the middle smaller part) will fit inside the smaller part of your hole.

W1QxYbQ.jpg
 
Last edited:
I'm sure that Buck, or whomever they have make scales for them, can have bits made specifically for them.

I use "pilot point" bits (example below) to produce the same types of holes. I have also ground the tips of normal drill bits flat to produce flat bottom holes. If you can't acquire the proper bits to countersink the holes, perhaps you could use longer screws and have the screw heads sit above the surface of the scale. Another option is to use V-shaped flat-head screws and use a V-shaped countersink bit to have flush screw heads.

If you go for a "pilot point" bit, make sure you get the measurements right. You need to make sure the diameter of the point (the middle smaller part) will fit inside the smaller part of your hole.

W1QxYbQ.jpg
Thank you for the detailed response! I like the look of the "pilot point" bit, had never heard of that type before. I really want to keep the original hardware, if possible. If not, using different screws with a tapered head is a good alternative that I hadn't considered.

I will update when able.
 
You're welcome.

I just took a look around and noticed that there are other drill bits that will produce the same effect. Knifekits.com sells what they call "step drills", and McMaster.com sells bits called "counterbores".

I know from experience that it can be difficult to impossible to find the really small diameter "pilot point" bits like the one I pictured before, but fortunately there are other small diameter options out there (the step bits and counterbores I mentioned).
 
Last edited:
I used brad point drill bits. They have the same kind of tip as the forstner bits, but come in smaller diameters.
AP1GczNkdYhbtuJYluBdaqHur7mG25rWbxhLHYEVXJ8--8NRgnFwUnsr9zwzVLx6JDyMc5ZbeGSuqz3y0Gsv2bds146X5z299zg7bv074q1r4rDEv-ybP7q7eWg4fPkim2LCGP0CXIq4aVAxl5c8iIRidPep=w378-h839-s-no


It's a two step process. Drill the larger diameter part of the hole first. (I recommend using a drill press, with the depth stop set. So that you don't drill to deep.) Then change bits and drill the center through. Using the hole from the brad tip to center the smaller diameter drill bit.

O.B.
 
I tried (and failed) at making something with cocobolo years ago only to have the internet collectively jump on my head about poison concerns of wood particulates and the need for a solid respirator when cutting or sanding.

That top right set is going to make a beautiful set. Can't wait to see the results!
 
Yes the world is a different place. Hard to believe that so many of us survived childhood, without the internet telling us how to live. For anyone who's concerned, I will take safety precautions. Knock on wood, I've made it this long with all of my original parts lol. And I plan to keep them.

And thanks, the top right is my favorite of the 3 also.
 
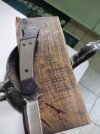
I was messing around with ebonizing some black locust and absolutely love it.

It's not polished but it's up to 800 grit (minus the large saw marks) I think it's going to look incredible finished.

So while midnight rider is making ebony scales I'm going to try "fire" orange micarta and ebonized curly black locust.

I just want to say thanks for the tips shared in the thread. It will be a big help.

M Midnight Rider I hope your project is going well.

IMG_20241120_124339475.jpg
 
I was messing around with ebonizing some black locust and absolutely love it.

It's not polished but it's up to 800 grit (minus the large saw marks) I think it's going to look incredible finished.

So while midnight rider is making ebony scales I'm going to try "fire" orange micarta and ebonized curly black locust.

I just want to say thanks for the tips shared in the thread. It will be a big help.

M Midnight Rider I hope your project is going well.

View attachment 2715898
Good Luck Rick👍
Looking forward to the finished product!! 😍
John 😁
 
I was messing around with ebonizing some black locust and absolutely love it.

It's not polished but it's up to 800 grit (minus the large saw marks) I think it's going to look incredible finished.

So while midnight rider is making ebony scales I'm going to try "fire" orange micarta and ebonized curly black locust.

I just want to say thanks for the tips shared in the thread. It will be a big help.

M Midnight Rider I hope your project is going well.

View attachment 2715898
That's some gorgeous grain in your Black Locust. It's going to look really nice on your 112. Please keep us posted, and good luck!

I had to postpone my project for a bit. Other "honey-dos" took priority. I'll be working on it soon, winter is our slow season at work.
 
I was messing around with ebonizing some black locust and absolutely love it.

It's not polished but it's up to 800 grit (minus the large saw marks) I think it's going to look incredible finished.

So while midnight rider is making ebony scales I'm going to try "fire" orange micarta and ebonized curly black locust.

I just want to say thanks for the tips shared in the thread. It will be a big help.

M Midnight Rider I hope your project is going well.

View attachment 2715898
Locust is some really gnarly & tough wood. There are untreated & unpainted locust fence posts in pastures around here that have been in the ground for probably fifty years or more. And they're still keeping the cows inside. I had a couple good sized locust trees that I cut down along my creek bank and it's a real b---h to split if you're using it for firewood though.:)
 
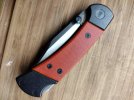
Here is the fire orange micarta from Makers

View attachment 2742186

I had to use a black g10 liner to get the right thickness but no biggie. It looks really red after polishing, before hand it was at 400 grit and was more orangish. Looks pretty cool though.

Looks great, what did you use to drill the holes? Will have to look up micarta on makers to see what they have.
 
Looks great, what did you use to drill the holes? Will have to look up micarta on makers to see what they have.
Thanks!

I did what kilgar and old biker suggested and used pilot point bits. I did a test hole in a scrap piece and set the depth on the drill press and then made the holes for the screw heads. Afterwards ran the smaller bit through for the screw shaft.
 
Thanks!

I did what kilgar and old biker suggested and used pilot point bits. I did a test hole in a scrap piece and set the depth on the drill press and then made the holes for the screw heads. Afterwards ran the smaller bit through for the screw shaft.

What thickness did you get? I was thinking of getting a sample pack. Haven’t checked any dimensions to figure out what size I will need.

 
What thickness did you get? I was thinking of getting a sample pack. Haven’t checked any dimensions to figure out what size I will need.

I bought .125 & .1875 and ended up using the .125 with a really thin g10 liner under it. I don't know the liner thickness but it was super thin.
 
Back
Top