manix 2 bevel on the Wicked Edge?

TRfromMT

Gold Member
Joined
Jan 4, 2016
Messages
5,666
I put my Manix 2 (Fradon Lock Company exclusive in 4V) on the Wicked Edge last night. I found the bevels *tapered* from heel to tip. Let me see if I can explain...

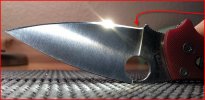
I got the setup dialed in at 19.5 dps (measured with a digital angle cube). At the heel the stones were only contacting about the top 1/3 to 1/2 of the bevel. By the middle of the belly to the tip, the stones contacted the full bevel. I maybe had only 90% contact at the tip and had to work just a little longer to get to the apex of the edge. When I started I used the sharpie (this is the first time I've had this blade on the W.E. and didn't have the settings written down yet). The sharpie showed contact at the very edge (at the heel) full contact in the middle, and shoulder contact at the tip.

Bevels were even on each side from the factory. And they looked the same height from heel to tip, but with a single setting on the W.E. it seems the angle at the heel was a bit more acute than at the tip.

For those more familiar, do you find a variable edge angle on the Manix 2?
 
I find the edge changes/varies on pretty much every knife I put on my edge pro. And are usually different from side to side.

But keep in mind how you clamp or place the blade. Unless you are sharpening a straight edge you will always get SOME difference from heel to belly to tip on a guided system.
 
Pictured below is my Manix XL:
  • It bugs me that with the WE I can't reach the base of the blade by the ricasso; I still have my EdgePro so I use the method on this video to eliminate/minimize that little J at the base of the Spyderco ricassos
  • Once you've mounted your Manix or other Spydercos in the WE experiment with tilting the blade tip down as it rests on your depth key
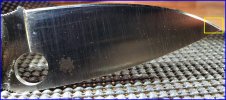
  • As an example when I first sharpened my Manix XL my Advanced Angle Guide markings were G.4 & 2.4 (increments of 5 is what I used when it falls in between the AAG markings); this left the bevel at the tip wider than at the heel (you can still see the old grind marks on image below; yellow outline)
  • This last time I used the AAG settings of H & 5/bottom depth key holes/Gen 3 jaws; I tilted the tip down lower and I like how it came out the second time, it appears more narrow at the tip but that's because of the previous grind marks
  • Check out how much the blade is tilted down on Clay Allison's video for the Para 3; I use his settings on my PM2s (modified due to the longer blade of course) as well as my Para 3s
Feel free to PM me if you're getting uneven bevels on your WE, there's a formula for correcting vertical blade lean so you get even bevels while sharpening :)

ManixXLBevelB.jpg
 
Last edited:
Thanks toxophilus toxophilus - good info.

I do adjust the tip up or down to even things out. I started this one tip-up and readjusted it to have the spine on the pins after seeing the Sharpie pattern at first.
 
Thanks toxophilus toxophilus - good info.

I do adjust the tip up or down to even things out. I started this one tip-up and readjusted it to have the spine on the pins after seeing the Sharpie pattern at first.

Well dang it... below is the 20CV Manix 2 that I recently sharpened and I would pass on the AAG settings to you but I cut the paper off where I had recorded them to test another knife for sharpness before entering it into my spreadsheet (HA!)

My old AAG settings for my Gen 1 jaws were E.5 & 5 / bottom depth key holes, you could start there if you have the AAG.

On this one I haven't modified the blade area by the ricasso yet, still has some 'J' on it, that'll change on my next sharpening session for this one!

Manix220CV_B.jpg
 
I don't have the AAG. I just eyeball it and check my angle with the digital cube. I write stuff down, and do my best to duplicate it on the next sharpening. I might have to look into the AAG.
 
Pictured below is my Manix XL:
  • It bugs me that with the WE I can't reach the base of the blade by the ricasso; I still have my EdgePro so I use the method on this video to eliminate/minimize that little J at the base of the Spyderco ricassos
Is this due to the plastic lip that extends past the edge of the stone? If so, I cut mine off. One on each side of each stone. It is pretty easy with a box cutter, using the edge of the stone as a guide.
 
Is this due to the plastic lip that extends past the edge of the stone? If so, I cut mine off. One on each side of each stone. It is pretty easy with a box cutter, using the edge of the stone as a guide.


Yep I did that too, but because of the diamond plates not being squared (they are rounded off on the sides), you still won't get it right up against the ricasso part of it. I sanded mine down to the plate but that darn diamond plate has a slight curve on the edge...
 
Back
Top