MT17 Scale WIP

Joined
Aug 25, 2012
Messages
765
Yello folks,

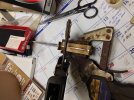
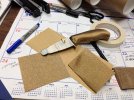
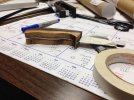
Just wanted to share a few photos of the mule i'm working on. Now, let me preface this by saying that this is my first time handling any blade at all, so if what you're about to see disturbs you... please heckle me to death. ;)

I ground the scales to rough sizing (within a millimeter or two) before epoxying them to the blade. I followed that by 48 hours worth of clamping. Then it went back to the grinder for some closer scale to tang work. Now i'm in the rough rough sandpaper process. I'll post some more pictures as I go.

Scale material is Ziricote.

one_zpse6ca5a91.jpg

two_zps7f9ba2bd.jpg

three_zps6c3e64db.jpg

four_zpsbd80e60d.jpg
 

Attachments

  • one.jpg
    one.jpg
    81.3 KB · Views: 51
  • three.jpg
    three.jpg
    100.9 KB · Views: 59
  • two.jpg
    two.jpg
    78.8 KB · Views: 61
  • four.jpg
    four.jpg
    71 KB · Views: 86
Last edited:
Pretty gutsy going epoxy on your first attempt! I might make a pair for mine, but it will be attached with hardware for sure. I just bought a pair for now (came with a sheath too). Good luck and looking forward to seeing your finished product.
 
Hey, dishcore! Looks like you've got a good start.

Normally, folks use pins or bolts to help hold the scales in place. This makes them a lot more resistant to shearing off with heavy use. Epoxy should hold up fine - no need to worry. If they do fail, you can try another mounting option! :)

Another tip is to ensure that you are using a good brand of epoxy. The general hardware store 5-minute epoxy is generally brittle and not durable. A lot of knifemakers use West Systems GFlex - which is about as strong as you can find, and also has a little flex to respond better to temperature extremes and shocks.

Cheers!
TedP
 
Thanks for the comments! I did a bunch of hand sanding over the last few days, to the point that it is very smooth to handle but nowhere near shiny or polished. I'm debating whether or not to take the corners down more before I continue on through further sanding steps. The rough shape of it now is fairly blocky, and although it is comfortable in hand it does feel a tad bit on the large side.

As for the epoxy, I used a Loctite brand 1-hour set that working cure time of 24 hours. I decided to go without pins on this one simply because I had the Loctite available at the time...and no pins available ;)

I have looked at a fair amount of pictures of the mules you've done Ted, and they look fantastic. If you dont mind my asking, what stages of sanding do you go through...as well as polishing/buffing?

Thanks again folks,
Chuck
 
Hey, Chuck! I usually use files and rasps to do the shaping and contouring of the handles - and take them almost to the final profile. Then I start with 120-grit sandpaper to smooth away the file marks and refine the shape. Then I go up the grits - 180/220/400 to get a good smooth working finish. I also use a handheld magnifying glass ($5 at Office Depot) to look at the fine detail - and also look for stray sanding marks that need to be worked on.

When everything is looking uniform at 400 grit, then I go to the final finishing stage. Usually, this means sanding with 800 and sometimes 1200 grit paper. Then I prep for the finish coats. If you are going to be using it outdoors, so you might want to hit it with an oil-based top coat. I like Tru-Oil, which is sold as a gunstock finish. It cures hard and tough and is easy to apply. Just apply in thin coats, wiping excess off with a soft cloth, then buffing with 0000 steel wool between coats. You can apply as many coats as you like - it will get smoother and more lustrous as the coats add up. Then I always add a coat of paste wax on top to get a good shine (Renaissance Wax is my favorite).

I would take some time to work on the contouring - if it feels a bit blocky and large in your hands now, it will likely give you hotspots during extended use. You want it to feel extremely comfortable in hand for the long haul.

We'd love to see some more WIP shots!

TedP
 
Thank you for the advice Ted! I will post some more progress shots as I contour it a bit more, I'll have to get raspy on this thing. I have it rough sanded to 150 grit right now to get an idea of what it would look like with the contours I have, but like you've said I think it will end up being uncomfortable with extended use. I'll get some more photos up tonight!

Thanks again!
Chuck
 
Ziricote is some really cool wood! Nice choice. The change between the lighter sapwood and the darker heartwood can be dramatic. Can't wait to see it finished.
 
Here's some updated photos - rough sanded to 150 grit. I'm going to contour the sides of the scales down a bit more, she's a bit too thick right now.

Thanks for the comments folks, I really appreciate it!

IMG_1604.JPGIMG_1605.JPGIMG_1608.JPG
 
Looking good! That coloring is drop-dead gorgeous.

I think you are on the right track to thin it out a bit more. If it is too large, it will create hand fatigue with extended use.

One more thing I might recommend is to taper the little point that extends in front of the choil. Speaking from experience, that will get in the way and catch on things. I would recommend beveling it down to a very thin profile. Just my $0.02. :)

Great progress, Dishcore!

TedP
 
I was able to work on it for a good amount of time last night, and it's starting to take shape of what I wanted!

TedP, I tapered the scales in the front to meet the blade and it feels a lot more comfortable. I'm thankful you recommended both that and that I follow up on further contouring it. Handling it now, it feels like i'm holding the blade with handles, not handles with blade. If you know what i'm getting at anyway.

A few more progress pics:

IMG_1617.JPGIMG_1622.jpgIMG_1623.JPG

It's sanded to 150 right now, i've got to pick up some more supplies to get it out to 400 and beyond. Also, there is a tiiiiiny bit of tang poking out at the tail end of the scales where my initial cut was a little too generous. I'm thinking to file that back a little bit to smooth it out with the scales.
 
A few more photos:
IMG_1648_zps1153045d.jpg

IMG_1647_zps68abe7cb.jpg


I've sanded through 220, 400, 600, and 1000 grit papers. I've blown the scales off with some compressed air to remove as much dust as I can before I apply some Tru-Oil to finish her off (thanks Ted!)

Edit: The tang shows a bit here and there. It's my first try :)
 
Looks really nice! I like how the vertical grain shows off ray fleck. It adds even more visual interest to such a cool choice of wood.

I always wondered about the reaction of the first person to cut into a Ziricote tree and seeing those amazing inky black lines swirling and swooping all over the place. They must've been flabbergasted!
 
Thanks for the kind words folks! I'll add some more photos after I apply the Tru-Oil and buff it out all fancy like.
 
A few fancy photos, 4 coats of Tru-Oil and a gentle buffing with a cotton cloth. I plan to pick up some renaissance wax at some point and shine it up, but I feel pretty happy with how it turned out.

IMG_1658_zps0e4355b9.jpg

IMG_1654_zpsd7971e35.jpg


Thanks for putting up with all my pictures, folks.
 
Looks great! I really like the finished shape - and your fit-and-finish is great for your first set of scales. Thanks for sharing!

TedP
 
Back
Top