How To Multi-part, Flat Tang Handles - how get everything lined up??

Cushing H.

Gold Member
Joined
Jun 3, 2019
Messages
2,714
This has been kind of talked about in the past, but I think not explicitly in this way...

I am about to start on a handle for a kitchen knife (Nakiri, but with western style handle) for a friend .... and I am thinking about using the opportunity to take a first stab at a multi-part handle (long rear portion one wood, but with another type of wood towards the front of the handle as a "bolster). But ..... how the heck to you get everything lined up???? Here is what I am considering:

  • start with blocks (not scales), and glue front piece to back piece (with spacer between maybe). Then drill a single hole through the front piece to coincide with the location of the front pin/corby.
  • Then .... rip the thing lenghwise into two "scales". The hole now becomes an alignment reference. add spacer to inside of each scale (if wanted)
  • put one scale onto the tang with alignment pin through hole and front hole in the tang (already drilled in tang). Drill out the other holes (two more of them) through the other pre-drilled holes in the tang.
  • put other side scale onto the tang, and drill out holes in that side (drilling through from the side that has already had holes drilled.
  • Remove scales, and with alignment pins in place, shape/finish front of handle.
  • Glue up scales to handle (using corbys, or temporary alignment pins, as wanted).
  • shape and finish handle as for any single piece handle (for pins, I shape and near-finish, t then ream holes and insert and peen pins).

Would this approach work? Does anyone have any other approach?

(I know horsewright just glues everything up in one single step .... but he is a magician, and I could not possibly hope to replicate... :-(
 
Yes, that will work. You want to glue the pieces on a liner to strengthen the joint. A pin or bolt through the front bolster piece as well as the main Corby bolts in the longer section would be wise.
 
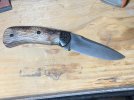
I've done it once so far with black linen micarta bolsters adhered to hickory and black liners. I started in scale form and used a combo of super glue and a hidden screw (I cut off the head) to attach the micarta to the hickory. Then I epoxied the combo to black liner material... Then proceeded as normal for a full tang knife.

It really wasn't as bad as I thought it would be and the screw I used really helped me get a nice tight fit between the micarta and hickory. Getting the mating faces to show no gap is the hardest part.IMG_20200912_200606_763.jpg
 
P.s. That was a dud knife I was trying this particular handle technique on lol... Bad grind IMO .. shop knife lol
 
I've done this several times with good success. Keep the unshaped unit as a block like you said, with perfect flat mating surfaces roughed up and glued (I use JB Weld for that). I've never clamped them though, just hand press them hard together several times during the early part of the cure. If they are flat there won't be a glue line.

Flatten the outsides completely. Superglue the block to one side of the tang and drill ALL the holes. (that's where we differ the most) Once everything's cured you can apply liners to the Outside of the block on both sides and re-drill the liners OR split them first then apply the liners and re-drill. The flat outer left side becomes the inner right side if you see what I mean? Perfect alignment every time.

Side note those joints are very tough to break by hand even without a liner, I've tried. I've also bent very thin cutoffs into a rainbow shape without breaking at the joint. Usually the wood fails somewhere else.

I've struggled with elk and deer scales. Since elk/deer scales have to be split first to glue to the tang I superglue, drill then split the bolsters first, then superglue/pin to the tang, then superglue the elk to the tang and bolsters and drill the elk. That's as good a method as I've come up with but I'd love to hear more variations.
 
I’ll put forward another method which I started doing after starting a thread about it when I wasn’t happy with my previous method. By I have done a few and I typically start with “scale” material not blocks and I’m typically doing a 45deg joint but once I have both pieces with their flat 45s I will put parchment paper on top of my surface plate and push the two pieces (bolster and main scale) together firmly at the joint with my hands and wick super thin CA glue into the joint and hold for a minute or so, repeat for the other scale. Next I flatten the insides of both, line up the joints of both scales, clamp the blade to the lined up scales, drill your holes, and then proceed like any other full tang. I usually use a liner as well but either way once they are glued to the liner/knife it is GFlex epoxy that’s holding things together not the CA glue.
 
Back
Top