My Bladesmith Progression; from 1st to....

Joined
Oct 24, 2013
Messages
906
This is my third forging but the first one I didn't set aside for another or toss in the scrap pile... Please critique the heck out of it as I have thick skin and am enjoying the learning aspect of this craft.

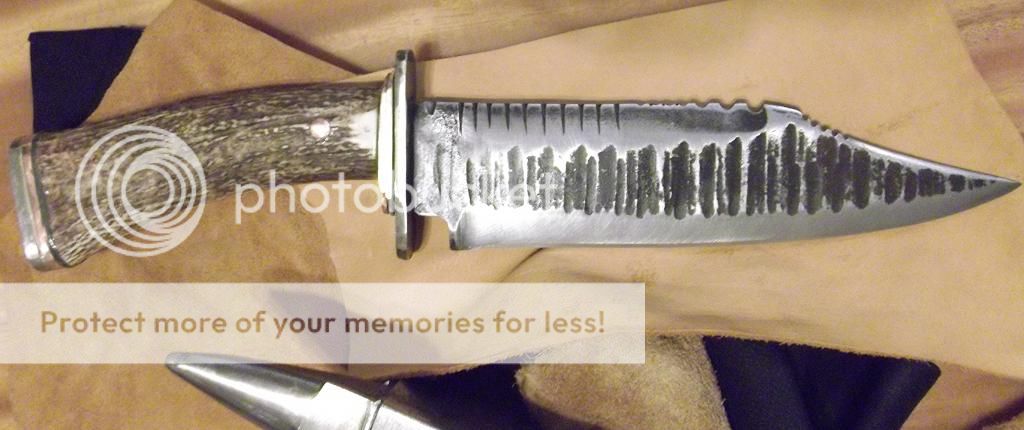
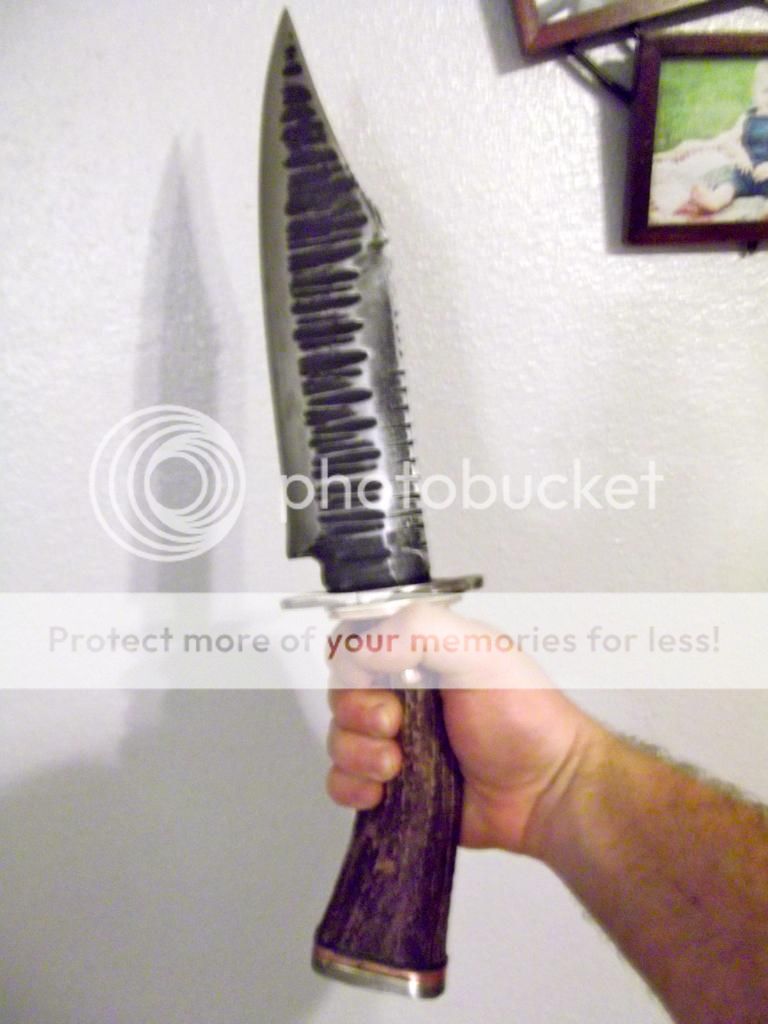
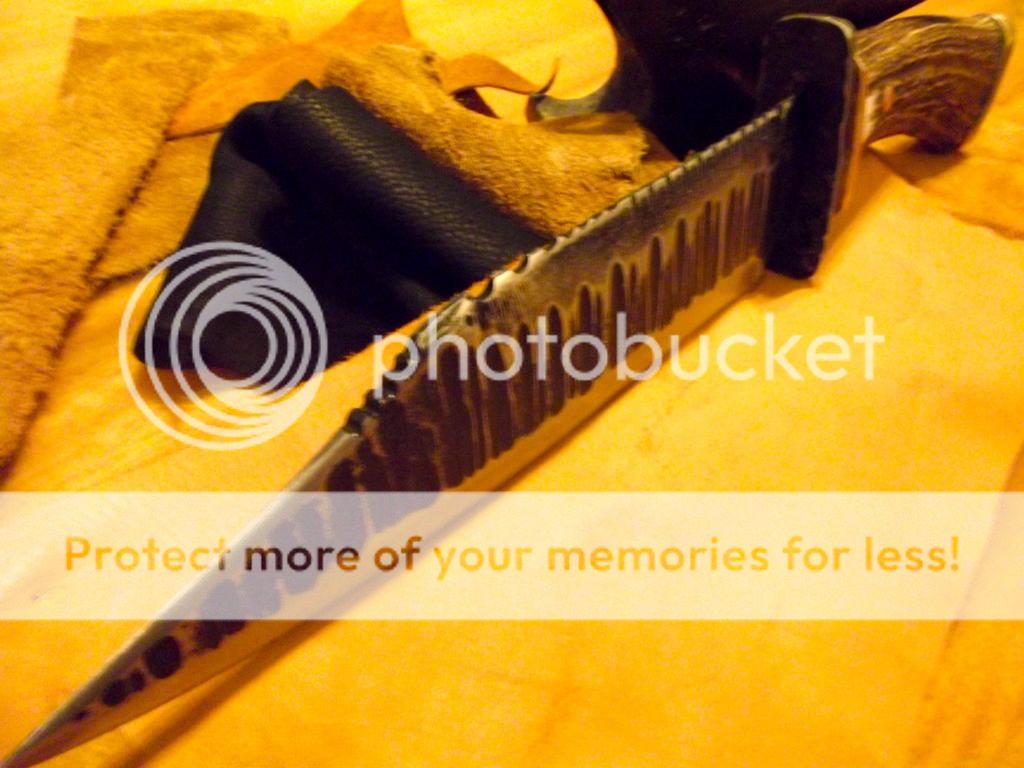
Blade Material: 5160 Leaf Spring
Handle: Elk
Design: Bowie rat-tail tang.
Hilt/Pommel: Forged; Copper, Stainless, and Bronze.
Pins: copper / stainless screws
OAL: 17.75"
Blade:
W:2.5"
L:10.5"
T: .25"

Weight: (guess) 2 pounds

f65aeedd-f103-4ada-9d28-406bbf1734fc_zps41702fa9.jpg


DSCF3013_zps14fb0aa8.jpg


DSCF3006_zpse25227c9.jpg


DSCF3018_zpsa3e8a15d.jpg


DSCF3022_zps2f7e8b35.jpg


DSCF3017_zpsca501659.jpg


DSCF3016_zps7f779f48.jpg


I'm not happy with the end result, but I'm chalking it up to a learning experience.

Oops #1:
I'd originally gone with just the forged copper, but added the bronze after I cut the bolt welded to the tang. Had I just stuck with the copper it would have turned out a lot cleaner in the rear... The two botched phillips screws on the but are 3" in length and secured deep into the epoxy filled handle. The bolt at the end of the rat-tail is snug and wedged inside the antler to the point of not being able to be threaded any tighter due to the side walls of the bone. I peened a copper pin in place of the intended through bolt/nut as a fix.

Oops#2: I used spiderwire to fill the gaps between the antler / hilt & pommel. I need to find a better means of a cleaner filled gap...

Oops #3: went a lil crazy on jimping past my bed time... little marring on the left side of the blade...

I know its ridiculously large... this was my intent. :D

These mistakes wont continue onto my next project as I have a new found respect for sticking to the plan.


Please don't be shy, the only way one gets better is through knowing failure... Thank you for your advice, comments, critique, and compliments in advance... This was a fun endeavor to say the least...
 
Last edited:
Mate that is one HUGE!!! Knife - if you had fun & and learnt a few things along the way that is the main thing. When you are knee deep in Iron Filings you will probably know what you are doing. (Me I'm only up to just above my little toe:))
 
That is one ugly knife, I like it though. This is just personal preference, but if I was looking to buy that blade, I would've liked a more defined swedge in it heading towards the tip (or maybe it's just the picture). Also some more refining on the choil, ricasso, and plunge line. Having a completely smooth and polished pommel/guard would make a nice contrast to the rugged blade in my opinion. But great job man, this is way better than my failed attempts at making a knife
 
Very first thing that strikes me is the mis-alignment from the ricasso to handle.

This is how we learn! Carry on......
 
I pity the fool that brakes in to your house... She's a beast!

My 2c: I like it when the spine and the top of the handle line up.
On the other hand, if you look at old knives (1800's) they often don't line up either
 
First impression is a quote from Mick Dundee - "Now, this is a knife."

OK, we know each other enough to understand that I will call it as it is.

This is a fairly good first knife. There is more wrong than right, but there was clearly a lot of effort put into it. You get kudos for that.

Issues that are blaring:
1) The knife wasn't though through before the knife was started. This is why almost every feature didn't come out quite right. There is such a mixture in work styles and materials I bet you were getting dizzy working on it. Draw a sketch, make a plan, and work the plan.
2) Overdone file work in three different styles, handle misaligned really bad, ugly screws on butt cap, poor peening on the tang, monstrously heavy, poor fit and finish, etc.
3) Don't even know what to say about the stack of plates on the guard/bolster. The two smaller plates should start with a fit to the handle, and either be an extension of the handle shape, or flow into the guard with a bit of flair.
4) Good thing there wasn't any lead, old vinyl records and tin sheet in the shop or you might have stacked that in the butt and guard, too. The materials used are incongruous and way too much. One material and a complimentary spacer or contrast is OK. Three totally divergent materials plus odd spacers is not attractive.
5) You said 5160 leaf spring? If it is 5160 it was unlikely a leaf spring. If it was a leaf spring, it was unlikely 5160. Very few leaf springs are 5160 today (and for quite a long time past).


The above items are the reason I really try to discourage new makers from giving advice to people who post questions in the forums. You are eager, but clearly inexperienced. Any advice given would be based on no experience, and could be quite un-helpful. Bad advice lives forever on the internet.

Take the two or three things you like the most about this knife and combine them in the next one. I would say the blade shape, the handle material, and the "frontier style" hammer finished blade. Leave everything else off that can be deleted. Make that knife as perfectly as possible, taking into consideration the critiques above.

Now that's what I was looking for!

I'll adhere to everything mentioned thus far as gospel.

1) Piss-poor planning produces piss-poor performance; that's not a foreign concept to me, but the excitement of it all got the best of me. Consider #1 as branded into my bladesmithing pursuits from now on out... On knee-jerk change and I found myself married to fixing the reverberating effects of change the whole way through to the end.

2) The file work was was just something I'd never done before and I was really just trying it out and got too carried away. Good thing though as you've mentioned "different styles"... Can you shed more light on these particulars because all this was mimicry of what I've seen at best? If there are specific styles meant for specific blade profiles or areas of the blade then I would like to keep that knowledge handy for the next go.

Also, handle misalignment... I've been itching at this one since I slid the antler on the tang for test fit... Is this the misalignment you're talking about? Furthermore, to correct the issue would I try to make the back of the handle as linear (as possible) with the spine?

f667ffbe-bcd0-4425-9bc9-09c5bde1b6f2_zpsa7fcc6d8.jpg


3) Extension of the handle orFlared transition from handle to guard... Ha! / Wow.... I'm living proof you can look at a thousand different pictures of blades and not truly understand that part of the blade or how to successfully make that transition aesthetically pleasing... that is until now... again, thank you for this one.

4) lol, yep... I don't know what I was thinking, but when I realized I wasn't, it was too late...

5) It was a leaf spring off an old up-armored bank truck... I'd say 60's-70's... The decision to use this material centers itself around my budget and inexperience... I'm not looking to sell any of my blades now, but when and if the time comes, I will use a known steel.

Since I last ticked you off (lol), I've stopped posting whimsical incoherent ramblings after reading and scowling at them the next day. The only advice that I've given on blades is a regurgitation of your own, citing your directives explicitly and that which I'm tangibly familiar with from smithing. I've even cited you in the flesh, verbatim, to fellow newbie bladesmiths. Be confident that I'm as humble as they come and dislike bad information as much, if not more, as you do...

Thank you for your guidance and wealth of knowledge in this thread. I have a much better grasp than I did before reading your post...
 
All right, Sine! Making knives and posting them. I really can't asy too much that hasn't already been said, but keep it up- we will like to see what you come up with next.
 
The part I'd stress, the funny grooves in the blade, almost like a granton edge in a kitchen knife

The thickness of the blade, the high blade height and the very very blunt angle of the bevels
If you have a 2.5" blade height, but the bevels are only .5" high the rest is just added weight and the angle is more like an axe than a bowie
I think you could work that clip down smaller to eliminate those grooves too.


I think you could probably still work this into a full flat grind so it cuts and eliminate the grooves by doing so.

You shouldn't see the epoxy booping out.


Oops#2: I used spiderwire to fill the gaps between the antler / hilt & pommel. I need to find a better means of a cleaner filled gap...


Don't fill a gap, flatten until there is no gap.
I think you could pull it apart and redo that too.


It's plenty big I think you could pull it apart, regrind it to eliminate all thoe grooves and jimps, reguard it and repommel it to end up with something much better than what you have there.

I'ts good to practice, nothing lost by reworking this one.
 
Last edited:
First off congrats on forging that thing on that tiny anvil :)

A few things I'll add just from an esthetics aspect some of which has been mentioned:

Personally I'm not a fan of all those ridges in the side of the blade Bowies as a fighting knife tend to be more of slicers than an axe like chopper that you have there so I would've brought the bevel A LOT higher up the blade making it considerably thinner and eliminated a lot of those hammer marks. If the hammered finish was your thing I think you could've achieved a similar look with less defined divots on the bevel and still been thin enough to be a nice slicer.

As others have said the handle is way out of line from the blade since the blade looks to be considerably wider than the antler trying to center it more in line with the blade would look better.

Third pic looks like there is quite a bit of space between the spacers between the handle and the guard make sure they're dead flat so you don't get any daylight between them. Use whatever between them most folks use thin sheets of G10. The jimping in the clip is just, no lol

Stacy and The count have good suggestions and you could rework this. Here is just a quick idea of what I'm thinking and mind you I'm not a very experienced maker but that's my .02

This hopefully will give you a bit of a better visual to what I was thinking.
 
On bowies, the blade "drops" from the handle. The top line is what is optically important. I prefer having the spine line match the handle top line. In most cases that looks best. This is where a sketch and/or mock-up in wood really helps.

I agree that the grind should go higher as Matt showed above.
 
Those fuller marks running down the length of the blade were intentional and more deliberate in form rather than function. It's something I can't help but hold onto for future knife forgings, because I'm a texture needy individual.Thanks to this thread, I'm also more aware of what is traditionally expected of a Bowie. Thank you gents for your contributions. I learnt a lot....
 
Those fuller marks running down the length of the blade were intentional and more deliberate in form rather than function. It's something I can't help but hold onto for future knife forgings, because I'm a texture needy individual.Thanks to this thread, I'm also more aware of what is traditionally expected of a Bowie. Thank you gents for your contributions. I learnt a lot....
I echo the kudos on effort. There was certainly a lot. And kudos for diving in...
It looks like it was made for Shaquil O'Neil though... I tend to be very light and small with my stuff, so coming from my camp, take that for what it's worth.

The only note I'll add is to say you may want to rethink your texture choice. For one it is deep. Deep means thin spots. That means your blade is going to be thicker than it needs to be, or weaker than it should be. And for a buyer who is a tad knowledgeable it looks like draw marks that weren't addressed. Light hammer marks are usually just that, light. Any time I see dimples I know it was either inexperience or intentional texturing... both of which are 'steer clear' flags for me.

2 pounds is very heavy even for the biggest of bowies. Despite their appearance, most are rarely (historically speaking) more than 1/8" thick, and actually rather light.

Cheers.
-Eric
 
I am a new maker as well, so I will not try to give technical advice only encouragement and a couple of thoughts. You have made a nice effort. I think your next knives will be leaps and bounds over this one based on adhering to the advice already given. I find myself like many with a pile of ideas to incorporate into a design. At this point I keep designs simple with attention to detail and technique. I am learning to do the basics well and slow the process down. It takes patience but I think it's worth the reward of a solid, well executed knife. Best of luck.
 
I am a new maker as well, so I will not try to give technical advice only encouragement and a couple of thoughts. You have made a nice effort. I think your next knives will be leaps and bounds over this one based on adhering to the advice already given. I find myself like many with a pile of ideas to incorporate into a design. At this point I keep designs simple with attention to detail and technique. I am learning to do the basics well and slow the process down. It takes patience but I think it's worth the reward of a solid, well executed knife. Best of luck.

Good to know I'm in good company when it come to the making part; experienced and inexperienced alike. Crawl, Walk, Run is the beginning of every story, and I couldn't agree more. Basics are one thing I am lacking so it's definitely back to the books. Hopefully the mistakes, and the guidance in this thread help more than just me. ;)
 
The pictures are not the best. I wasn't able to take the #2 and #3 blade pics due to time constraints, so those who got blades for christmas presents were elicited to act as my photographers... lol... :D

each blade was taken to an innocent PT 6x6 fence post getting through 1/2 to 3/4 sans chipping or rolling... they were still as sharp as they were before the test....


Please critique, love, hate, say rude things, say nice things, be constructive, and tear it apart. I think my execution of these were better because of the constructive critique of #1.

#2
Bowie/ differentially quenched assumed 5160 leaf spring/ Bamboo with copper pins

IMG_5949_zps63350d1a.jpg


#3
Straight Khukri / differentially quenched assumed 5160 leaf spring / Jatoba with Bronze pins
IMG_8022_zpse865543b.jpg


IMG_8023_zpscac08581.jpg


#4

Drop-point Chopper/ differentially quenched assumed 5160 leaf spring/ Purple Heart with copper pins...

IMG_0216_zpsf303810c.jpg


IMG_0218_zpscf97fa08.jpg


IMG_0217_zps6e941ef2.jpg


IMG_0219_zpsc365dc0c.jpg


I learned a great lot from the last knife and look to learn more. The next knives will be a little more advanced than the previous. I've got a pattern welded mandau and a san mai bowie in the works...
 
???? -240 layers of 15n20 and 1074/80, Convex
FullSizeRender1_zps95524581.jpg


Mandau? Honesty, went for that design initially, but the idea evolved into something a little different. This shape wouldn't fall in the realm of a "traditional" because it took on a Kopis like curvature. It has a nice balance to it and think the finished product will be pretty interesting. I can't help but think some culture, in some corner of the globe has a similar blade profile. Getting to play with a pattern welded billet for the first time was the best part as I got to play with a "little bit of everything" concerning patterns. The reveal etch was pretty cool.


Cable San Mai w/ harpoon grind; 1080 RR Track with 1-1/4" wire rope.
FullSizeRender_zps429d1d03.jpg


I had some issues with this one, but I think I'm on the right track now... I tried to accomplish this as a meatier convex ground blade, comparable in size/thickness as well. The cable I'm working is really rusty and nasty stuff, and when I attempt something like this again, I'm going after the newer stuff. Even though I soaked it in PH minus for a good 48 hours, fluxed and twisted (brushed), and flux and twisted (brushed) again before forge welding it together, throughout the lamination process the garbage just kept coming out of it...

When I quenched pockets of the wire delaminated. It was more superficial than catastrophic, and only in two small areas. I was able to bring it to welding temp and correct them. I also believe that these flaws, while superficial, might have originated by going with the convex grind (not to say that it couldn't be done with cleaner parent metals to laminate). Researching several similar knives, I see a very common element; flat grinding. I've actually fabricated a platen for flat grinding and thankfully have enough meat to have at it for a second go at it. After a little grinding, I'm confident I'll have a better end result.


Now this is my next project in the making. but I'm hitting a lil bit of a wall working with a material that would be considered a little advanced for my level. I've searched the open forum for people that might use it, but nada... DC53... I'm not even certain about putting it into the mix, it might just be too dissimilar and end up ripping things up in the end. I'm shooting for it being a stand-in for what Jim Hirosalas speaks of as "uber duuber damascus", superior to the 1050/ O-1 mix. Be it that they're compositions are somewhat similar I'm going to give it a boy scout try.

IMG_0254_zps9e746773.jpg


and here is the wall... I'm working it at nothing but orange/yellow heat and getting a lot of this... I'm certain it's operator error, I just have to do a little more research into where I'm failing... I might have to start forging this at night without any ambient light to make sure I'm staying well within the parameters.

IMG_0256_zps541126ab.jpg


Thanks for looking, and thank you even more for your input.
 
Back
Top