-
The BladeForums.com 2024 Traditional Knife is ready to order! See this thread for details: https://www.bladeforums.com/threads/bladeforums-2024-traditional-knife.2003187/
Price is$300$250 ea (shipped within CONUS). If you live outside the US, I will contact you after your order for extra shipping charges.
Order here: https://www.bladeforums.com/help/2024-traditional/ - Order as many as you like, we have plenty.
You are using an out of date browser. It may not display this or other websites correctly.
You should upgrade or use an alternative browser.
You should upgrade or use an alternative browser.
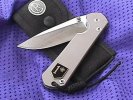
My EDC
- Thread starter pbubsy
- Start date

- Joined
- Mar 27, 2006
- Messages
- 142
Did you do both sides of each slab or only the front side of the non lock side. Looks good i like it:thumbup:

- Joined
- Mar 27, 2000
- Messages
- 1,821
Well, yeah... it's my job. And here some details: http://www.bladeforums.com/forums/showthread.php?t=303542
(BTW, I asked Matt and he let me play on couple of Sebenzas and to make them like that )
)
(BTW, I asked Matt and he let me play on couple of Sebenzas and to make them like that
)
I actually just did it to one side, just finished. I was going to do it to the other, but I just traded it to someone that was interested for a fixed blade I've been looking for. I wouldn't go without at least one small seb though. I've still got my small classic lefty, I've been using that one more and more. I really only carried the righty because of an injury to my left hand that prevent's me from wanting to use it too much b/c of the pain. It's been getting better though, so I'm going to start carrying the lefty. I'm going to try something different with that one. I'll surprise you guys with some pics. I'm going to start with a Tialn coated blade from Mollecular Metallurgy down the street here........I think I might just be the pioneer of that one.
- Joined
- Nov 23, 2005
- Messages
- 5,302
Pbubsy, of all the alterations I've personally seen done to a Sebenza, I like your softning/rounding the best. I would love to know the particulars of how you did that. What grit of paper? Did you have to dismantle all the way? How did you round the corners? That was just about slicker than owl shi#!
Hillbilly.223: Thank you for the compliment, I love to hear feedback. It's fun to customize your knife! I'm glad you appreciate my work. In regards to your question here's how I did it just in case you wanted to do the same:
Materials=
1) 120 grit sand paper (multiple sheets)
2) 150 grit sand paper (multiple sheets)
3) A sanding block (just use an appropriate sized block of wood)
4) Steel wool (one good piece will do it)
5) Chrome rubbing compound (found in the same section of many superstores by the car wax and care products)
6) An old rag (I used an old washcloth)
Step one: Dissasemble the knife and proceed to take the side (let's say the front side) that you're going to work first in hand. Using the 120 grit carefully start to sand the edges with whatever motion you're most comfortable with. Make sure that you're being consistant and not giving too much attention to any one spot. You can pretty much get a good visual feel of where you want to sand it down and round it off, I kind of held the sandpaper in my hand and seated the slab at the angle I wanted and stroked it along the bend of the second knuckle of my index finger. The smaller areas you just use your finger through the sand paper to round off. Just take your time and make it all even and consistant. ~The whole process is really easy because of the little bevel at the edge of the knife, all you do is take this away......and then some~
Step 2: After the entire slab is rounded just how you want, put your 120 on the sanding block. Take the front side of the slab (leave the inside alone) and keeping it flat and moving in the same direction, rub it back and forth until you've removed the rest of the original coating.
Step 3: After all the sanding you've done, you'll probably have some scratches on the slab. First take the slab in hand as you did when rounding it and using the 150 grit (or higher) start to sand away the bigger scratches from the 120. After the edges are smoothed out put the sandpaper on the sanding block and do the flat front of the slab on the sanding block as done above. When all the bigger scratches from the 120 are removed move on to the next step. Make sure you keep a consistent direction as you'll develop a nice grain. I personally like the grain to go lengthwise.
Step 4: Now take the knife in hand and using the same direction continue to polish and rub with the steel wool. This should be done until all visible scratches from sanding are removed and the knife has a nice sheen. The grain is now very fine and adds the nice asthetics to your knife that you've been wanting.
Final step: Now that the knife looks nice and clean you'll give it a finer finishing polish. Take the rubbing compound and put a liberal amount on the knife and let sit for a minute. Then, taking the damp rag, and again keeping your movement consistent with the grain, proceed to polish and rub out until you're satisfied with the finish. Wash it off and re-assemble. You're done. You can leave it at one side, or move on to the back if you move on to the back, make sure you leave the lock and the inside of the slab alone, don't mess with any of the clearances.
Keep in mind throughout this process that you want to stay away from the inside of the slabs to avoid ruining the close tolerances CRK has machined for your knife. Also keep in mind that you don't want to remove any more metal than is necessary to round it out just to be safe. And lastly, you don't want to thin out the slab any more than is necessary to take the original finish completely off to avoid any problems with the fitting of your hardware.
Now that you're done, you'll notice that the knife is even more comfortable to handle than before, and that your hand grips better. The clip can be done to match.
Good luck!!!

- Joined
- Nov 23, 2005
- Messages
- 5,302
Phubsy, thank you very much for the detailed info on how to trick my Sebenza!