Trubetzkoy
Basic Member
- Joined
- Jun 3, 2022
- Messages
- 424
Hi everybody,
I wanted to share with you my last completed project: a sheath for a Sheffield-style cutlery-handle bowie that I put together recently with an English handle and a modified CVA blade.
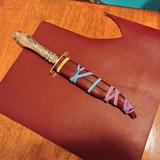
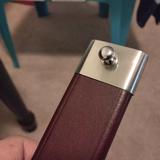
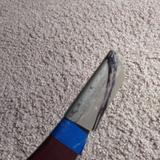
I've been making my own sheaths for a while now, strictly as a hobby, and recently I completed my first traditional butt-stitched sheath for a Fca. de Toledo plug bayonet, which turned out decent. However, aside from a chape I improvised recently for a small Wostenholm bowie, I had never taken a stab at metal fittings, until now. Basically, I wanted a 19th-century-style sheath for this knife, butt-stitched at the center and with a nickel silver throat and chape. Having done the sheath for the plug bayonet and gotten familiar with the nitty-gritty of wet forming and butt-stitching, making the actual leather sheath was not too hard (especially since the blade is made of 440C, so rust wasn't a concern):
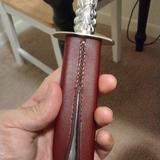
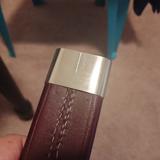
Now it was time for the throad and chape, for which I ordered a 24-gauge sheet of nickel silver. The throad, as it turned out, was fairly simple; it was mostly a matter of cutting the piece in the right length and folding it carefully to match the contour of the sheath with the knife inside, carefully drill the hole for the stud button, and solder (since this was my first attempt, I left the joint in the middle of the back side of the piece):

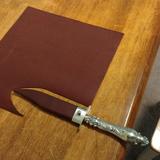
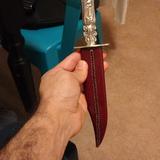
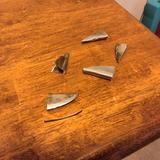
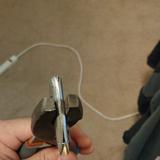
Definitely the hardest part of the project was the chape. Previously, I had seen this great video tutorial (in Spanish), which gave me an idea of how to proceed. However, I didn't have all the tools (including the "cutout" to hammer onto), and my chape had to be asymmetrical, with one straight side and the other one curved, so I had to be creative. Long story short, I tried several times taking different approaches, and ended up ruining five pieces. In the end, what worked for me was folding a roughly shaped piece onto the sheath (with the knife inside) and then carefully closing it with a hammer. This left an open section at the tip, to which I soldered a small piece of the same material that then had to be ground down (in the end I had to use glue to fill in some soldering imperfections). Since I failed so many times, I didn't take many pictures of the final piece, but here are a few images of the entire process:

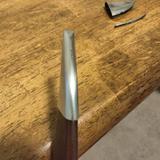
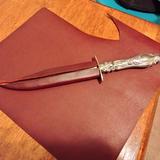
Still lots to learn, but after some polishing and putting together a frog, I really liked how it turned out, at least from a hobbyist's perspective:


Comments/tips welcome!
I wanted to share with you my last completed project: a sheath for a Sheffield-style cutlery-handle bowie that I put together recently with an English handle and a modified CVA blade.
I've been making my own sheaths for a while now, strictly as a hobby, and recently I completed my first traditional butt-stitched sheath for a Fca. de Toledo plug bayonet, which turned out decent. However, aside from a chape I improvised recently for a small Wostenholm bowie, I had never taken a stab at metal fittings, until now. Basically, I wanted a 19th-century-style sheath for this knife, butt-stitched at the center and with a nickel silver throat and chape. Having done the sheath for the plug bayonet and gotten familiar with the nitty-gritty of wet forming and butt-stitching, making the actual leather sheath was not too hard (especially since the blade is made of 440C, so rust wasn't a concern):
Now it was time for the throad and chape, for which I ordered a 24-gauge sheet of nickel silver. The throad, as it turned out, was fairly simple; it was mostly a matter of cutting the piece in the right length and folding it carefully to match the contour of the sheath with the knife inside, carefully drill the hole for the stud button, and solder (since this was my first attempt, I left the joint in the middle of the back side of the piece):
Definitely the hardest part of the project was the chape. Previously, I had seen this great video tutorial (in Spanish), which gave me an idea of how to proceed. However, I didn't have all the tools (including the "cutout" to hammer onto), and my chape had to be asymmetrical, with one straight side and the other one curved, so I had to be creative. Long story short, I tried several times taking different approaches, and ended up ruining five pieces. In the end, what worked for me was folding a roughly shaped piece onto the sheath (with the knife inside) and then carefully closing it with a hammer. This left an open section at the tip, to which I soldered a small piece of the same material that then had to be ground down (in the end I had to use glue to fill in some soldering imperfections). Since I failed so many times, I didn't take many pictures of the final piece, but here are a few images of the entire process:
Still lots to learn, but after some polishing and putting together a frog, I really liked how it turned out, at least from a hobbyist's perspective:
Comments/tips welcome!
Last edited:
