My NEW mini commander

Spyder Punk

Banned
Joined
May 27, 2002
Messages
218
The liner lock is killing my thumb!!!!!!!!!!!!!!!!!!!!!!! its so freakin hard to close it, every time i push it to the left to close it i gotta use ALOT of pressure and it digs the hell out of my skin. Now its bleeding and i gotta use my left thumb to close it. Im hopeing it will looseing up SOON, Will it? or does it take months. over all its still an awsome knife. :D thanks
 
Out of the box, they can be a little catchy. I grow out the nail on my right thumb to use. I don't even use the fleshy part of the thumb.;)
 
My Super Commander was a bit like that. After taking it apart, cleaning it, lubing it with Chris Reeve flourinated grease, and working it a zillion times, the lock disengages a lot easier. I did the same thing with my Mini Commander. The lock on it disengages very easy. My wife could handle it. :)

I have two questions. Have you cleaned & re-lubed your Mini Commander? How far over does the lock go?

The lock on my Super Commander goes almost to the middle of the blade. The lock on my Mini Commander goes about 10% into the blade.
 
I rather prefer the tight lock up of my Commnader and SpecWars.

Better to be locked up tight when you need it, but I look at my COmmander as a strictly self Defense knife, I carry the CQC-7A and Specwar as my work knives.

They do losen over time though. I have had my Commander since early 2000 and it still when waved open from the pocket locks up very tight. The wave action is violent on a knife opening, the Emersons have to be strong knives with great lock up or the wave actioning will beat the thing to death.

Using the Wave really stresses the knife but the liner should go back easier than that. Just wait it will loosen.
 
L.O. , I lubed it up pretty good, i havent taken it apart cuz i dont know what the hell im doing and even if it will come apart? id rather not take the chance unless you can give me some pretty Good detail on how to. it locks up about just about half way. ;)
 
Spyder Punk, it's not hard at all to disassemble and re-assemble a Mini Commander. Replacing lube is always better than adding lube. Your action (not so much lockup) will improve immediately. You'll KNOW your knife. Go for it!
 
Alright ill take him apart, thats what he gets for just sliceing me wide open, dam thing is sharp!!! :rolleyes: :mad:
 
OK i took him apart.. but on the left side towards the Ass of the knife the liner is sticking out a little bit and you can see it, i tryed about 30 times to line the g-10 and the liner back up but after its lined up and i start to screw it back on it pokes back out. what can i do to fix this? or am i screwed. :mad: :(
 
I seriously doubt that you're screwed. I've disassembled and re-assembled my Sebenza more times than I can remember. I've only taken two Emersons apart, but they were even easier to re-assemble than my Sebenza. All three knives went back together in EXACTLY the reverse order of how they came apart. Here are some tips. Read ALL parts before you start!

1. RELAX.

2. Wash and dry EVERYTHING.

3. Apply a small amount of lube to both sides of the bushings and the areas of the blade they'll contact.

4. Apply a small amount of lube to the primary and secondary detents.

5. Apply a small amount of lube to the blade pivot.

6. Lay everything out so you can easily see it.

7. RELAX.

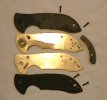
8. Start with the lock side. Push the pivot through the scale, then into the lock side scale. Place the pre-lubed bushing on the pivot. Place the pre-lubed blade on the pivot. Place the other pre-lubed bushing on the pivot.

9. Place the stop pin in its hole.

10. RELAX.

11. Put the non-lock slab and liner together. You now have two halves of a Commander, some screws, and a backspacer.

12. RELAX.

13. Lining up the stop pin and the pivot, assemble the two 'halves'.

14. Put in the pivot screw first. Screw it in a little, but do NOT tighten it.

15. Place the backspacer between the two halves. Carefully start the screws that go through it. Screw them in a little, but do NOT tighten them.

16. Look at what you've assembled. Make sure the stop pin is not crooked. Make sure everything looks and feels right.

17. Tighten the pivot screw until you feel a little resistance. Tighten the other screws until you feel a little resistance.

18. Repeat step 16.

19. Tighten the pivot screw until your blade moves EASILY. Tighten the other screws. Flick the blade open a few times. Tighten the pivot screw until your blade moves like you want it to move.

20. Install the clip.

21. RELAX.

Let me know how it goes.
 

Attachments

  • exploded mini commander.jpg
    exploded mini commander.jpg
    25.6 KB · Views: 147
Thanks Lynn, I really apriciate your help, I took it apart again oiled up everthing , made sure it was all lined up good , then screwed it back together and everythings fine now, its all lined up perfect. Thanks:D
 
Back
Top