Photos "My Shop" Photo thread

Stacy E. Apelt - Bladesmith

ilmarinen - MODERATOR
Moderator
Knifemaker / Craftsman / Service Provider
Joined
Aug 20, 2004
Messages
38,187
Post photos of your shop or garage here.
Show what you did, what you wish you did, and any advice for people building a shop.
Photos of special features and equipment would also be good.
 
Front room. 8 X 12.
7X 14 lathe, 1700 RPM buffer, Sherline mill, tiny Seig Chinese mill, dental buffer, drill press.
BTW- there is a really cool, variable-speed 1 X 30 belt grinder visible behind the bandsaw.
 

Attachments

  • IMG_3673.JPG
    IMG_3673.JPG
    239.6 KB · Views: 4
Last edited:
Middle room. 12 X 16.
Variable speed buffer, 2 speed dental buffer, Pheer 2 X 72 variable speed grinder, Hardcore 2 X 72 grinder, Multitool 2 X 36 grinder. Commercial air cleaner at the top right.
2nd pic- my clean workbench. Small Foredom variable speed buffer behind the chair.
3rd pic- heat treating area out of pic on left, large rolling mill, small bead blast cabinet. Unimat lathe and 4" table saw out of sight on shelf under bench. Air/propane and air/acetylene torches.
4th pic- Grizzly 2 X 72 grinder, Grizzly 3600 RPM buffer, dust collection system.
 

Attachments

  • IMG_3675.JPG
    IMG_3675.JPG
    275 KB · Views: 7
  • IMG_3676.JPG
    IMG_3676.JPG
    280.4 KB · Views: 6
  • IMG_3679.JPG
    IMG_3679.JPG
    271 KB · Views: 6
  • IMG_3680.JPG
    IMG_3680.JPG
    267.6 KB · Views: 8
Last edited:
3 Rd room. 8 X 24
Pic 1 & 2: My desk-covered with projects.
Pic 3: the laser engraver I'm not using. Knife cleanup before shipping is done here, too.
 

Attachments

  • IMG_3682.JPG
    IMG_3682.JPG
    254.8 KB · Views: 4
  • IMG_3681.JPG
    IMG_3681.JPG
    232.1 KB · Views: 5
  • IMG_3683.JPG
    IMG_3683.JPG
    208.7 KB · Views: 5
3rd room.
Pic 1- view from my desk. Ultrasonic cleaners, small refrigerator, pickle pot, sink, window A/C, portable A/C mounted through wall, fart fan, engraving machines on left side. Right side: plating bench with microwave to heat solutions. Engraving bench at end behind door.
Pic 2: view of large and small new Hermes engraving machines and accessories. Small steam cleaner in left side of pic.
Pic 3: the hand engraving bench.
Pic 4 view from the engraving bench.
 

Attachments

  • IMG_3688.JPG
    IMG_3688.JPG
    253 KB · Views: 6
  • IMG_3686.JPG
    IMG_3686.JPG
    237.8 KB · Views: 8
  • IMG_3685.JPG
    IMG_3685.JPG
    247.7 KB · Views: 5
  • IMG_3684.JPG
    IMG_3684.JPG
    239 KB · Views: 11
Please note: we are in the very slow process of cleaning and streamlining the entire shop- so be kind.
 
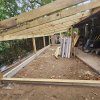
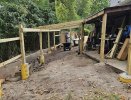
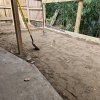
No finished shop photos yet, but I thought I would start posting photos of the new forge build. The shots are out of order, but are before adding 24 yards of fill, after leveling, and the foundation blocks in place with a footer on top. In the background you can see the bulkhead I built to protect the forge from future creek rise. It is about 7 feet above high water level in the creek level now.

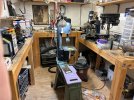
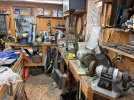
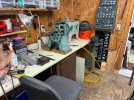
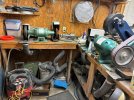
The enclosed portion will be 24' by 10', with a open 8'X12'area on one end for the trash cans and trailers, and an 8'X8' garden shed with one open side on the backyard end. When done, the forge will have a Solar grey Suntuf corrugated roof that lets in light, but blocks UV. The forge roof is sloped, and is pretty low on the backside, but will accommodate shorter people, like me. The new forge will be called " The Hobbit Hole". There will be a yellow with black diagonal stripes sign saying "Max Headroom" over the entry door (you have to be older than 50 to know the reference". There will be a welding area for Stik/Mig/Tig/Torch welding and other torch work; then the forging pit area where I have to figure out how to position way too much equipment; then a lawn and garden area the will store the electric rider mower/push mower/battery chargers plus most of my gardening things like backpack sprayers and long tools. The propane tanks will store on the low clearance back wall. On the inside high wall, there will be a tool rack for forging hammers/tongs/hardie tools/etc., and all my Ryobi tools and batteries will hang on a rack with the multi-charger. On that wall will be the PVC tubes for holding steel bars. Shorter steel pieces and other supplies will be in bins under the worktops between the sections. I have several beautiful oak cabinets and tool boxes that will finally have a good home for supplies and special precision tools.

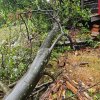
I also put some shots of the tree that fell on the deck and construction materials this morning in the big coastal storm. Miraculously, it did not damage a thing beyond some bushes. Look at the shot of the trunk (20" wide at that point) sitting right against two storm doors in their cardboard boxes.
 

Attachments

  • 20250914_171517.jpg
    20250914_171517.jpg
    355.5 KB · Views: 2
  • 20250916_103303.jpg
    20250916_103303.jpg
    425.1 KB · Views: 4
  • 20250916_102518.jpg
    20250916_102518.jpg
    551 KB · Views: 2
  • 20250916_135913.jpg
    20250916_135913.jpg
    358.1 KB · Views: 2
  • 20250916_103306.jpg
    20250916_103306.jpg
    539.3 KB · Views: 3
  • Forge rebuild 5 .jpg
    Forge rebuild 5 .jpg
    478.4 KB · Views: 4
  • 20250914_103656.jpg
    20250914_103656.jpg
    422.1 KB · Views: 3
I wish I could do carpenter work. Never been good at it. Scared of circular saws.
I worked in the building maintenance trade much of my life. Seems like every time I was introduced to a "master carpenter" or "lead carpenter" when I went to shake their hand-they had between 3-4 fingers left.
I thought-if these guys are good, I'll just have nubs at my wrists!
 
Last edited:
Back
Top