- Joined
- Oct 20, 2008
- Messages
- 5,547
A quick tutorial of something I figured out today, in case it may help anyone:
I mostly hollow grind with a 12 wheel. I usually give these blades a hand rubbed finish, so I need a radiused sanding block that matches a 12 wheel.
For a good while I used a strip of thick acrylic plastic, heat curved to the inside of the wheel and bonded to a hard leather surface for sanding these blades. I learned this way from Ken Onion, and it works great for smaller blades. He uses a hard rubber for the surface, which doesnt blend grind lines as badly.
I was about to sand a couple of hollow blades today, and was thinking Id like a metal 12 radius sanding block. Ive seen the ones made by Todd Begg, and while they look great, they are not in my price range right now. My acrylic and leather sanding backer does not give me the power for sanding medium to long blades, and if Im not very careful, really washes out grind lines.
Then I remembered reading in a book about building banjos that most brake drums on passenger vehicles are 11 I.D.
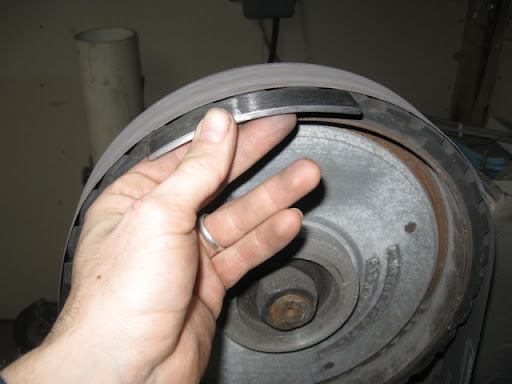
So I cut out a strip of 3/16 mild steel the size I wanted, about 7/8 x 5, on the bandsaw. I took a brake drum from the scrap pile, set it on a stump, and took a rounding hammer. I hammered the steel strip cold against the braking surface on the inside of the drum to match the radius, being careful to hammer the entire back all the way to the ends.
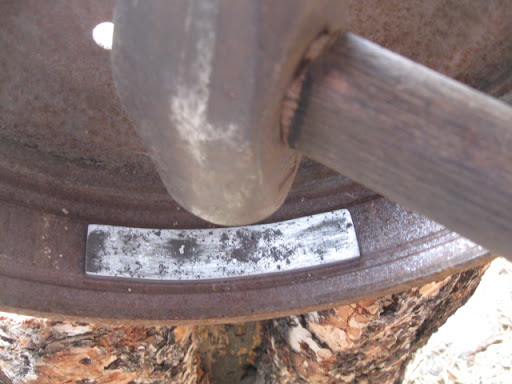
I ground the face of the strip clean, then put it over the outside of the drum, (11-5/8 O.D.) and used a rubber non-marring mallet to conform the piece to the outside diameter. Since the piece is 3/16 thick, by adding that thickness to both sides of the 11-5/8 outside diameter of the brake drum, I arrive right at 12 for the resulting radius on the sanding face of the block.

I checked it against the contact wheel, it looked right, so I cleaned the face up with a 240 grit belt, then very lightly round-chamfered the edges of the face all the way down both sides.

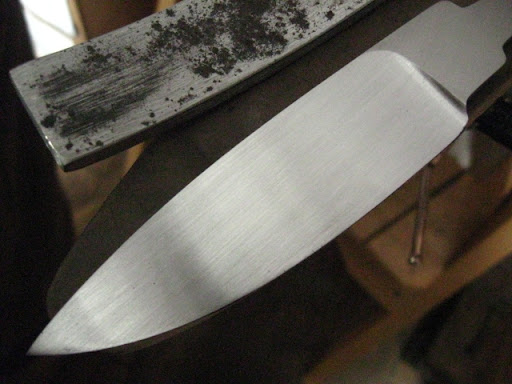
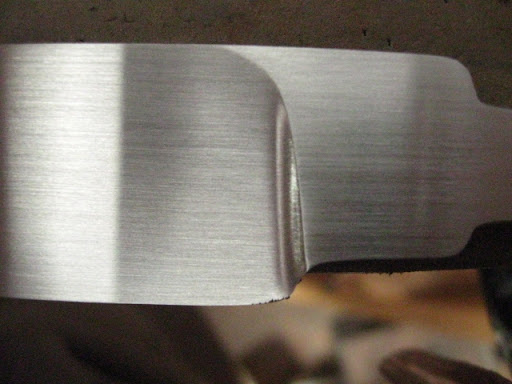
I went inside to try sanding with it. It works great, I can sand more aggressively, and it leaves the top of the plunge nice and crisp. With the slight chamfer down the edge, I can get right into the plunge radius and sand it smoothly.
Heres a couple pics of how it looks, and the two 12 backers by each other. The leather faced one is still good to blend the last few strokes with and make it look pretty.

I mostly hollow grind with a 12 wheel. I usually give these blades a hand rubbed finish, so I need a radiused sanding block that matches a 12 wheel.
For a good while I used a strip of thick acrylic plastic, heat curved to the inside of the wheel and bonded to a hard leather surface for sanding these blades. I learned this way from Ken Onion, and it works great for smaller blades. He uses a hard rubber for the surface, which doesnt blend grind lines as badly.
I was about to sand a couple of hollow blades today, and was thinking Id like a metal 12 radius sanding block. Ive seen the ones made by Todd Begg, and while they look great, they are not in my price range right now. My acrylic and leather sanding backer does not give me the power for sanding medium to long blades, and if Im not very careful, really washes out grind lines.
Then I remembered reading in a book about building banjos that most brake drums on passenger vehicles are 11 I.D.
So I cut out a strip of 3/16 mild steel the size I wanted, about 7/8 x 5, on the bandsaw. I took a brake drum from the scrap pile, set it on a stump, and took a rounding hammer. I hammered the steel strip cold against the braking surface on the inside of the drum to match the radius, being careful to hammer the entire back all the way to the ends.
I ground the face of the strip clean, then put it over the outside of the drum, (11-5/8 O.D.) and used a rubber non-marring mallet to conform the piece to the outside diameter. Since the piece is 3/16 thick, by adding that thickness to both sides of the 11-5/8 outside diameter of the brake drum, I arrive right at 12 for the resulting radius on the sanding face of the block.
I checked it against the contact wheel, it looked right, so I cleaned the face up with a 240 grit belt, then very lightly round-chamfered the edges of the face all the way down both sides.
I went inside to try sanding with it. It works great, I can sand more aggressively, and it leaves the top of the plunge nice and crisp. With the slight chamfer down the edge, I can get right into the plunge radius and sand it smoothly.
Heres a couple pics of how it looks, and the two 12 backers by each other. The leather faced one is still good to blend the last few strokes with and make it look pretty.
