Need help getting dailed in with my wicked edge

Joined
Oct 11, 2012
Messages
205
I bought the WE kit after I got my first RL knife with a D2 blade. I've used the WE to sharpen it, but can't seem to get a really good edge.

Here's how I set everything up.

1: I clamped knife roughly center of the using the bottom stop, and noted the position with the provided ruler.

2: I used a sharpie to shown the angle of the edge, then adjusted the rods to that angle. The angle ended up being between 22- 24*, so I set the rods to 24*.

3: I started sharpening with the 100 grit blocks. 3 passes on one side, then the other side with decent pressure. I probably did this 8-10 times with each grit. I continued this process all the way up to 1000 grit, then used the strops to polish the edge.

Here are my issues.

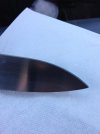
I was able to get a nice even edge up to the point where the blade curves to the point. There, the edge/angle gets wider. It's hard to explain, but you can see more of the cutting edge there, than on the flat portion of the blade. Also, I am killing the point. Kinda rounding it. I think this is probably because I'm pushing the block past the point too hard.

Here's a picture.ImageUploadedByTapatalk1358523935.857137.jpg
After I sharpened it the first time, it felt very sharp, but wouldn't cut paper cleanly, or shave my arm hair-usually how I tested knives in the past.

I resharpened it a few days later because I wasn't happy with the edge. This time I set the rods to 22* and repeated the process from 100 grit up.

Again, it's not sharp like I feel it should be. What am I doing wrong???

Should I be wetting the blocks?

Am I using too much pressure?

What's the best angle? Maybe that's off?

Any other tips would be appreciated.

Sean.
 
Wish I could help you! Im just curious bc i was thinking of getting a WE myself! Someone with knowledge on the WE will chime in eventually!!
 
Are you using each grit until you get a burr? Even at 100 grit you should get an apex burr
before you move on to the next grit. I've had a WE for several years and for a well defined
sharp edge, it can't be beat. But it takes some time. When I'm in a real hurry, I use
the paper wheels.
Bill
 
Are you using each grit until you get a burr? Even at 100 grit you should get an apex burr
before you move on to the next grit. I've had a WE for several years and for a well defined
sharp edge, it can't be beat. But it takes some time. When I'm in a real hurry, I use
the paper wheels.
Bill

Thanks for the reply Bill,

I'm pretty sure that I get a burr. I also apply sharpie again to check that Everything is consistent before moving to the next grit. I'll set it up again tonight and try again.

Do you wet the blocks when you sharpen?
 
To keep the bevel even from heel to tip you'll need to move the blade back in the clamp a bit. As you progress through the grits lighten the pressure on the stones, it doesn't require gorilla strength. Wetting the stones is not required.

It does take practice & I'm still learning myself so don't get discouraged.
 
I have a Lansky sharpening kit and had the same problem at first. I later realized I wasn't spending enough time on each stone before moving to the next one. Keep going at it with the first stone you use until you can run your finger from the spine down past the edge and you feel a burr. Then switch to the other side and to the same until you feel the burr. Feel for the burr on the opposite side from where you are running the stone on. Once I feel a burr on both sides I give it a few more extra light passes on both sides just to remove the burr. Then I repeat the process with the next stone.
 
I was able to get a nice even edge up to the point where the blade curves to the point. There, the edge/angle gets wider. It's hard to explain, but you can see more of the cutting edge there, than on the flat portion of the blade. Also, I am killing the point. Kinda rounding it. I think this is probably because I'm pushing the block past the point too hard.

Here's a picture.View attachment 324960

Like others have said, you need to make sure you've reached the edge... a burr is a good way to tell.

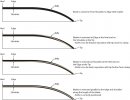
I thought I'd address this part of your post, that the edge is getting wider towards the tip. It's addressed on this page:

Finding the Sweet Spot

Basically, you adjust the knife horizontally, until the curve toward the tip is the same as the rest of the blade.

sweet-spot-on-a-curved-knife_zps5a18d3a0.jpg


As for rounding the tip, you may be rolling the stone as you go past the tip. To avoid rounding the tip, lighten the pressure and stop the stroke before the stone runs off the end, preferably when the tip is about 1/2 way across the stone, and make sure you don't roll it around the very tip.
 
I bought the WE kit after I got my first RL knife with a D2 blade. I've used the WE to sharpen it, but can't seem to get a really good edge.
Hi Sean,
Great advice here so far - here is what I would add. The diamond hones can take a while to break in. For some people this is not a noticeable issue and they get hair whittling edges immediately. For others it is quite dramatic - creating disappointing results at first that lead to a lot of self questioning. Basically there is a lot of extra diamonds that are on the surface of the hone and aren't attached to the nickle plating. They make the stone extra coarse and uneven at first. These will come off heavily as you start using the handles, grey powder on your base, and the hones will smooth up over the course of 6 - 12 or so knives and your results will improve dramatically.

In my experience, tools steels like D2 can be deceptive when sharpening. This is at the stage that Bill and Simioh are suggesting you spend more time working on, raising the burr - the spot where most folks go wrong in their sharpening. The most important part of sharpening if making sure your scratches make it all the way to the cutting edge usually checked by raising a burr. On tool steels I often find that I feel a burr along the full edge from both sides and think I am good, then get to the 800+ grit level and the edge just seems to have gone away - sharp by not Sharp and sometimes no real catch to the edge at all. It seems like you can raise what I would call a false burr on these steels (I don't know what is really happening at a microscopic level but it is like your scratches aren't really to the edge but the metal has stretched over the top so you feel like you have made it). So I raise what I call a strong burr - not just one where I feel my fingernail catch lightly, but something that really stops my finger from sliding off the edge (I feel for the burr by moving my finger nail from spine toward the edge and feel for the catch).

After I sharpened it the first time, it felt very sharp, but wouldn't cut paper cleanly, or shave my arm hair-usually how I tested knives in the past.

I resharpened it a few days later because I wasn't happy with the edge. This time I set the rods to 22* and repeated the process from 100 grit up.

Again, it's not sharp like I feel it should be. What am I doing wrong???

My guess is that the first sharpening you were having a problem with the stones not being broken in, while the second was the issue of not really making it to the cutting edge with your scratches.

I was able to get a nice even edge up to the point where the blade curves to the point. There, the edge/angle gets wider. It's hard to explain, but you can see more of the cutting edge there, than on the flat portion of the blade. Also, I am killing the point. Kinda rounding it. I think this is probably because I'm pushing the block past the point too hard.

To fix that tip widening you need to add one more check to your set up. Do the sharpie, find your angles, set your angles, then using a fine grit and/or very lightly run the stone along the full blade length just like you are going to sharpen. The stone should remove all of the sharpie along the back portion of your blade, but what you are really looking for is what happens as the stone moves around the curve, over the belly etc as you approach the tip. You want the stone to take off the marker evenly all the way. If it doesn't, you need to reposition the knife. What you would have seen in your case is that the marker would be gone completely on the flat portion and then at the curve to the tip it would have only removed the marker on the shoulder of the knife. This tells you to pull the knife back towards you in the clamp - clamp closer to the tip. Keep moving and testing until you find the sweet spot. Vice-versa if the cleaned line went to the cutting edge - here is a diagram from Wicked Edge's instruction page. Lots of other good info there too

sweet-spot-on-a-curved-knife.jpg

For rounding the tip, pressure is the issue. In general, other than when setting in the bevels and creating the edge, you don't need to apply any pressure against the knife with the hones. I really just let the handle rest on the knife and only think about lifting and moving it forward with no pressure inward. The only exception to that pressure is at the tip, and I apply just the slightest back pressure with my thumbs to keep the stone pressed flat against the knife becasue for me I found the stone wanted to roll forward around the tip otherwise - either rounding it off, or creating little facets in the bevel right at the tip. And, you don't have to push the stone all the way until it falls off the tip of the knife, just moving through part of the hone does the trick - just don't stop short (if you color in with the sharpie before each grit while you are learning your stroke - you'll be able to see parts of the knife you miss regularly)


Should I be wetting the blocks?

Not necessary, I don't. some people do to help control the metal dust

Am I using too much pressure?

Sounds like it, after you have your edge created, work light as a summer breeze as LEO on the Wicked Edge forum likes to say

Your angle choices sound great. I usually start any knife by matching what is there, even if it is asymmetrical as measured on the Wicked Edge. Then after sharpening, using, touching up a couple of times I decide about changing it. And usually that asymmetry is because the cutting edge is not centered in the blade - but nearly always the bevels look nice and even (it could also be because you blade is leaning in the clamp, or due to blade thickness -but matching what is there means you don't have to fret about those issues as much). The matching technique keeps your look the same so you don't unintentionally end up with a wide bevel on one side and a narrow one on the other. While you are learning I suggest maintaining the asymmetry if you decide to reprofile - that is if you find the angles to be 22 on the left and 20 on the right and you want to take it down to a finer angle, say 18. Then take the 2 degrees off of both sides and sharpen it at 20 on the left and 18 on the right. Your bevels will still be even. As you get better with the system and are ready to try to move the cutting edge back into the center (assuming that is the reason for the asymmetry), then set both sides at 20, or 18. In this case you would be wanting to move the cutting edge to the left, so you'd do more work on the right side (hope that makes sense). And when you do tackle that you'll want an angle cube to ensure you are really setting in equal angles as blade thickness does affect the angle accuracy of the base rod markings.

hope that helps and wasn't too long winded! :D

Have fun!!!
 
Last edited:
Damn Curtis - nice job -- much more concise on the sweet spot. I'd blame it on the phone calls that interrupt my typing but I know I just type too slow and use too many words! :o
 
Back
Top