- Joined
- Jan 13, 2017
- Messages
- 33
At the beginning of the year I came on here with guns blazing and said that I'd be making knives and wanted some advice on equipment to start out with. I had this wild idea that I could do what I wanted in a tiny space, and with a minimal budget. The responses that I received were mixed, at best, but mostly opened my eyes to the reality of the situation. I appreciate that, truly, and spent a lot longer putting all of this together. I started a spreadsheet to lay out the equipment and funding needed. Now, months later... I'm a few coats of poly and some trim work away from being up and running.
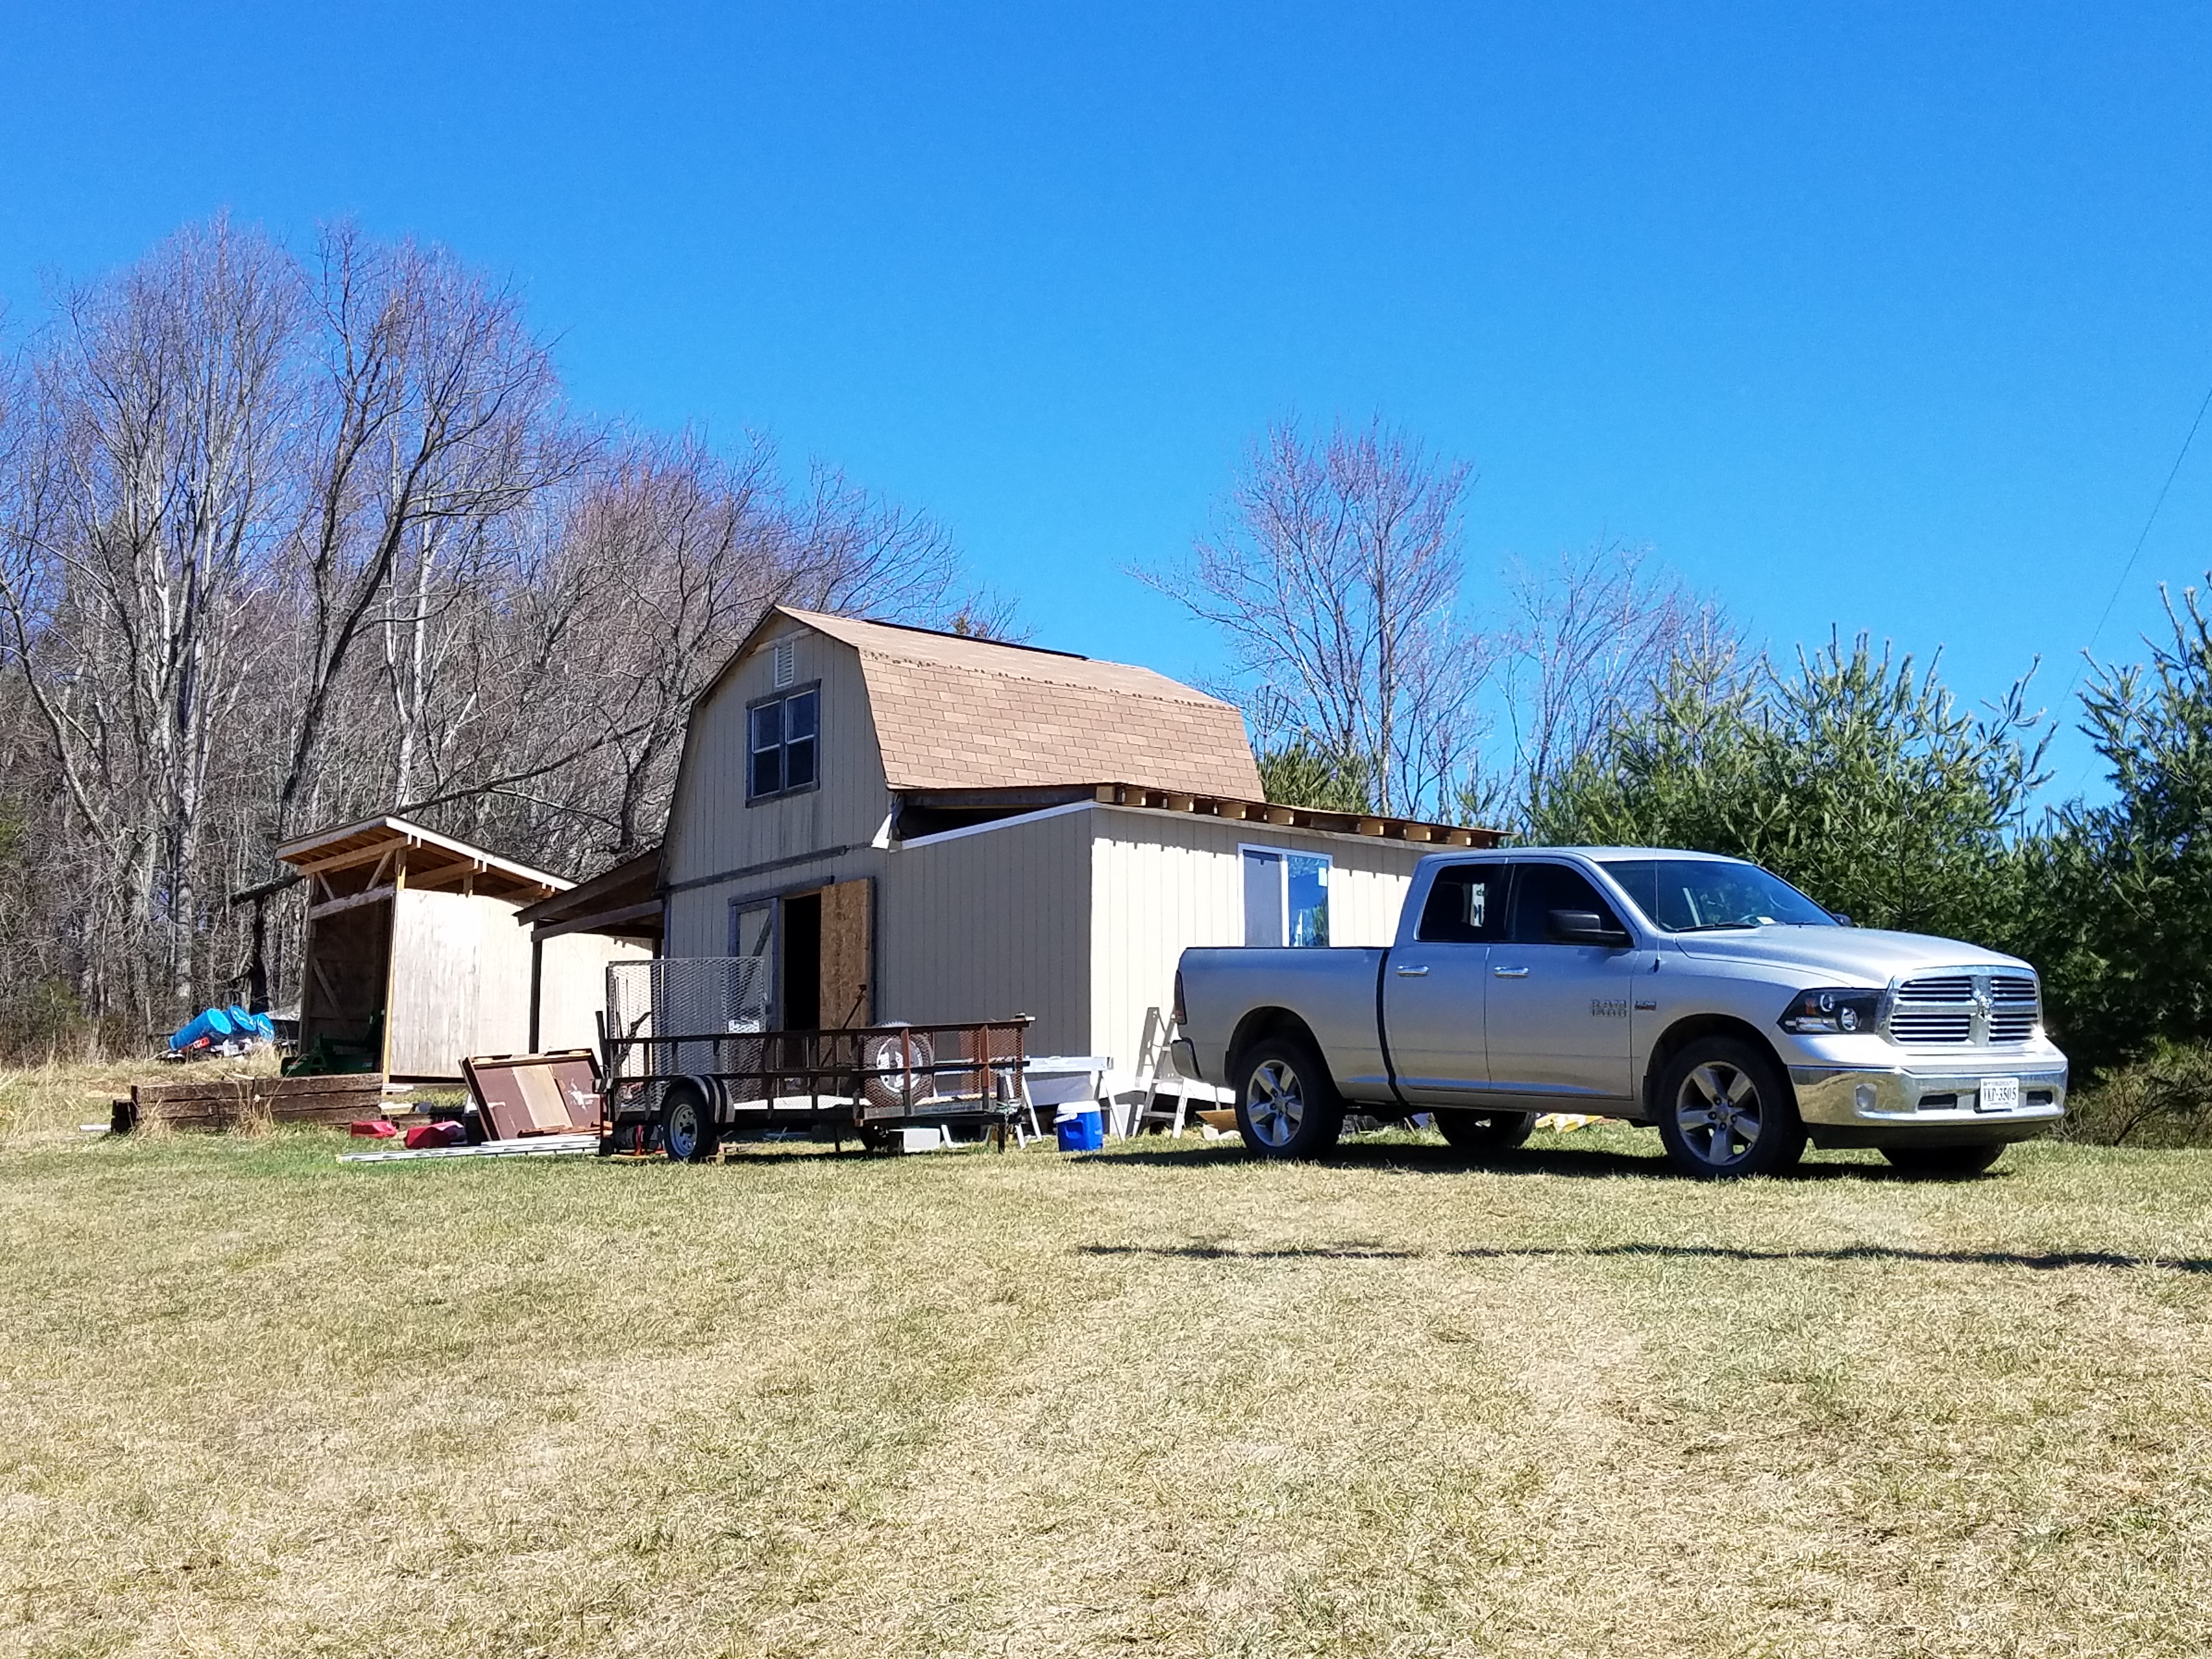
For those of you that remember, I had 2 options for the shop space. A 10x10 portion of a 10x20 shed, or a 16x16 2 story barn. I didn't go with either. My stepdad and I decided to enclose a 10x16 awning/lean-to on one side of the 16x16. I used 2x6 studs for good insulation and bought a decent door and window. We will be cutting out a large doorway into the 16x16 area in the near future. That will allow us to expand as needed. Eventually, the upstairs of the 16x16 will be a finish room. We may even add similar additions to the other side and the back. This image should give you an idea.
I pondered things over and over. My girlfriend and parents would literally try to distract me just to give my mind a rest. I filed for LLC status and started making purchases well before the shop was ready. I somewhat regret that... only because I had boxes, insulation, and other shit stacked to the ceiling in the 16x16 side and getting to something I needed was impossible due to all of the woodworking machinery already in there. It all worked out though. Here is what the inside looks like now, minus a metal cutting bandsaw I put together Friday night using the worst possible directions imaginable... just a picture and a parts list.
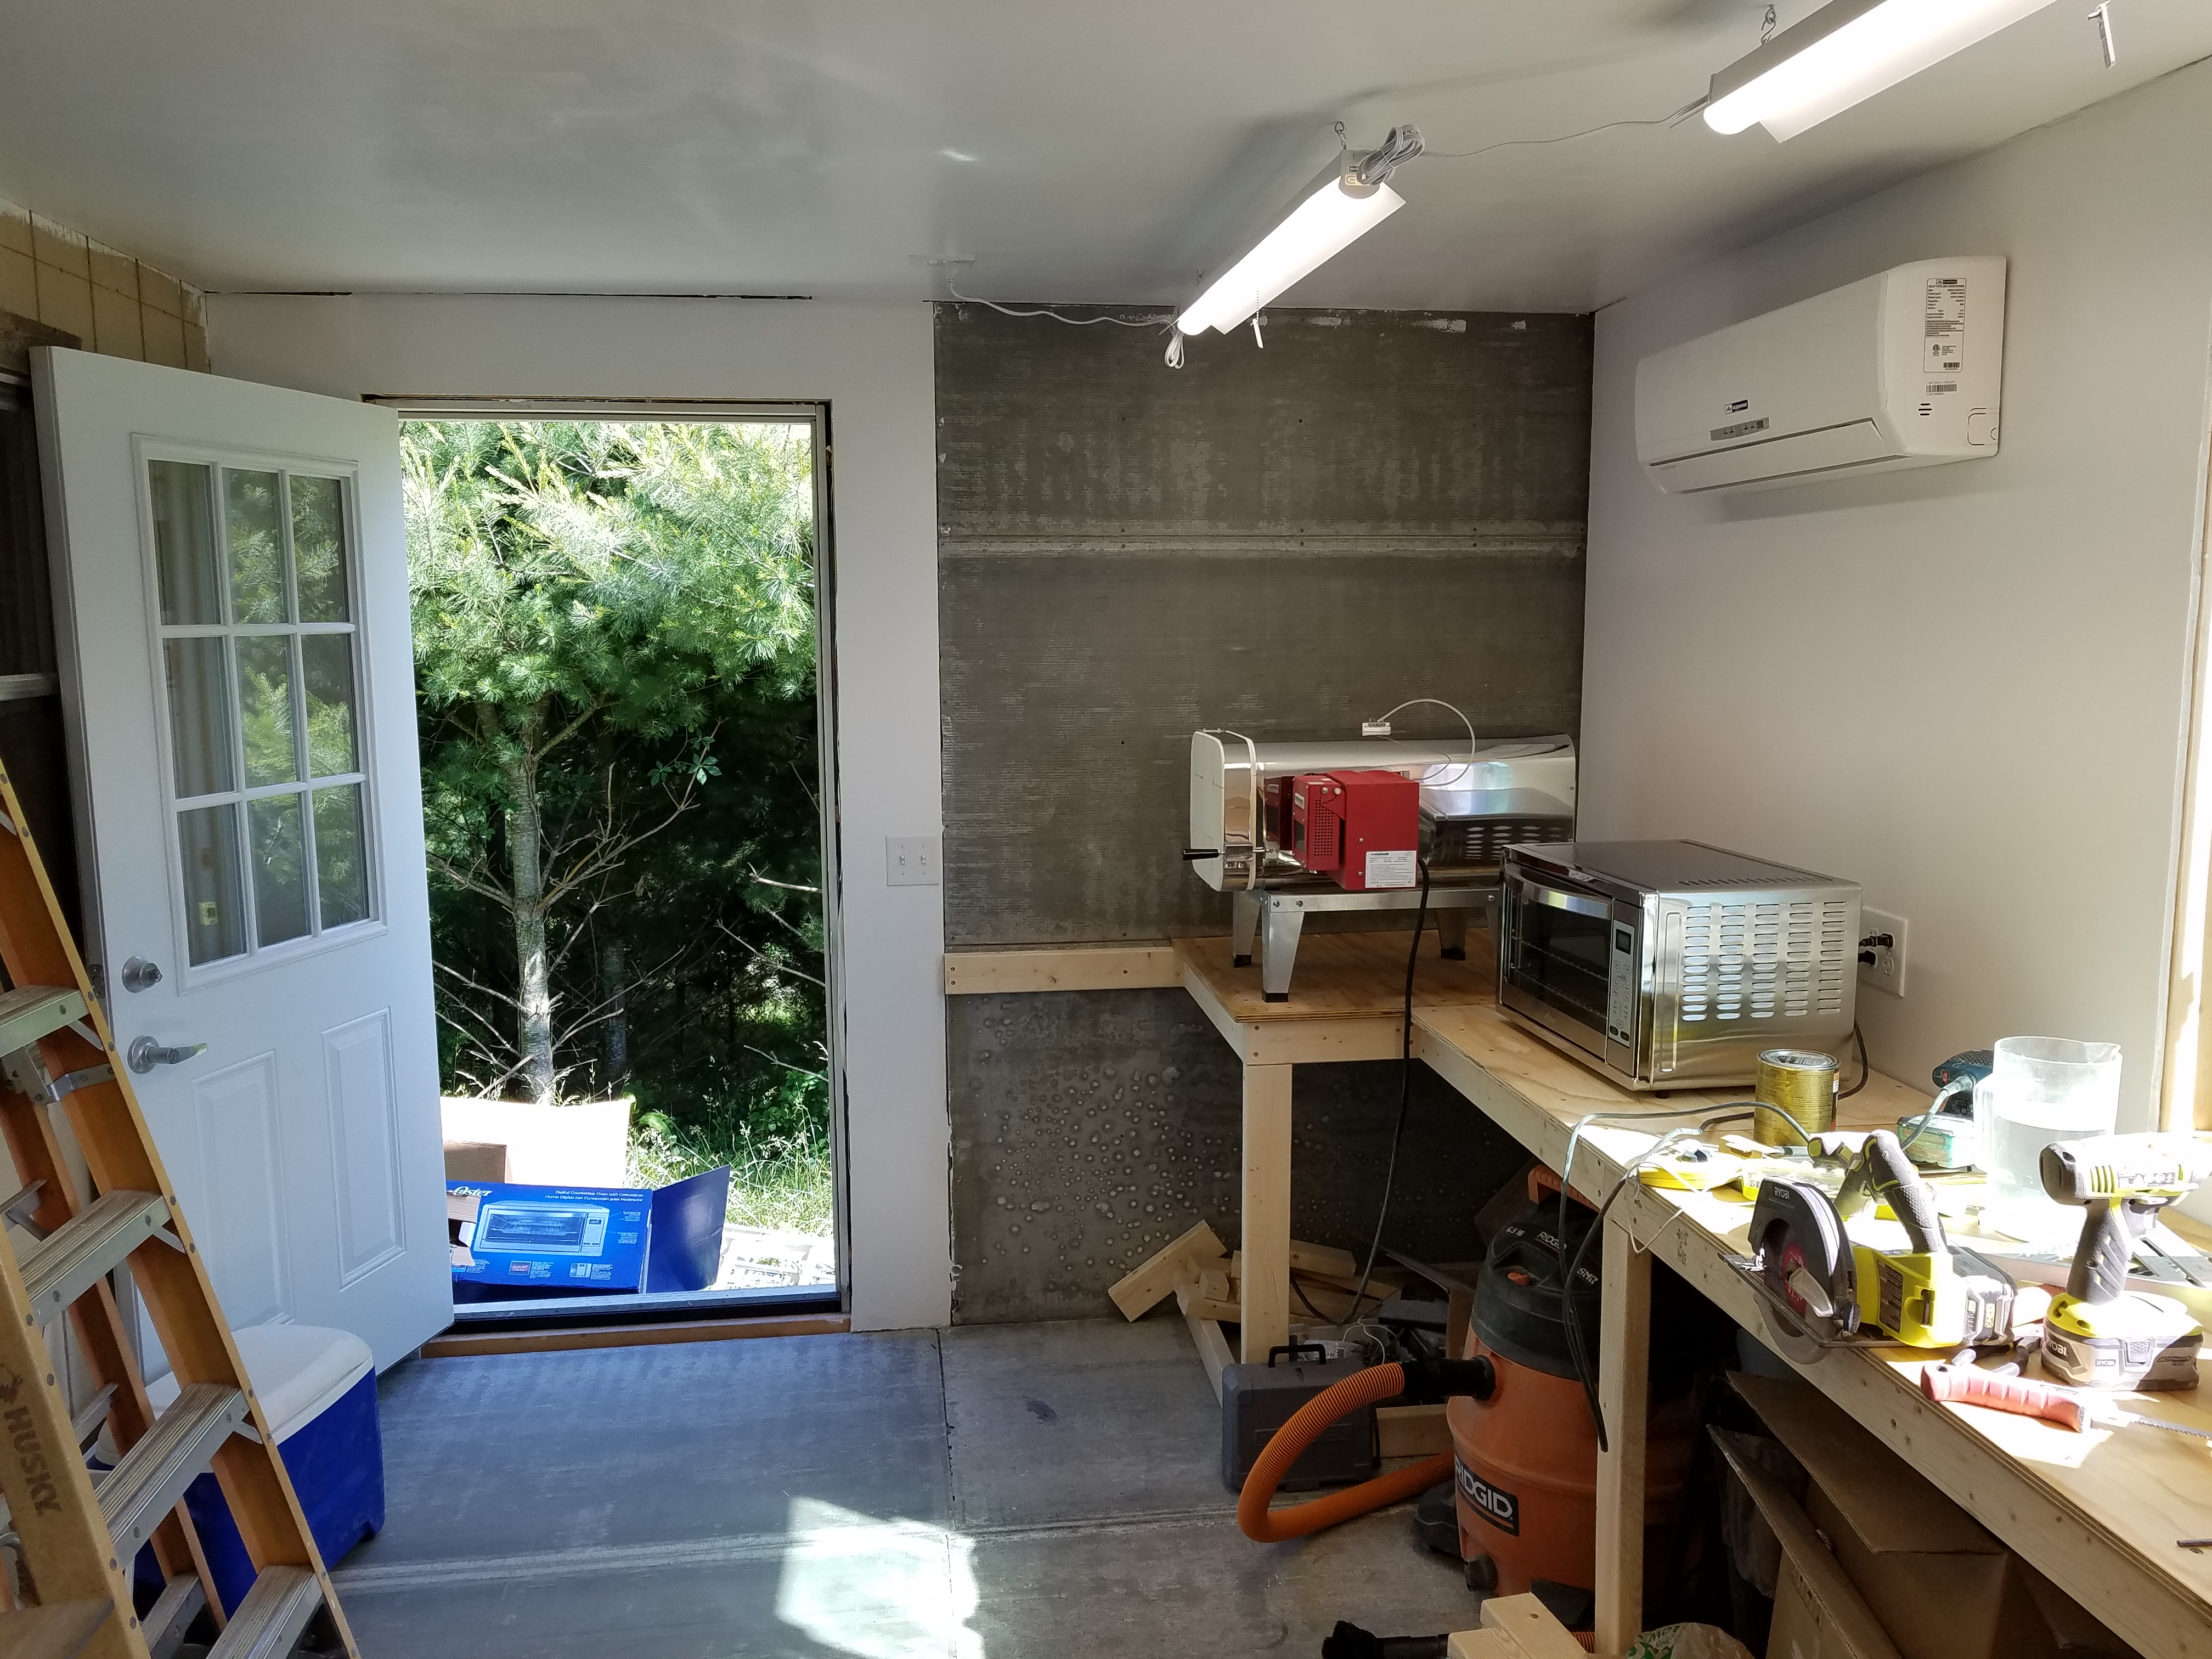
In this picture you can see a mistake. We originally wanted the EvenHeat KF22.5 to back up to the cement board wall. I realized that it greatly limited my space in that corner. My stepdad and I had planned to put a full size oven in for tempering. That limited our space even more. I settled for an extra large toaster oven for now. We plan to add the full size oven to the 16x16 side when we expand. Also, I got a Blue Ridge Mini Split for heat and air. I did most of the install and a local HVAC guy did the final hookup for $125. That unit is rated for 350 sq ft.
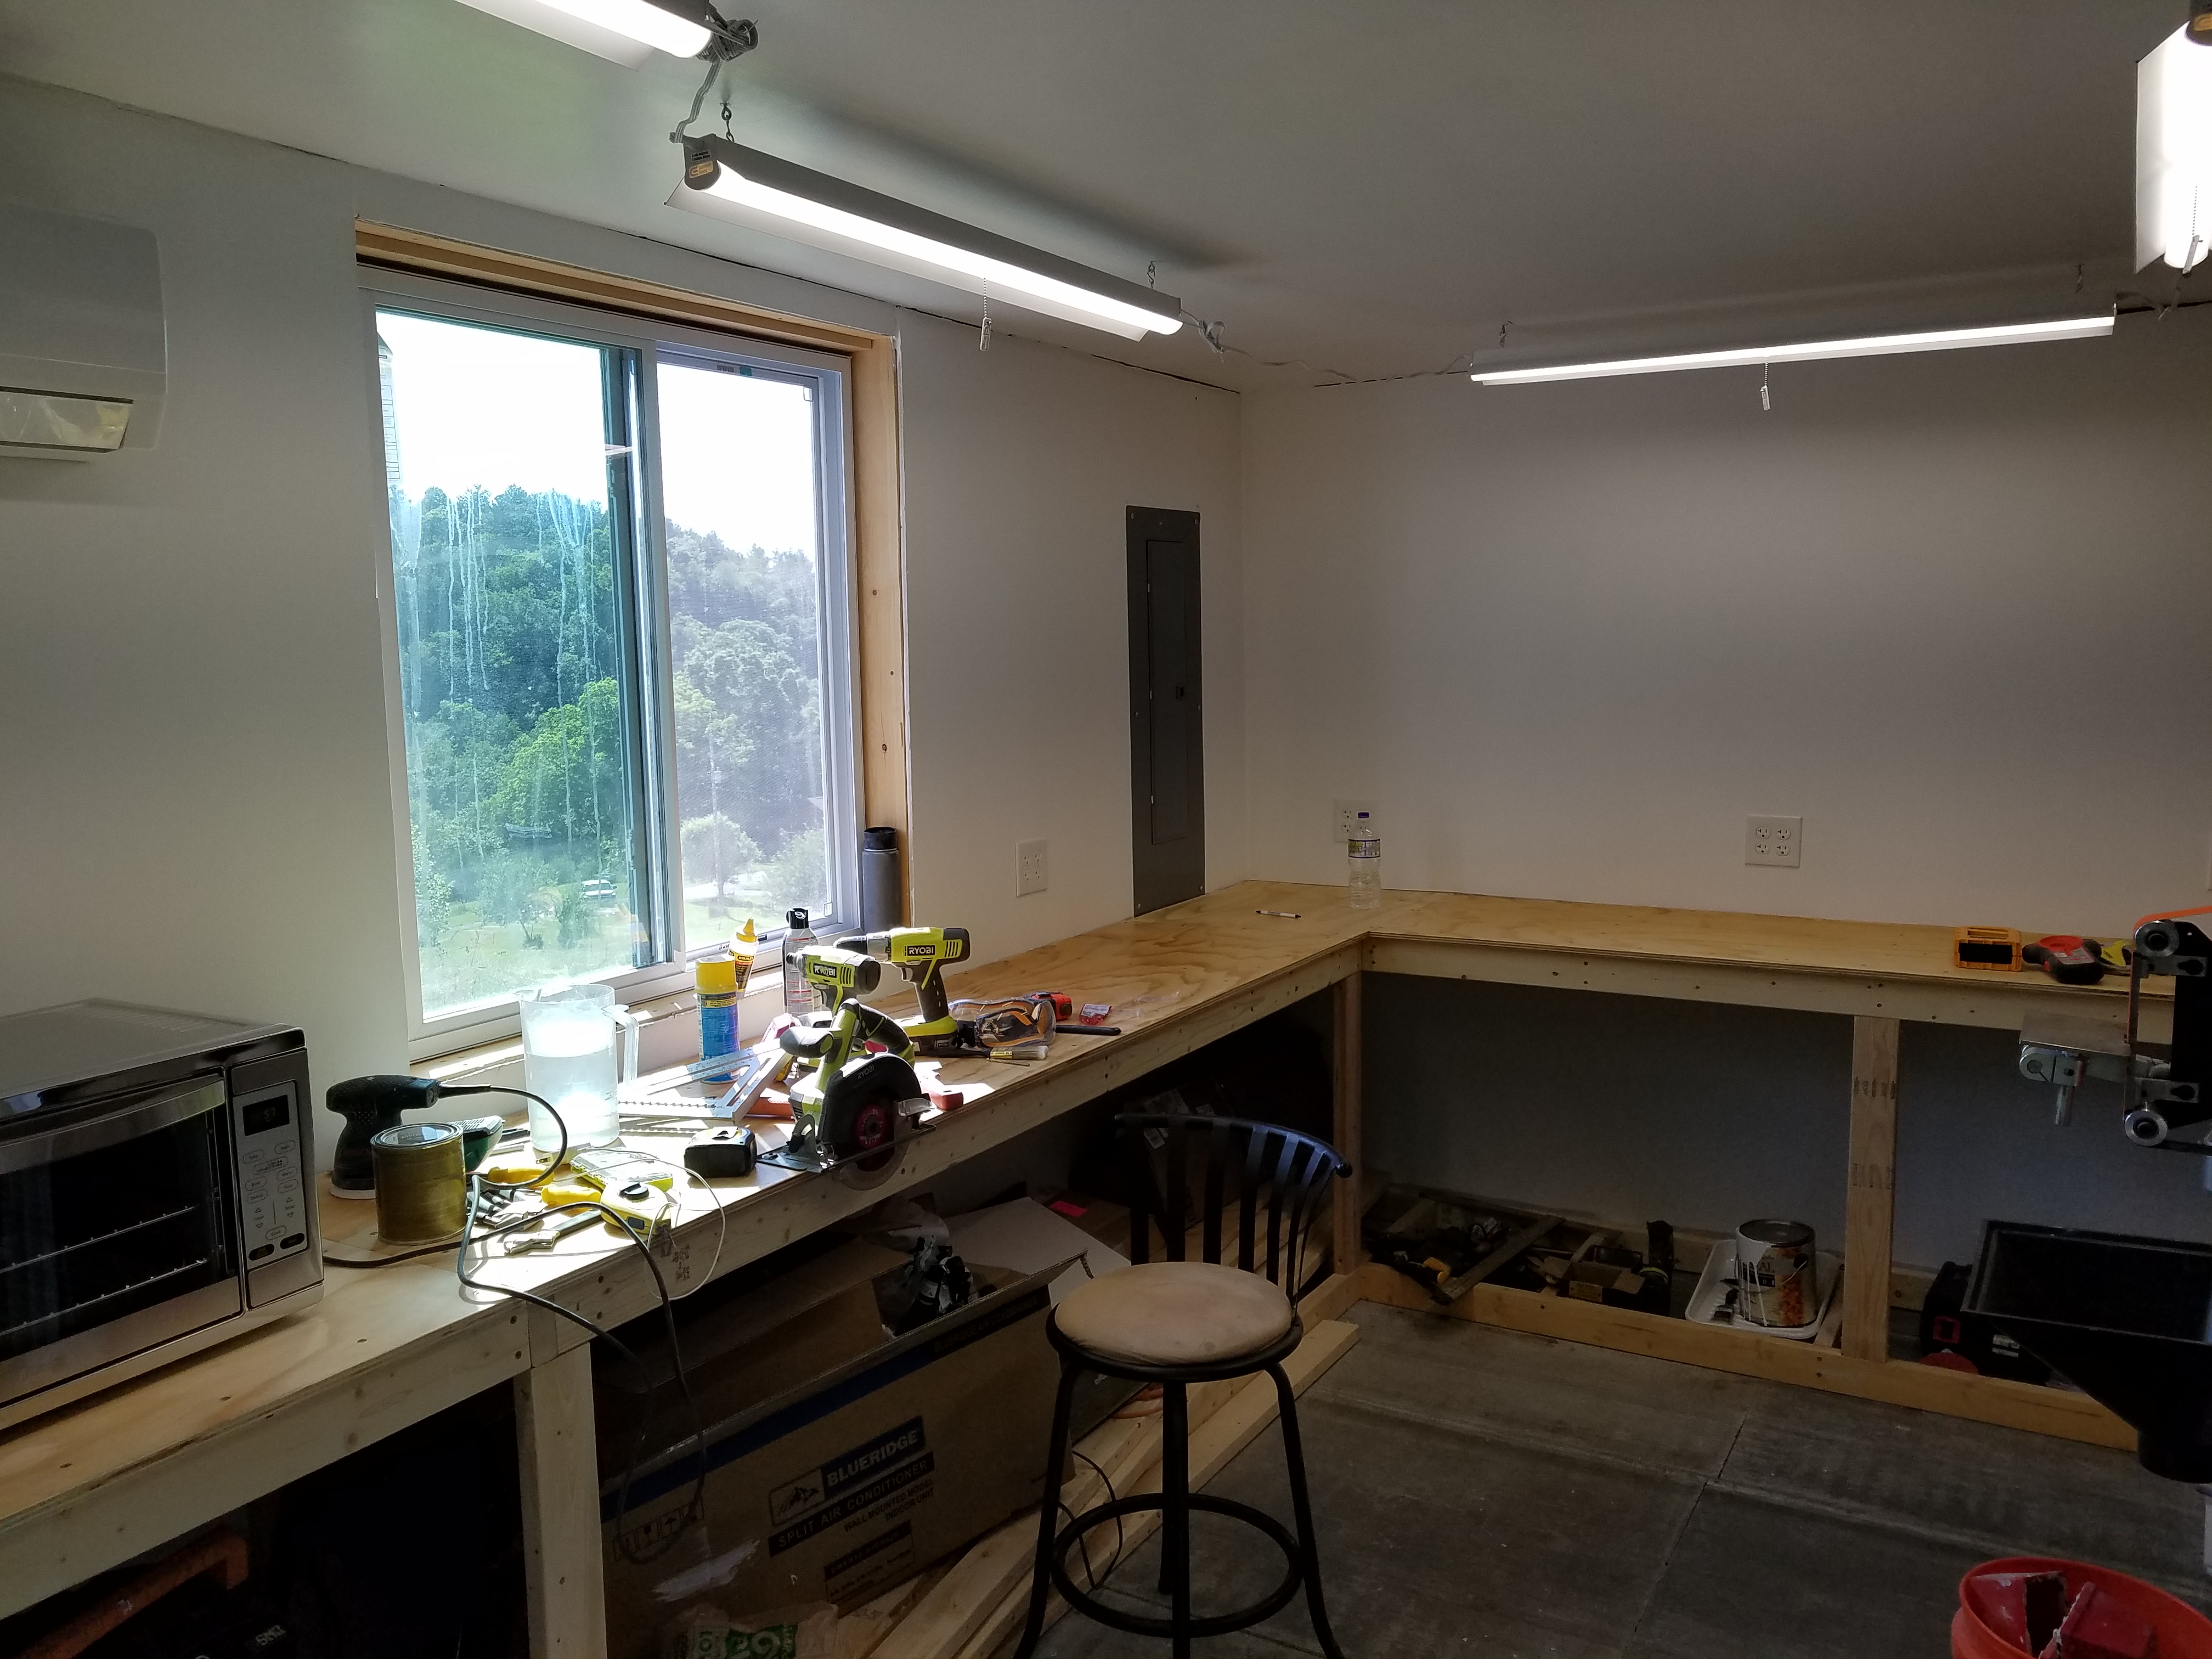
This picture shows most of my bench area. I've got 3 bench vises to play with and figure out which ones I like. I also have a Wicked Edge Pro Pack III to sit somewhere, probably in the corner near the breaker box. The bench height is functional for me both standing or sitting in a stool. I still need to figure out the organization and under bench storage aspect of things. The lighting is 4 separate 4ft LED lamps and 2 architect style swinging arm LED lights that clamp on where needed. One is visible in the next picture.

I finally decided on the NorthRidge Tool Pro Package. It came with the Baldor motor and small wheel attachment. I have a 1" wheel for now. I will probably be ordering a contact wheel from them in the near future. I called Tru-Grit and got set up with Blaze belts, AO belts, leather, and cork. I also installed a JET air filtration unit on the ceiling. It has the 5 micron and 1 micron filters... and really turns the air over. I was impressed by its power but the noise left something to be desired. I also have a 16 gallon shop vac with a HEPA filter for additional cleanup.
So, like I said in the beginning... a bit more to go with trim work and finishing up under the benches. My electrician buddy did a great job making sure I had enough outlets and we're using less than a 1/3 of that breaker box so I can add more as needed. Some tools and equipment aren't shown, but I didn't want to have them in there just to work around while finishing up.
I have some steel from NJ Steel Baron. All 1084 to start with. .250 (2 3"x"48"), .156 (5 3"x48"), and .125 (2 3"x48"). My stepdad has stacks of dried walnut, oak, pecan, and hemlock for handle materials to start out with. My girlfriend's father also gave me some additional furniture grade walnut, oak, and european beech scraps he got from one of the companies he supplies. I ordered a stabilization kit to start curing blanks as I'm finishing up the shop. Basically... I have everything I THINK I need between what you see here, some stuff still in boxes, and some of my stepdad's wood working tools and equipment (mainly the Shop Smith).
I would greatly appreciate any input on the bench layout, shelving, peg board, and under bench storage. I read a few threads out there with some ideas but I feel like there are more floating around. For the belts, we plan to build a hinged door/wall with pegs on both sides. It doubles the storage in a collapsable space.
I would also love to hear your thoughts on possibly venting the heat treat area. With the AC overhead, I think that area may have been overlooked in a planning sense. It would be better to adjust it now than have to do it later.
I can't wait to get started. My parents and I were talking over the weekend and Mom mentioned that there are only a few times in my life that I have been so passionate and driven. When I bought my first bike, when I joined the ARMY as a Special Forces candidate and was selected into the Q Course to chase my stepdad's legacy as a Green Beret, and when I got it in my head that I was going to thru-hike the Appalachian Trail three weeks after being medically retired. This endeavor is no different than any of those... only more variables. I have never felt so alive.
As always, thanks in advance... even for the negative feedback.
For those of you that remember, I had 2 options for the shop space. A 10x10 portion of a 10x20 shed, or a 16x16 2 story barn. I didn't go with either. My stepdad and I decided to enclose a 10x16 awning/lean-to on one side of the 16x16. I used 2x6 studs for good insulation and bought a decent door and window. We will be cutting out a large doorway into the 16x16 area in the near future. That will allow us to expand as needed. Eventually, the upstairs of the 16x16 will be a finish room. We may even add similar additions to the other side and the back. This image should give you an idea.
I pondered things over and over. My girlfriend and parents would literally try to distract me just to give my mind a rest. I filed for LLC status and started making purchases well before the shop was ready. I somewhat regret that... only because I had boxes, insulation, and other shit stacked to the ceiling in the 16x16 side and getting to something I needed was impossible due to all of the woodworking machinery already in there. It all worked out though. Here is what the inside looks like now, minus a metal cutting bandsaw I put together Friday night using the worst possible directions imaginable... just a picture and a parts list.
In this picture you can see a mistake. We originally wanted the EvenHeat KF22.5 to back up to the cement board wall. I realized that it greatly limited my space in that corner. My stepdad and I had planned to put a full size oven in for tempering. That limited our space even more. I settled for an extra large toaster oven for now. We plan to add the full size oven to the 16x16 side when we expand. Also, I got a Blue Ridge Mini Split for heat and air. I did most of the install and a local HVAC guy did the final hookup for $125. That unit is rated for 350 sq ft.
This picture shows most of my bench area. I've got 3 bench vises to play with and figure out which ones I like. I also have a Wicked Edge Pro Pack III to sit somewhere, probably in the corner near the breaker box. The bench height is functional for me both standing or sitting in a stool. I still need to figure out the organization and under bench storage aspect of things. The lighting is 4 separate 4ft LED lamps and 2 architect style swinging arm LED lights that clamp on where needed. One is visible in the next picture.
I finally decided on the NorthRidge Tool Pro Package. It came with the Baldor motor and small wheel attachment. I have a 1" wheel for now. I will probably be ordering a contact wheel from them in the near future. I called Tru-Grit and got set up with Blaze belts, AO belts, leather, and cork. I also installed a JET air filtration unit on the ceiling. It has the 5 micron and 1 micron filters... and really turns the air over. I was impressed by its power but the noise left something to be desired. I also have a 16 gallon shop vac with a HEPA filter for additional cleanup.
So, like I said in the beginning... a bit more to go with trim work and finishing up under the benches. My electrician buddy did a great job making sure I had enough outlets and we're using less than a 1/3 of that breaker box so I can add more as needed. Some tools and equipment aren't shown, but I didn't want to have them in there just to work around while finishing up.
I have some steel from NJ Steel Baron. All 1084 to start with. .250 (2 3"x"48"), .156 (5 3"x48"), and .125 (2 3"x48"). My stepdad has stacks of dried walnut, oak, pecan, and hemlock for handle materials to start out with. My girlfriend's father also gave me some additional furniture grade walnut, oak, and european beech scraps he got from one of the companies he supplies. I ordered a stabilization kit to start curing blanks as I'm finishing up the shop. Basically... I have everything I THINK I need between what you see here, some stuff still in boxes, and some of my stepdad's wood working tools and equipment (mainly the Shop Smith).
I would greatly appreciate any input on the bench layout, shelving, peg board, and under bench storage. I read a few threads out there with some ideas but I feel like there are more floating around. For the belts, we plan to build a hinged door/wall with pegs on both sides. It doubles the storage in a collapsable space.
I would also love to hear your thoughts on possibly venting the heat treat area. With the AC overhead, I think that area may have been overlooked in a planning sense. It would be better to adjust it now than have to do it later.
I can't wait to get started. My parents and I were talking over the weekend and Mom mentioned that there are only a few times in my life that I have been so passionate and driven. When I bought my first bike, when I joined the ARMY as a Special Forces candidate and was selected into the Q Course to chase my stepdad's legacy as a Green Beret, and when I got it in my head that I was going to thru-hike the Appalachian Trail three weeks after being medically retired. This endeavor is no different than any of those... only more variables. I have never felt so alive.
As always, thanks in advance... even for the negative feedback.
 i would just install a kitchen exhaust fan in the wall over the oven and make a hood. or use a pre made oven exhaust hood that vents outside.


