New to knife making

Precision Edge Sharpening

Mail in sharpening service
Gold Member
Knifemaker / Craftsman / Service Provider
Joined
Jul 8, 2023
Messages
79
I have made a few knives and most people here will be past this stage but I lose motivation after I spend several hours of filing bevels, especially when things are not going very well. Any help or advice would be appreciated.
 
Get good files. Make goals for your self. Not like "I want to make a knife", but more on the lines of " I want to file this two inches of bevel down to the centerline in the next 30 minutes".
And again, get good aggressive files, the make all the difference when doing this by hand.
 
Practice.
Start playing with power tools if you can, if you're careful an angle grinder with a flappy dics can take steel off fast, before you get to a file. Maybe think about thin stock scandi grinds, or kit knives.
 
Welcome Sheldon,

Fill out your profile so we know where you live and a bit about you. It may allow a nearby smith to invite you for a shop visit and some lessons. With your profile filled out I might send you a starter kit like in the instructions below.


At age 14 a lot of the advice people may give isn't necessarily good advice. I know some folks are in love with angle grinders, but they can ruin a knife in seconds and have the possibility to severely injure you. I would say to start with good files.


The following tutorial is a no grinder set of instructions for making a good knife. It was specific to kits I would send new makers containing a blade blank, handle blank with rivets, and files and sandpaper. Most of the information is universal and can teach you a lot.

This is from an old thread I posted 15 years ago ... still good info:
I'll have to break it into several posts


These are the instructions I use to get someone started with a profiled stainless steel knife blank. I send it to new makers when I send them a blade blank and handle kit.


I thought there might be those who could use the tutorial and pointers. Some details are specific to a particular knife project, but the info is universal. You can start with a bar of any type of steel and shape it to the knife profile you want. 1084 is a good starter carbon steel, and CPM-154 is a good starter stainless steel.


Files needed are a 10-12" mill bastard (or a magic-cut), and a 10" second cut file. A finishing file is nice, but not necessary. Here is a great file and filing tutorial - http://www.appropedia.org/Filing_Metal

As to the paper, use wet-or-dry metal working paper in grits from 100 to as high as you wish. Most folks use it in steps of roughly doubling the grit. A good set would be, 100/220/400/800/1000/1500/2000/2500. Buy the best paper available. 3M or RhynoWet are both good. I am posting this in two parts.


Part One - Basic Instructions:

The knife:

I have preformed the knife shape to your template. The handle scales will be rough shaped and drilled to accept the Corby bolts. When you get the knife, unscrew the bolts and remove the handles. Take a look at how things fit for reassembly later.


Let's get the names of all the parts clear.

The end of the handle is called the BUTT.

The two pieces of wood are called the SCALES.

The attachments for the scales are called RIVETS. The type of rivets I am supplying are called CORBY BOLTS.

The flat area directly in front of the handle is called the RICASSO, and is the space between the end of the bevels/cutting edge and the handle.

Any inward curve or indentation at the ricasso area or ricasso end of the handle is called a CHOIL.

The little rounded notch at the end of the sharpened edge (at the ricasso) is called a SPANISH NOTCH

The top of the blade is the SPINE.

The cutting part is the EDGE.

The taper from spine to edge is the BEVEL.

The end of the cutting edge and bevels is the PLUNGE LINE.

The handle area above the ricasso is the TANG. There are several types of tangs.

The taper from the ricasso to the tip (looking down on the spine) is called DISTAL TAPER.

The point is the TIP.
 
Last edited:
Work area and procedures:

Find a place where you can safely work on the knife and have room to move. A picnic table outside will work, or any small work surface in the garage. Don't use the kitchen table or the resident cook may become upset with you.

If possible, screw or clamp a strong piece of wood so about 10 inches sticks out from the corner of the worktable. This is the sanding arm. A piece of 2X4 will work. The knife is clamped/screwed to the board, with the edge just off the wood, to allow sanding and filing. IF you curt the board to match the shape of the blade edge it makes filing much easier.

File with smooth strokes in one direction only. Never file in a back-and-forth motion.

When sanding, cut the paper into strips, and use a two-inch-wide by six-inch-long block of hardwood as a backing block. I cut 8X2" strips and use a heavy rubber band to hold the ends on the block. Get a small plastic tub or something that will hold about a quart of water for when you do the wet sanding. You will dip the block and paper in the water. Sand in one direction strokes. Most sanding should start at the ricasso and progress toward the tip. The initial sanding can be perpendicular to the blade (spine to edge) but the finer sanding should always be parallel to the blade ( ricasso to tip). When changing grits in the coarse to fine range (50 to 400 grit) change the angle of each grit so you can tell the old sanding lines from the new ones. Don't move to a finer grit until all the scratch lines from the last one are gone. It is very hard to get them out later. They have a nasty habit of showing up again as you get to the fine grits. If you see a deeper scratch.....stop....and go back at least one grit until the scratch is gone .... then proceed back up the sanding steps. Skipping grit sizes is not going to speed things up. Progress from the coarse grit to 400-800 for the pre-HT sanding. In final finish, the finer the grit, the better the blade looks. The rule of thumb is to double the grit size (more or less) each grit change. That would roughly be 100,200,400,800,1000,1500,2000,4000,8000.
When doing the final sanding some people sand dry to 800, then wet sand to 8000. I generally wet sand all the time. With the 3M polishing papers (the multi-colored pack) wet sanding is not as necessary but works very well if you go that route. Wet sanding will give you a brighter and shinier final finish. Save the 3M papers for final finishing after the HT. They are super for getting the handle sanded and polished. When wet sanding, clean off the blade, the block, and change the water in the tub at each grit change. The sanding water should be - a quart of water, ½ teaspoon dish soap, 1/2 teaspoon of baking/washing soda.
More on sanding later.


Getting Started:

Mark the blade tang with a marker where the handle ends at the ricasso. When working on a blade, don't sand or file any of the metal that will be under the handle scales, or the wood may not sit flush with the tang when reassembled. This is a common error, and often shows as a little space where the handle comes down to the ricasso. Avoiding it now is how to keep from having to deal with it when you start to assemble the knife and discover that the ricasso is curved up under the handle a bit. By marking the handle area, and not doing any sanding/filing there, you will assure that the area is still flat when you finish the knife after heat treatment. Some folks actually tape this area with masking tape (the blue painter's tape is what I use), to make it clear that there is to be no work done there. That is a good procedure to learn. I often tape any part of a knife that I am not currently working on - the handle area when doing the bevels or the blade when working on the handle, etc.

Decide how you want the blade to be beveled, and where the plunge line should be. For this blade, I suggest a full bevel - from edge to spine - and the plunge line about 3/8" to 1/2" in front of the handle. A good trick to keep the plunge even and straight is to clamp a piece of steel on the blade at the plunge to guide the file and act as a stop. Here are special made File Guides made from carbide for this task. It is a good investment when accumulating equipment.

Screw or clamp the blade to the board. Clamp the plunge guide on the blade at the ricasso. File the bevels in slowly. Take a little off at a time, easing up on the final shape. Flip the blade and work the other side regularly, allowing the shape to form from both sides. Don't try to do one side and then the other. That takes a lot of experience, and gives many old smiths trouble.


Stop each step before it is fully to the point you want. Look it over carefully before taking the final strokes of the file. It is easy to take a little more metal off later, or to go back and change the shape, but impossible to put any metal back on once it is filed away. Also, don't file the bevels to a sharp edge. This is one of the most common errors. Leave the edge a fairly wide flat surface. About the thickness of a dime in the filing stage (.040-.050"), and half the thickness of a dime after sanding before HT (.020-.030"). Always remember that the next step will take off some more metal. I suggest filing to 80% shape, sanding to 95% shape, HT, then final sanding to shape. The last step after the handle is assembled is forming the edge secondary bevel and final sharpening.
 
Last edited:
OK, get filing:

When the bevel looks good, and you are happy with the plunge lines, it is time to start sanding. Sanding is where the blade shape takes on the final look. It goes fast in the coarse stages, and slower in the fine ones. Use even firm pressure on the sanding block. Avoid using a piece of folded up sandpaper and your fingers. You can easily make dips and waves in the blade that will show up after the final grits like a fun house mirror. Grits below 400 should be done on a backing block and applied just like they were a file. Finer grits don't gouge the metal as much and can be worked without a block if needed, but the block is your friend if you want straight and flat bevels. The block can be hardwood, aluminum, or steel. A final sanding block for very fine paper ca have a surface padded with hard leather.

Once the filing is done, you can remove the tape from the tang area, but be careful that any sanding done at the ricasso still leaves the tang flat. The tang does not need to be sanded smooth, and bonds better with a rougher surface. Initially, a few strokes of the file to assure it is flat is all that is needed. The best way to avoid the ricasso dips is to flat sand the tang and ricasso area together with the sandpaper laying down on a smooth and flat surface and moving the knife over it in smooth strokes. A granite surface plate is a very useful tool, but a piece of granite countertop or a sheet of thick glass will do to start. Sand the tang/ricasso to 200 grit, then gently sand the ricasso area to 400. Now, you can proceed to the blade bevels without much risk of rounding the ricasso up under the handle. When the blade bevels are sanded to 400-800 and all surfaces are scratch free, the blade is ready for HT. If working from your own blade blank, be sure to drill all holes in the tang before the HT. You will really hate yourself if you don't. Also, the holes should be about .050-.060" larger than the rivets/bolts used, so for an 1/8" pin, drill a 3/16" hole; 3/16" -drill 1/4"; etc. Too large isn't a problem....too small can be a big problem later on after the blade is hardened.


Heat Treatment:

When the blade is sanded to 400 and all is well, it is time for the heat treatment. This is where the soft (relatively) pearlitic steel is going to be changed into hard martensite. The blank provided is ATS-34. The blade needs more than just getting it hot and quickly cooling it off if you want a superior blade. It will be heated to 1900F and held there for 30 minutes, then plate quenched to cool and remain straight. After that it will receive two temper cycles at 400F.

When it is ready for HT I will do it, or you can have someone else do it. You won't be able to do it yourself for stainless steel, and carbon steel still requires some degree of heat control.

Please feel free to ask me any questions while working on the blade. If you can take photos of the progress, do so by all means. They will help me see what you are doing and will be useful to you when you post the "My new knife" thread.

Take your time. Spending a few more hours/days/weeks on the blade will result in a far better finished product than trying to rush it out in a single day/weekend.

Work a while, take a break, and when you come back, examine the progress before you start back up. You may see some area that needs attention that you would have gone right past.
 
Last edited:
Part Two - Finishing your knife:

Once you receive your blade back from the heat treater it may look dark, spotty, and unattractive. It was shiny and smooth when you sent it off, they must have ruined it! Don't despair. The changes are normal. It is caused by the surface getting hot in HT. It will be sanded off in finishing the blade.

The first step is to remove the layer of discolored and de-carb metal on the surface.

Put a quart of water, a 1/2tsp of dish soap, and a 1/2tsp of baking/washing soda in the plastic tub. Dip the sanding block in this and sand, re-wetting regularly. Wipe off the blade often, too. Other ways of wet sanding include using a spray bottle of water/soap or using Windex.
Start with 220 grit. paper. Clamp the blade on the work board, and using the sanding block, wet sand the blade completely, ... exactly as you did before. Once the surfaces are cleaned and bright, start going up the grits. At 400 grit switch to making all strokes longwise, and use an even but firm pressure. Try to avoid any strokes that don't follow the blade length. When the 400 grit is done, the blade should have a bevel that comes to almost an edge. Don't let it get sharp yet. You really don't want to be sanding on a blade with a sharp place on it. If the edge gets sharp, dull it with a few strokes of 220 grit paper along the edge. Look the blade over really well. If the surfaces are smooth and defect free, continue. If they are not, keep on working the 400 grit. You can quit sanding here for a field use blade or take it up to a much smoother and shinier finish. Put a quart of water, a 1/2tsp of dish soap, and a 1/2tsp of baking/washing soda in the plastic tub. Dip the sanding block in this and sand, re-wetting regularly. Wipe off the blade often, too. Other ways of wet sanding include using a spray bottle of water/soap or using Windex. When you think you are ready to move to the next grit, wash the blade, change the water, wash your hands, and clean up any water and sludge from the previous coarser grit. These things have a bad habit of coming back to make scratches later. Examine the clean dry blade in a strong side light (using an Optivisor or other magnifier is a good idea). Look for any scratches from the last grit that are still showing. If there are scratched, dips and ripples, blurry places, etc. go back to the grit you were doing and work some more. If the scratches are bad, go back one grit coarser. The point is, don't move on until the current grit is completely done.

When done for the day wipe down the blade well and completely dry it when done for the day. A light coat of oil is always a good idea when setting a project blade away for the day.


At 2000/2500 grit, the blade should be smooth, shiny and scratch and ripple free. If it isn't, that means you did not completely finish a previous step before going on. The temptation is to say, "Heck, it is my knife, that is good enough." ... Don't do it! You owe it to yourself to do a good job. Go back and take the time to re-sand as needed. I have often found a small place I missed and gone back to 220 grit and completely re-done ten or twenty hours of work. It is worth it in self-pride alone.


Now, open the package of 3M polishing papers. Notice that each has an abrasive side and a "cloth" side. Each is a different color to designate its grit equivalency. The package has the grit size and colors on it. Take a sharpie marker and put an X on the back of each sheet so you can tell the abrasive side from the back. The white paper is very hard to see the difference so marking it while fresh is important. You can also mark the grit number as well. These papers can be used until they are shredded, so keep them after use for other sanding projects, especially handle work. Also, keep them in a plastic bag when not in use. You don't want them contaminated with sandpaper grit and making scratches. I go back to the green sheet - which is about 400 grit. Since you have gone way past this point already, progress up the grits will be fast, but you will notice that then surface gets smoother and shinier than it did with the sandpaper. The papers can be used wet or dry. Try it both ways, but I usually go dry, as they polish so well. You should use the sanding block up until the blue sheet, and then can switch to folding the paper, or continue to use the block. I have a 2X1X4" hard felt block that I back the papers with. Going all the way to the white sheet is a polish up to about 8000 grit. The blade should be mirror shiny at that point. If you want a more matte finish, just stop at a lower grit, or go back down the grits until you get the desired look.
 
Last edited:
OK, now your blade is polished. Keep it that way by wrapping tape to protect the smooth shiny bevels. The blue painter's tape is the best. Another trick is to wrap the blade with a layer of paper toweling, and then tape over that with the tape. This is easier to remove and requires less clean-up of the tape's adhesive. In any case, the blade should be well protected from sanding grit, tools and other hazards during the handle work.

Take your handle scales and look them over. Are they a good match? Is there a certain orientation that looks best (grain direction, burl pattern, etc.)? Are they the right material for the knife? Again, just as in the sanding, don't accept OK as good enough. If they look right, fine. If not, change them or modify them to be right.

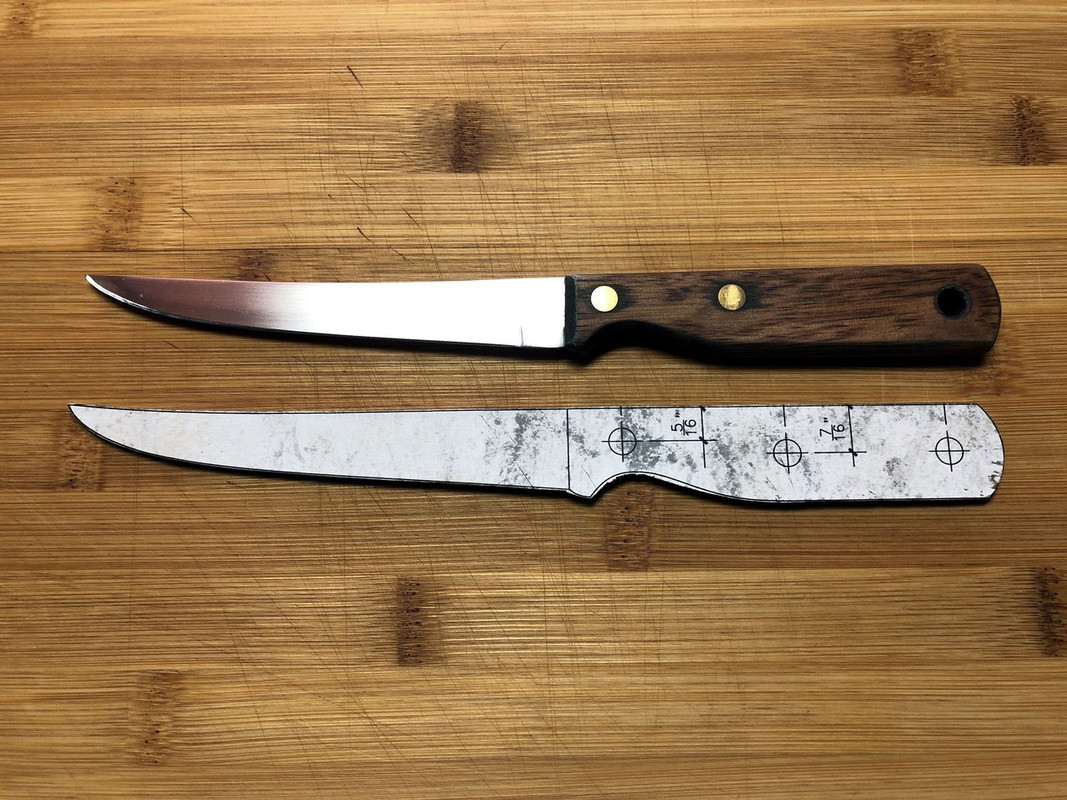
Mark the inside of each scale and put an arrow towards the front and top. This sounds silly, but you would not believe how often one is put on or drilled backwards. Place the scales together, and tape them tightly.

The front end, where the ricasso will be, needs to be shaped and sanded before assembly. Saw/file it to any curve needed, sand it smooth, rounding up to the flat sides. Sand the ends to 800 grit or finer. They should be smooth and scratch free. This area will be impossible to sand and polish without ruining the blade finish once the handle is on the knife, so make sure it is right. If you are applying a finish to the scales, apply it to the ends and sand/buff/polish it now . The scales only need their front ends done right now, the rest can be a rectangle, you don't want to shape anything else yet.

I hope you remembered to drill the holes in the tang before HT, because that will be a lot harder to do now. Also, the reason you want to drill the holes a bit large is to allow for any miss alignment in drilling. I make the holes at least 1/16" larger than the rivet.

Lay the blade over the still taped together scales and position it where the scales should be. Use a clamp to hold it there and take a look at arm's length to check the positioning. Once it looks good, mark the exact center of each rivet/bolt/thong hole. Set the blade aside for the moment.
NOTE - It is best to determine the correct drill sizes on a piece of scrap wood before drilling the handle.
While the scales are still taped together, drill the front hole through both scales, using a drill press if available. Drill as straight and accurately as possible. Use a drill bit that is a little smaller than the pin/rivet that will go through that hole. Re-drill it with the correct size bit. The correct size is a few thousandths over the pin size, so a 1/8" pin gets a .130" hole, or there about. You should measure your pin stock to make sure of its size, as they vary in actual diameter. Now, take a piece of the rivet stock you will be using and check the fit. Sand the ends of each rivet to a slight chamfer to aid with insertion. Re-drill as necessary until the rivet goes through with little or no pressure needed. Leave the rivet in place. If using Corby bolts, drill both sides for the shoulder, and screw in a bolt. This step you just complete now has the two scales firmly locked together to make sure the rest of the holes will all align. Now it is time to drill the back rivet. Drill it the same way, inserting a rivet in the hole when ready. Continue to drill any other holes as needed, fitting the rivet/tube/etc. as you go. If you cut the rivets ¼" longer than the scales thickness the rivets will be ready to install during assembly. When all is done, remove the rivets/bolts/tubes and take the tape off the scales. Place on the blade and dry fit, going in the same order as before (front, rear, etc.). If there is any trouble going through the blade tang, re-drill that tang hole to make it allow the rivet to pass through. A carbide or diamond burr in a Dremel tool will enlarge it quickly. Once all is fitted with the blade in place, remove the pins again. Lay the tang on the inside of one scale, aligning the holes carefully, and gently clamp it in place. Trace around the tang with a pencil (avoid markers, as they can absorb into the wood and make stains that show later). Do the same for the other scale. Cut the excess off with a coping saw, or a band saw if available. You don't want to get any closer to the tang than 1/8". The rest will be filed/sanded away. If desired, do any pre-shaping needed. Check all fits again and if it is good, you are ready to assemble the handle. Tape the blade ricasso to keep the epoxy from running down the blade, leaving about ¼" of the ricasso exposed.


Gluing the handle on and finishing the knife:

This is a good time to talk about adhesives. The best way to assemble a handle is to glue and bolt it together. That way it is never coming loose. This is not always the way it is done, so the glue should be able to do the job by itself. With the exception of Corby and Loveless bolts, rivets are mainly just to prevent lateral blows from shearing the glue joint. Top grade structural epoxy is what you want for the job. Forget all the advertisement hype about super glues and Gorilla glues, etc. They all have things they do best, but for handles, epoxy is king. There are many types available, but the slowest curing time and maximum strength make for the best joint. Don't use 5-minute epoxy ever. Acraglass is a resin made for gun work, and is really good, but the 24-hour cure epoxies from any woodworking shop will be just as good, and much cheaper. I prefer System Three T-88. Get your epoxy resin from a place that moves a lot of glue to assure fresh resin. Mix the resin in a small disposable plastic cup (I use the 2oz. condiment cups). The ratio of hardener to resin is critical, so get it perfect. Using a scale is a good way to assure things are equal. (Note that the part A is usually a tad heavier than part B per volume. Look at the bottle for weight instructions.)

Spread newspaper covering the entire work area, put on work clothes, and put on a pair of nitrile gloves. Lay out about five or six pieces of paper toweling (I tear them into ¼ sheets) and unscrew the lid on the alcohol can. Check that everything is ready, and all materials and tools are there. Hit the bathroom, kiss the wife, do anything that needs doing for the next hour. Once you mix the epoxy the clock is ticking. You don't want to get epoxy all over your gloved hands and suddenly realize you don't have something you need.

Stir the two parts of the epoxy well with a popsicle stick for one minute. I mean a whole minute! The epoxy can be cleaned up easily with denatured alcohol while uncured. Acetone will remove cured epoxy with some elbow grease, but the solution is to clean up any excess and drips while it is uncured or half cured.

Take the pins and tubes and lightly roughen them by rolling them across a sheet of 120 grit paper. Don't sand them up and down or they will get smaller. Corby bolts need no preparation.

Apply the resin to the rivet holes on the scales first, getting it down in them with a bamboo skewer or toothpick if needed. Now put some resin on the rivets and slip them through one scale. If using Corby bolts, don't get resin in the female bolt hole. Apply epoxy to the inside of the scale, place the tang over the scale, apply resin to the exposed tang, and place the other scale on. Snug this sandwich up with your fingers until the rivets are evenly sticking out both sides, and the scales are positioned on the blade in the correct alignment. If all is good, clamp it or tighten the Corby bolts snug. Don't tighten or clamp too hard.
 
Last edited:
Now, let's talk clamps and gluing. The purpose of a clamp is to hold something in place. In this case while the glue cures for a day. If you clamp the scales to the tang so hard the glue all gets squeezed out, you have defeated the entire purpose of all the work you just did. All you need is a couple of light tension spring clamps ($1-3 at the hardware store). If you can't easily open it with one hand, it is too powerful. All it needs to do is hold the scales down against the blade with a layer of glue between the two. There are several ways of preventing a glue starved joint, and thus not having to worry about the clamp strength. The simplest is to drill a lot of 1/8 " to 1/4" holes all over the tang ... called "swiss cheesing". This allows the epoxy to pool between the scales, effectively making epoxy rivets, and assuring a strong joint. When using structural epoxies, like T-88, this is an excellent choice. The other way is to grind out (hollow grind) the tang center, leaving only about 1/8" of surface around the perimeter of the scale area. This makes a shallow reservoir of resin between the scale and the tang, which can't be squeezed out by the clamp. One of these procedures should be used on any glued-up handle.

Back to the clamps. Two clamps are far better than one. They don't need to be as strong, and you can position them to make sure the scales are in contact with the tang evenly. Place one in the front at the ricasso to get a seamless seal, and one in the back to make sure the butt does not rise up. One strong clamp in the center can actually make the ends curl up, causing a gap at the ricasso and butt.


Take a piece of paper towel and wipe any large amount of excess epoxy off the handle sides (no need to do much more than avoid dripping). Take another clean piece and wipe the excess at the ricasso, making sure you get any off the finished ends of the scales. Put some alcohol on a new piece and wipe the ricasso area again. Don't overdo it with the alcohol at this point, you only want to remove any epoxy puddles. Too much solvent, and you can affect the epoxy strength. Set the clamped knife down flat (not edgewise) and let it sit until the epoxy in the mixing cup is starting to set up. This can be from 10 minutes to 6 hours, but for T-88, and most other 24-hour resins, about one hour is normal. While you are waiting for the epoxy to gel, clean off all tools and things that have epoxy on them. and put them away. Use alcohol or acetone as needed. Wash your hands well with soap and water to avoid any contact dermatitis caused by the chemicals in the epoxy and the solvents. Throw away any paper towels you used and tidy up the work area. There should be nothing but the clamped knife, the alcohol can, the epoxy in the mixing cup, and some paper towels left out.
Note - A good hand lotion like Cera-V is a wise way to keep your skin from damage in knifemaking.

Check the clamps and handle after 10 minutes to make sure nothing has moved, then set it back down. Another quick wipe at the ricasso with an alcohol dampened paper towel may be necessary if there has been more squeeze out.

Once the epoxy is gelled in the mixing cup (about an hour), clean the ricasso area again with an alcohol dampened (not soaked) paper towel. Clean any resin off the untaped areas of the blade. (Now you know why we taped up the blade so well).

Set the knife down and go do something else for the rest of day. Leave it undisturbed for at least 12 hours. Remove the clamps, clean up any spots that need it with acetone. And set it aside to cure for another day. If you follow this procedure, you will have a very strong handle.

Once the epoxy is cured, tape up the ricasso right up to the scales. Put several layers of tape here, as it will get abraded when sanding the handle, and you don't want to mess up the nice sanding job you did earlier.

Clip/saw/file off any excess rivet material and file it flush with the scales before starting to shape the handle.
Go slow, removing a little here and a little there. The first step is to take the scales down to the point where the tang metal shows all around the sides. Then, round the corners and edges to make the handle a roughly oval or egg-shaped cross section. All this can be done with files, rasps, and coarse sandpaper. Look it over and make any adjustments in the profile as needed. While a belt sander makes this an easier job, it can be done by hand. Most inexpensive 1" belt sanders (Harbor Freight, etc.) do a fairly good job on handle work. A Dremel tool can be used, too.

After the rough shape is done, continue to refine it and smooth it, starting with 120 then 220 paper and going up the grits to at least 800-1000 grit. At some point you will have to un-tape the blade and make sure the handle and spine are a smooth transition. Just be careful not to scratch the blade. While fairing in the spine, tape the sides of the blade to protect them.

The 3M polishing papers are the absolute champ at handle finishing and can make your handle shine like glass with no finish at all if the material is suitable (many stabilized woods and some exotics are great for this). I recommend a set of the papers that are kept to only sand handles. This will prevent them darkening light color woods from the metal swarf from previous use on blades.
If you are using a finish on the handle, apply it in very light coats, and rub it into the wood (not painted on the wood), and wipe off the excess after a few minutes. Allow to dry and sand off until the surface is just down to the wood. Repeat until it will take no more into the wood. Allow to dry for several days, then finish out with the 3M papers for a prize-winning shine.

Un-tape the blade, and clean everything well. Check for any small rubs and scratches and fix them now with the 3M papers (hopefully there will be few or none). The tendency for scratches and blemishes to show up at this stage ... and the words that it makes you say ... are why very few ministers make knives. Buff up everything with the last two grits of 3M papers and your knife is done.

Make or purchase a sheath if it to be carried, but never store the knife in the sheath. Storing in a sheath is a sure way to find rust spots later on. Always oil a knife when putting away for any period of time. A zippered pouch is the best place to store a knife.

Sharpen the knife carefully. First create the secondary bevel by slowly working the edge on a medium stone. DMT diamond stones are excellent. It is wise to tape up the sides of the blade to prevent accidental scratches in sharpening. Once the secondary bevel is formed to a sharp edge, refine it on a fine and extra fine stone. Polishing the edge on a leather strop charged with rouge is the final step. This removes the "wire" formed in sharpening. Cut a few pieces of printer paper to check for rough or dull spots.

Congratulations, you have made a knife that you will be proud of. You can someday pass it on to a child or grandchild.
On that note, never sell or give away your first knife. It may be tempting, but don't do it. Someday you will regret it.
Ever wonder where the first knives made by Moran, Loveless, Scagel, Randall, etc. are??? and what they are worth? You never know, your first knife may be one of those someday.

Please feel free to ask questions while working on the blade. If you can take photos of the progress, do so by all means. They will help me or other see what you are doing and will be useful to you when you post the "My new knife" thread.

Stacy
 
Last edited:
Something that helped me when I first started and would lose motivation, make more simple knives. I did that a lot when I started back in high school. Then one day I forced myself to make a short 12” machete out of some thin 15n20, and to make sure the handle was glued/clamped by the end of the day. I filed a quick edge on it, thinner stock made it easier and faster with hand tools. I still use that machete to chop up 1/2” sticks when camping. When you finish a knife you feel a lot better about getting through the next one.

I have some bad adhd, even with medication some days I just don’t feel like I have the energy to get through a knife without messing it up. It’s not a bad thing to step away from a knife if you’re not feeling it, but it’s good to keep the momentum going by finishing projects. Then when you’re having a better day jump back on the knives you took a break from.

Making kiridashi or as other suggested something with a Scandi grind is a good idea. Even now with more equipment and a proper kiln, if I feel like I’m getting stuck on a project I’ll make some kiridashi. The only difference now is I can pump out 10 in a day or two and I can be confident in the HT. Vs 1 or 2 kiridashi over 2 days. Still makes me feel just as confident as it used to and helps me jump back into other more complicated projects.

Kiridashi also make good gifts for your friends who want to whittle or do woodworking. Makes you feel even better knowing something so simple can get lots of use, keep at it and find what you like to make!

Kevin
 
Excellent instructions Mr. Apelt. I have not yet commenced my first knife making endeavor but while I had a general concept of the procedure, your write up has answered many questions I had.

I purchased a Pheer grinder about 7-months ago and I've spent some time having it painted, and I reassembled it replacing all of the nuts and bolts with black oxide coated stainless steel socket head cap screws, washers and nuts, and I had a more substantial 3/8" thick work table made for it. It has not yet been switched on and it will be a while before I ever grind anything as it often takes me some time to get things finished. Nevertheless, my goal for my first knife making endeavor is to make (4) 6" Kitchen utility steak knives from 1/16" 1084 that I purchased from Alpha Knife Steel, that will be sent to Peter's Heat Treat once profiled and thereafter I will attempt to grind the bevels, add the Micarta handles, and finish the knives, following your instructions.

This is a photo of the 30-year old kitchen utility knife I am hoping to recreate along with the 1/8" mild steel template I created that I need to finish profiling.
IMG-2101.jpg


And this is a photo of my grinder, work table, and Moen grinding fixture (that I purchased prior to reading your advise elsewhere to learn to grind freehand, first...), with the kitchen utility knife template clamped in for the sake of the photo.
IMG-2254.jpg


I am not sure when I will commence the work - I move slow - but I will be referring to these instructions when I do.
 
Last edited:
Excellent advise here especially from Stacy.

After messing around with knives for several years I made my first "real" knife when I was 16 with the help of a very patient retired maker. Completely shaped with files. After there was a disaster with the handle late into the build my mentor advised we break the wood off and start all over on the handle. Many many hours later the knife was finally finished and much better than I ever expected it to be. I made my next two knives that way including a hand forged Damascus dagger with Mokume forged by hand and a round Snakewood handle all shaped by hand. Then I was able to purchase a belt grinder.

Fast forward eleven years and now I own a machine shop and focus on catering to the custom knife making world. So looking back I am forever grateful I didn't give up on that first knife. All those endless hours of filing ended up defining my career.

It's amazing how many machinists I know who don't know how to properly run a file. Files are precision instruments in the correct hands.

So stick with it you are learning skills other people never will! It will only get easier and more fun.

Edit to add: Take you finished knives out and use them doing whatever else you enjoy. The experience will come full circle that way.
 
Last edited:
caffeine is sometimes a good motivator, and snacks always help. For me, having some music to listen to always always helps.
but really it just comes down to pushing through it. There are so many aspects of knife making that are tedious and laborious and for me, the best way to stay motivated is to push through to the next stage because getting to the next stage is always motivating in and of itself.
I like having multiple knives in the works at any given time- having knives in various stages so that I can turn to another job if the one I'm doing is best walked away from for the moment.
 
Back
Top