- Joined
- Jul 27, 2003
- Messages
- 5,667
..........or at least, that's what I thought a month or so ago. 
Seriously, Nick posted up a picture of a W2 knife he did with a rather spectacular hamon and stated that he had created that piece using heat and time, etc., only, and with no clay.
Keep in mind, it was a pretty spectacular hamon, and I had seen others in the past he had posted stating the same set of "facts".
Well, this last one - and, Nick, if you want to re-post that one here as well, it's fine by me - had such a special and nicely geometric hamon that I really could not see how it could have been made without clay.
Then, I did this one this week.
No clay.
The only thing that influenced this hamon is steel type, blade geometry, heat, time and quench.
I applied no media of influence on this blade.
I post this here to give fruit to your thinking process when considering what's going on in your blade during the hardening process.
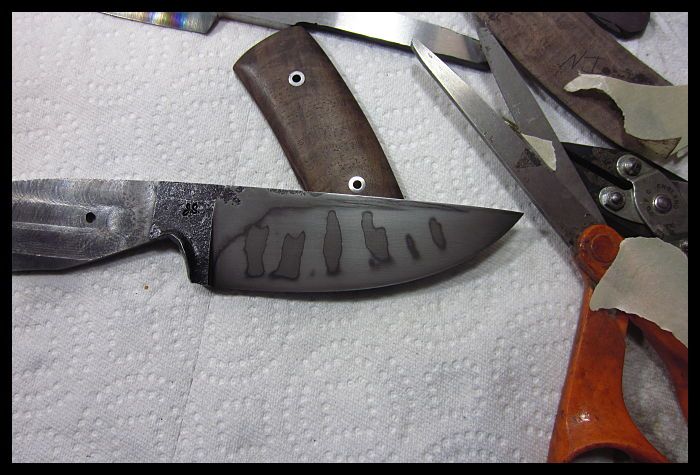
There's nothing special about this knife - it's a simple W1 Brute de Forge with a mortised tang.
But, I hope you do appreciate the NATURAL hamon.


Seriously, Nick posted up a picture of a W2 knife he did with a rather spectacular hamon and stated that he had created that piece using heat and time, etc., only, and with no clay.
Keep in mind, it was a pretty spectacular hamon, and I had seen others in the past he had posted stating the same set of "facts".
Well, this last one - and, Nick, if you want to re-post that one here as well, it's fine by me - had such a special and nicely geometric hamon that I really could not see how it could have been made without clay.
Then, I did this one this week.
No clay.
The only thing that influenced this hamon is steel type, blade geometry, heat, time and quench.
I applied no media of influence on this blade.
I post this here to give fruit to your thinking process when considering what's going on in your blade during the hardening process.
There's nothing special about this knife - it's a simple W1 Brute de Forge with a mortised tang.
But, I hope you do appreciate the NATURAL hamon.


 Time and temperature only for this hamon in W2. No clay. These are a mix of my own pictures and his.


")

