Orbis 10 in the making

Joined
Sep 3, 2004
Messages
450
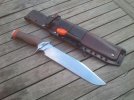
I started on an Orbis 10 and thought it would be nice to take pictures of the whole process. The Orbis 10 is an integral bowie styled user knife. This one will get a double guard, only the upper guard will be just high enough to place a lanyard hole in it. It will get a brown micarta handle and an orange spacer. the handle will be closed by a pommel that will be secured by a peened over tang.

Here are the first pictures:

Foto-YZ4VTU4L.jpg


Foto-ZZILNRPI.jpg

The block of steel I start with, 1.2510 (O1), 2.5 cm (1") Thick, 6 cm (21/2") wide and 15 to 20cm (6" to 8") long.

Foto-FMXL4PCC.jpg

The first forgings under the press to lengthen the blade part

Foto-OZKHJNZW.jpg

Using the rolling mill and the press I form the first part of the tang.

Foto-KSJL8VXA.jpg

Here you can see the start of the different thicknesses


The next step will be the folding out of the "Wings" that will form the guard and forming the bevels and tip.
 
Looking forward to seeing this one come together. I really love the look of your knives and would like to get my hands on one someday. :thumbup:
 
And a bit more action...

Foto-UCHFAKRA.jpg

Drawing the rough lines on the blank. Important for the positioning of the wings and the point.

Foto-APHDH3AQ.jpg

Here I used the angle grinder to cut of the point in reverse. So the angled part will become the back and the straight part the edge. Than I made two cuts which I will fold out.

Foto-HEX47NFK.jpg

Using the chicle, I push the wings to the outside....

Foto-6BVVUBT7.jpg

a bit more....

Foto-R3RGY8UW.jpg

...and not any further. Later on I will position them at the exact location.

Foto-RTGPD88E.jpg

Next I forged the point and tapered the whole blade and started forging on lower and lower temperatures. After this I will start on drawing the final dimensions on the blade and grind some of the parts, forge the guard some more and draw out the tang.
 
I am looking forward to seeing the rest of this project. It makes me want to work on my forging techniques. Keep it up. Todd
 
I like how you're making that guard. I look forward to more.

ps.. I see the pics fine.
 
I am looking forward to seeing this knife as it progresses.
I like the integral wings/guard feature.
 
Thanks guys...


And we go on....

Foto-P8KXIIKF.jpg

Positioning of the grind guide...

Foto-BLGQWMJ7.jpg


Foto-ZV4YBZB7.jpg

first grinding

Foto-NWZKPGY7.jpg

Opening up the choil further by using a wider diameter contact wheel...

Foto-DNR767UI.jpg

Choil opened up and steel removed from the tang...

Foto-YNBPPN8P.jpg

check if the grip is all right. The forward grip is the reason why the guard is angled. With a double guard I like to angel it just to make sure nothing is poking in your hand.

Foto-ZAJOICOE.jpg


Foto-DRLJSPGZ.jpg

My incredible high tech and pricy measuring instrument. I sell this exceptional piece of must have gear for only 857.00 euro's.....you can't live without it!...

Foto-7LYVCFSS.jpg


Foto-ESWFCJGJ.jpg

Measuring the guard on the left....

Foto-TZ7FJWMZ.jpg

and the right side....I will do this also on the opposite side, just to make sure the guard is the same on both sides.
 
So it took awhile but here are the rest of the pictures:


Foto-RDXT7ZCT.jpg

Here the blade is placed in the oven to be softened and stress relieved. The oven is programmed to do both treatments in one long program.

Foto-EVFFGGOD.jpg


Foto-AITRWA8Q.jpg


Foto-D4UOWFXG.jpg


Foto-LFWANHO6.jpg


Foto-LDXVUMNV.jpg


Foto-A3M7TQZR.jpg


Foto-G4TVRUTB.jpg


Foto-PGATRW63.jpg


Foto-O8WWW3YL.jpg


Foto-R3K6H6SM.jpg


Foto-6JDFGKUI.jpg


Foto-OSYN3PWH.jpg


Foto-O4K3MN3A.jpg


Foto-C4TP3YHC.jpg


Foto-HLTDYJJL.jpg


Foto-GCKOHP6E.jpg


Foto-3YC43ZQ3.jpg


Foto-WF8WAHAR.jpg


Foto-ZYYIZXI3.jpg


Foto-PJZWXNR8.jpg


Foto-K8KDLPM8.jpg


Foto-MOSADHGO.jpg


Foto-DEEOZU3V.jpg


Foto-WDWUWMX7.jpg


Foto-JAGQT8CX.jpg


Foto-GRMLFJP3.jpg


Foto-Y467SR7S.jpg


Foto-W8A3TJKV.jpg


Foto-YJYHOBMS.jpg


Foto-QAS8XK73.jpg

When the knife is ready to be hardened it will be stress relieved for a second time and then hardened.

Foto-N8KKBKZA.jpg


Foto-XSMV3QGY.jpg


Foto-BOC7LF36.jpg


Foto-M63SEQUA.jpg


Foto-SA7FMELS.jpg


Foto-DTOYFBSI.jpg


Foto-PIGUOZO3.jpg


Foto-AZILTKOF.jpg


Foto-HATHTXGD.jpg
 
Foto-RSAAWHHP.jpg


Foto-ALMM43GC.jpg


Here are two pictures of the finished knife with the Kydex/Leather sheath made by Martin Swinkels


Foto-BL44VBKF.jpg


Foto-YBWMNHMU.jpg
 

Attachments

  • Foto-YBWMNHMU.jpg
    Foto-YBWMNHMU.jpg
    33.2 KB · Views: 7
  • Foto-BL44VBKF.jpg
    Foto-BL44VBKF.jpg
    33.3 KB · Views: 11
Fantastic! Thanks for posting the progress shots, that was fantastic to watch the creation of the knife; and paired with a Swinkel's sheath? Who could ask for anything more?!?
 
Wow, very nice. After all that work I am surprised you went with a rat tail tang with all the beefiness of the rest of it. Nice work.
 
Wow, very nice. After all that work I am surprised you went with a rat tail tang with all the beefiness of the rest of it. Nice work.

He Broe,

The reason for the rat tail is that I only want lots of steel in places were it counts. Having a very thick tang only ads weight. Btw the rat tail part is still 3/8 thick ad the end. This way the knife is still nicely balanced at the choil without excessive weight.

Hengelo: Yes the buttplate is hardened. It can be used for hammering etc.
 
Back
Top