- Joined
- Oct 18, 2001
- Messages
- 20,978
Just finished this up this morning and thought I'd share. :thumbup:


http://www.kosterknives.com/sheaths.htm
I've done enough of these now that I'm no longer in the "design phase" anymore... ...and have figured out how to make it simple and functional.
Basically, the idea is a simple pancake sheath with a canted belt loop sewn to one side. This allows for easier carry and can be setup for strong side or weak side...in-the-waistband...horizontal....vertical....whatever works best for you. (though this plan is setup for canted carry)
So, here's a diagram to get you started.

I'm not going to go into the details of how to sew leather...glue it up...etc. All of that is covered in countless other tutorials. This is purely for sharing the plan (idea) and giving you some instructions on how to do it. The only trick is the belt loop, which is not a simple rectangle.
1 - Lay the Kerambit down on one side and trace around it in pencil past the bolster (on some leather). Flip it over, repeat. (shown as a green dashed line above)
2 - Draw a line around your outline that is 1/4" wider at the tip, and 1/2" wider at the bolster. When you get to the bolster, just connect the two sides with a gentle arc.
3 - Cut the pieces out carefully with some heavy-duty scissors, exacto, etc.
4 - Lay one of the pieces down on some leather and trace along the bottom where the edge of the knife is. Offset a line about 1/4" and you'll have a "welt" (protects the stitches so an improper draw won't cut them).
5 - Skive the ends of the welt (where the dashed lines are) so that they taper in thickness.
This next part is for the canted belt loop. Pay attention!
6 - Take the "inside piece" (the piece that will have the belt loop on it) and lay it smooth side up on the table. Put your belt over it and figure out what angle you want the sheath to sit at. Keep in mind that the handle keeps curving past the mouth of the sheath. So, if you angle it too horizonal, you might end up with the handle hanging down = BAD.
7 - Lightly pencil in where your belt will sit - on the smooth side of the leather (add 1/4" to the top and bottom to allow for stitching).
8 - Remove the belt and lay the the piece smooth side up on a piece of leather, also smooth side up. Transfer the curves and lines onto the bottom leather piece lightly. You'll end up with a funny looking piece (cross-hatched area).
9 - Offset a line a least 1/4" from the stitch sides (I did mine from the left side first, then copied the same curve over 1-1/2 inches. It's important that you leave room for the stitching around the outside of the sheath.
10 - cut you piece out, glue the top and bottom edges down, and stitch 'er up.
11 - Glue the welt to one side.
12 - Glue the two sides together and stitch.
13 - Apply desired finish and you're done!
Note: The pictures at the top show the sheath set up for small-of-the-back carry for a right-hander. The diagram, however, is set up for a strong-side canted-back carry for a right-hander. (kinda like a revolver draw)
Somebody tell me if I missed something....
And, Yes...the same can be done with cardboard and duct tape. :foot:


http://www.kosterknives.com/sheaths.htm
I've done enough of these now that I'm no longer in the "design phase" anymore...
...and have figured out how to make it simple and functional.Basically, the idea is a simple pancake sheath with a canted belt loop sewn to one side. This allows for easier carry and can be setup for strong side or weak side...in-the-waistband...horizontal....vertical....whatever works best for you. (though this plan is setup for canted carry)
So, here's a diagram to get you started.
I'm not going to go into the details of how to sew leather...glue it up...etc. All of that is covered in countless other tutorials. This is purely for sharing the plan (idea) and giving you some instructions on how to do it. The only trick is the belt loop, which is not a simple rectangle.
1 - Lay the Kerambit down on one side and trace around it in pencil past the bolster (on some leather). Flip it over, repeat. (shown as a green dashed line above)
2 - Draw a line around your outline that is 1/4" wider at the tip, and 1/2" wider at the bolster. When you get to the bolster, just connect the two sides with a gentle arc.
3 - Cut the pieces out carefully with some heavy-duty scissors, exacto, etc.
4 - Lay one of the pieces down on some leather and trace along the bottom where the edge of the knife is. Offset a line about 1/4" and you'll have a "welt" (protects the stitches so an improper draw won't cut them).
5 - Skive the ends of the welt (where the dashed lines are) so that they taper in thickness.
This next part is for the canted belt loop. Pay attention!
6 - Take the "inside piece" (the piece that will have the belt loop on it) and lay it smooth side up on the table. Put your belt over it and figure out what angle you want the sheath to sit at. Keep in mind that the handle keeps curving past the mouth of the sheath. So, if you angle it too horizonal, you might end up with the handle hanging down = BAD.
7 - Lightly pencil in where your belt will sit - on the smooth side of the leather (add 1/4" to the top and bottom to allow for stitching).
8 - Remove the belt and lay the the piece smooth side up on a piece of leather, also smooth side up. Transfer the curves and lines onto the bottom leather piece lightly. You'll end up with a funny looking piece (cross-hatched area).
9 - Offset a line a least 1/4" from the stitch sides (I did mine from the left side first, then copied the same curve over 1-1/2 inches. It's important that you leave room for the stitching around the outside of the sheath.
10 - cut you piece out, glue the top and bottom edges down, and stitch 'er up.
11 - Glue the welt to one side.
12 - Glue the two sides together and stitch.
13 - Apply desired finish and you're done!
Note: The pictures at the top show the sheath set up for small-of-the-back carry for a right-hander. The diagram, however, is set up for a strong-side canted-back carry for a right-hander. (kinda like a revolver draw)
Somebody tell me if I missed something....
And, Yes...the same can be done with cardboard and duct tape.
:foot: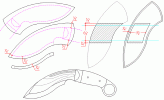
")
