Question about 1084/15N20 sanmai coloration

Joined
May 7, 2018
Messages
23
Hi. I have recently took a class on forge welding, as a a project I have forge welded a billet of 1084 with 15N20 jacket. It looks good, I don't see any delams, so I started cutting out a knife shape and at some point, after a basic surface grind I have decided to etch it in ferric chloride to see the contrast. The chloride I'm using is diluted and I only kept my blank in it for a couple of minutes, but the result I got is not really what I expected.

What I expected was for the 15N20 to be white or shiny or anything. But the color of the whole billet is pretty uniform gray, as you can see here:


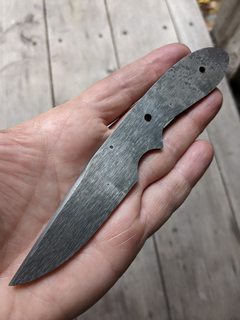
If you look at the edge, there is a slight line that shows the border between the steels and 1084 is very slightly darker then 15N20, but nowhere near the contrast I would expect.


Of course, the knife is still not hardened, I need to polish it a lot more and keep it in the ferric chloride for longer. But my questions are:

1) Would that be enough? Or should I do something else to bring out the contrast?
2) Why is it so uniform? If one of the steels were a mild steel I would chalk it up to carbon migration, but they are both high carbon steels.

Any help would be highly appreciated.
Thank you!

Luka
 
I've only done a couple of san mai blades, but I had the same reaction to my first one. The contrast is much more distinct after hardening.
 
First - IT won't show any difference until hardened.
Second, you don't need to etch that long. It also looks like you just let it sit and the bubbles made the streaks. Etch for 10-15 seconds is enough to see what is happening. Longer etches should be done in 30 second to two-minute soaks, taken out and cleaned off under running water with a paper towel, washed with soap and water, rinsed well, and soaked again in the FC. Repeat as many times as desired.
The edge shot looks like you have the sides pretty thick. You will have to grind a lot off to get to the hardened core once you do the HT.

Try this
Harden the billet.
Grind a 45° angle on the edge and etch to check that the edge is centered. You only will need a short dip of 15-10 seconds to see the dark core. The 15N20 won't be white, but will be lighter than the simple carbon steel.

If the edge looks centered, then grind the bevels, keeping the core centered. Regular dips in the FC will show you the status.
 
Thanks, Stacey, I will follow your recommendation. Since the outer jacket is 15N20, the whole thing is going to be hardened, not just the core, but yeah, I will probably grind off some more on the sides.
 
Stacy agrees with Stacey's recommendations (There is no e in my name ;))

I am not the final authority on things, but I did spend a night in a Holiday Inn. I just post my experience and observations. What makes Shop Talk great is many experienced smiths doing that and a question getting answered from multiple perspectives.

FatFrumos - Clean up the sides of the billet, but don't grind much of any taper in the billet before HT or you may get warping of the edge part. Also, the rule for any san-mai blade is to do then HT for the core metal. That means you would use a HT regime for the 1095 core. Since they both fall in the 1450° -1500¯ range, 1475° is what I would choose. Give is a sufficient 5 to 10 minute soak to assure the core is ready for the quench. you need a fast oil. Canola will work, but Parks #50 would be better.
 
I jokingly say to people who ask how I spell my first name, "The E is after the Y" I get some confused looks and then point at my signature. Then they say, "OH!" I reply, "No, E"
 
Something else to consider is partially forging in your bevels. I've made the mistake of making san mai and leaving the layers all the same thickness and then cutting the knife shape out. (basically stock removal from a rectangular san mai billet) The problem I've run into is when grinding the bevel I removed too much of the outer layers which moved the contrast line way up the blade, and back way too far from the tip of the knife. If you forge in your bevel and taper you can control where the contrast line ends up on the bevel. Advice you didn't ask for I realize, it's probably worth what you paid for it.

Looks like a great design, good luck with it.
I have a question, I forge in my bevels. And when I finish the blade, i’ve been struggling for over a year now to get good contrast on my 80CrV2/15N20 brute du forge san-mai. Recently, I was chatting with “Knife Steel Nerds,” and he suggested that maybe I’m introducing scale or a transition layer during forging that’s messing up the final etch.

I use a gas forge to forge out a blade relatively fast, as I have a forge press. So I don't know what I am doing wrong with the forging.

Here’s my current finishing process:

1. I take the blade to about 2000 grit on oilstones (briefly touching 3000), then clean thoroughly with brake cleaner.

2. I dip in ferric chloride for short cycles (about three minutes each), wiping off the oxides with 0000 steel wool between dips.

3. Immediately after ferric, I go into a strong coffee soak overnight to keep the 80CrV2 dark and (hopefully) the 15N20 bright.

Unfortunately, my 15N20 keeps going dull or gray. I’m wondering if there’s a hidden decarb or scale layer from my forging that’s interfering with the etch, or if I need to tweak how I do the acid and coffee cycles.

Any thoughts on how to adjust my forging to minimize scale (maybe forging at a slightly lower temperature or doing a light surface grind right after forging to remove decarb)? Or tips for finishing steps that keep the 15N20 bright and crisp? I’d love to hear your take—especially if you’ve dealt with this on san-mai before. Thanks again for the advice!
 
Good morning F Finerknives , welcome to Bladeforums

First, resurrecting old threads here is called 'necroposting' and is generally frowned upon. It would have been better to start a new thread with your question.

But in response to your question, are you sanding the black off your 15N20 after your final etch? It doesn't sound like it from your post, so you are not doing the final step in the process.
I stopped sanding higher than 800 grit before etching my damascus years ago. After etching long enough to get some topography, I then do a light sanding with 5000 grit paper on a hard backing stick to make sure I only hit the high spots (the 15N20). This keeps the deeper/dark spots dark and brightens the higher 15N20 nicely.
 
What weo said.
Sand to 400-800 and then etch. Re-sand/polish the high spots with a 1000 grit or higher on a hard backer to brighten the high spots.

Tips:
High grit finished don't etch as well as lower grit. Many folks only go to 400 grit.
Make sure the etching is deep enough for the topography to show the high/low contrast. If you can't feel it with a fingernail, it probably needs more etch time.
Over sanding ... and especially buffing ... can make the pattern show poorly. It rounds off and blends the layer contrast.
You want the final polish paper stretched tight on a hard flat backing block. Sand/polish flat to the surface with firm but light strokes. I like to lubricate the paper with soapy water.
 
I have a question, I forge in my bevels. And when I finish the blade, i’ve been struggling for over a year now to get good contrast on my 80CrV2/15N20 brute du forge san-mai. Recently, I was chatting with “Knife Steel Nerds,” and he suggested that maybe I’m introducing scale or a transition layer during forging that’s messing up the final etch.
Do you have a photo?
Brute du forge doesn't have all the decarb removed, so that might be affecting things if your outer layer is quite thin?
 
Back
Top