Question on applying clay on blades

Joined
Nov 20, 2008
Messages
10,188
I've read that the ashi lines should not extend all the way down to the edge, but I have seen pictures where they (the ashi lines) do indeed go to the edge. What is the correct (best) way to put the ashi lines on a blade?

Sure would appreciate input from you guys on this.

Thanks,

Dave
 
Some of it depends on your blade thickness and your heat treating temperatures. A thicker blade is going to have to work hard enough to beat the nose during the quench without a lot of extra clay holding in heat. If you really know your steel and your temperature, you can get an amazing hamon without even using clay. You just have to find the edge of the austenitizing temperature so that when quenched, the thinner portion of the blade including the edge beats the nose while the thicker portions don't quite make it thus creating your hamon.

However, that's a little off topic on your question. The question itself is hard to answer because it depends a great deal on the balance of your entire heat treatment. Are your temperatures right; do you have the proper amount of clay (i.e. not too much); what's the blade thickness; etc. I say if you're doing ashi lines well down toward the edge, make sure they are thin. It doesn't take much clay at all to push a hamon down too far toward the edge. If you're not using too much clay to begin with at the spine, the ashi lines can add some detail. Give it a go, and if you don't like what you see, you can always re-do the heat treatment cycle. It usually takes lots of practice and experimenting to get a hamon to do something close to what you want. Even then, it's often a crap shoot.

--nathan
 
Nathan,

thanks for the info. Here's a few pics to illustrate what I was talking about. As you can see, each blade appears not only heavily clayed, but the ashi clearly covers the cutting edge. I thought extgending the ashi into the cutting edge created soft spots, but that may not be the case. The second picture, where the blade is shown vertically, was taken off of a Japanese swordsmith).

Dave
 

Attachments

  • Clayed blade.jpg
    Clayed blade.jpg
    31 KB · Views: 62
  • clayed blade3.jpg
    clayed blade3.jpg
    44.1 KB · Views: 62
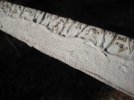
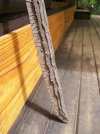
I have a hard time making out the first picture, and my guess is that the clay looks thicker than it really in on the second picture (the light source is coming in obliquely which lengthens the shadows). Also, in the case of the Japanese sword, you're probably looking at an extremely fast water or brine quench compared to the fast oils many of us use.

I'm no hamon expert by any means, but I've played around with them for a while now, and I've tried to pick up hints from other makers. The clay is really just a tool used to control heat. That's what it's really all about. Clay on top of a part of the blade may or may not mean softer steel underneath. Don't focus on what's happening with the clay; focus on what's happening with the steel. If the steel has reached austenitizing temperature for a sufficient time period (depending on the steel) and it drops temperature fast enough during the quench, it will harden no matter what is on top of it. In a like manner, if the steel doesn't drop temperature fast enough during the quench, it will not harden no matter what is or is not on top of it.

So, just use the clay to "push" the heat around and to hold on to it for just a little bit. If the edge of you blade quenches quickly enough, ashi lines covering the edge won't prevent hardening. However, if the clay is too thick or the ashi lines hold too much heat at the edge, you may not get a fast enough quench to harden the steel because of all of the retained heat in the clay.

Again, it's something that you have to play with to get right, and the subtleties depend on all of the variables of your particular heat treating apparatus and the particular knife it's used on.

Don't you love vague answers :D. My students know that my favorite answer is "it depends" because most of the time it does. ;)

--nathan
 
That's pretty much gospel, Nathan.

One thing I'd add is that the sword blade pictured is probably made of tamahagane, which acts quite different than W2. Things that you see in books about Japanese work are often only concepts, guidelines or ideas when it comes to monosteel hamons. Also, tamahagane behaves only in the way the smith forges it to, according to his method and experience.

One thing I've borrowed from Yoshindo's book is to use a thin ridge of thicker clay along where you hope the habuchi to be, to help accentuate it. It seems to work for a dramatic line. Your mileage may vary...
 
Back
Top