- Joined
- Sep 5, 2010
- Messages
- 1,998
Last week, I won a Ratmandu from KalEl as part of a really generous charity giveaway.
If I may borrow the picture, it came like this:

I got the knife yesterday and started working on it on a mousepad-backed sheet of 80 grit sandpaper. I like swedges, but I like them to end less abruptly. I like knives with smooth, flowing curves in them, 'cause I think they're kind of sexy, like a lady. So I spent a couple hours rubbing this sexy curvy lady's spine against an abrasive using a college textbook on computational geometry vision for stability and to pass the time reading about Voronoi diagrams.


This is a Voronoi diagram. Basically what it is is you have a random scatter of points on a plane, and the lines represent the points that are farthest away from the two closest points. Sort of looks like plant cells.

The colors don't mean anything, though there is this theorem that says no more than four colors of triangles are required to make it such that no two triangles of the same color are touching. If you think about it, you can see that it works out that way, but it's still "unproven" as far as the mathematics of it goes. Math can be pretty intuitive yet abstract, if that makes sense. (The lines connecting the points here are Delaunay triangles, by the way, sort of like the "inverse" of Voronoi diagrams.)

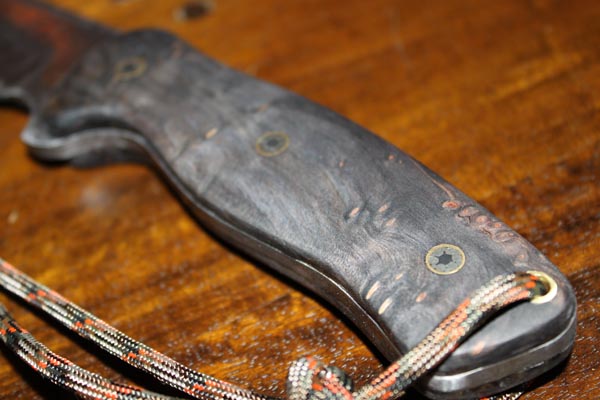
Some other shots of the blade after a bit of sanding the finish and some sharpening. It's not that neat, but what do you expect when sanding by hand. The edge is pretty polished and I only went up to 1200 grit, but it's not that sharp. I've never managed to get a sharp edge from the mousepad-sandpaper method, but that's fine for now while I'm still handling it. I'll probably take it to a stone and give it a tiny flat bevel after all this is done.


The scales arrived today, a couple slabs of stabilized, dyed redwood burl cut from this block.

I had a tough time working these scales. I'm doing a rough shaping so far and decided to go about it by drilling a bunch of holes to outline the shape. I tried taking a small plastic model hobby saw to it, but it didn't work too well. I decided to get out my chisel from when I was into woodworking (yeah, I'm into a lot of hobbies) and started hammering away.


Unfortunately the wood tore out on the other side when doing this chiseling. It is a pretty deep chunk.

However, the scales are 7/16" thick so I have plenty of room to go if I want to match the thickness of the original scales, which are 1/4", so I'd have to trim down the thickness anyway. As you can probably tell from the odd method of roughing, I don't have the right equipment for shaping the handles, so I am not looking forward to sanding this down at all. I do have a planer, but I can't see myself comfortably planing such a small piece of wood.

I'm going with a rounded, convex polygon-ish (sorry, still have computational geometry stuck in my head) bolster as opposed to the stock scales' odd "boney head of a deformed baby quail eating food on the ground" shape. I call it a scquaile. Scale quail. Squail. Squale. I don't know.

I tried rotating the scale 90 degrees counterclockwise, and it looked less deformed. It almost looked like the shape of a penguin instead.

I wasn't too sure about this so I had to confirm. I think it was successful.

I also tried a rockhopper penguin variation. Although they look grumpy and angry, they are still pretty friendly and playful. I saw them in the aquarium in Boston about five years ago.

I'll also be shaping it all the way to the pommel hole rather than having a cutout there, but I'll be putting brass tubing for a lanyard.

I was using this leftover piece of walnut as a working surface for the drilling. My wife is kind of ditzy and naive sometimes, so when she asked if I wanted anything from the grocery store one time, I gave her this grocery list on this block of wood asking for "Superman Juice." I almost got away with it, but then she caught on and got angry at me for trying to make her look stupid in public.

Unfortunately, I drilled some of the holes too deep.

Yep. What can you do. Didn't really like this cheap Ikea desk that much anyway.

Thanks for reading.
If I may borrow the picture, it came like this:
I got the knife yesterday and started working on it on a mousepad-backed sheet of 80 grit sandpaper. I like swedges, but I like them to end less abruptly. I like knives with smooth, flowing curves in them, 'cause I think they're kind of sexy, like a lady. So I spent a couple hours rubbing this sexy curvy lady's spine against an abrasive using a college textbook on computational geometry vision for stability and to pass the time reading about Voronoi diagrams.
This is a Voronoi diagram. Basically what it is is you have a random scatter of points on a plane, and the lines represent the points that are farthest away from the two closest points. Sort of looks like plant cells.
The colors don't mean anything, though there is this theorem that says no more than four colors of triangles are required to make it such that no two triangles of the same color are touching. If you think about it, you can see that it works out that way, but it's still "unproven" as far as the mathematics of it goes. Math can be pretty intuitive yet abstract, if that makes sense. (The lines connecting the points here are Delaunay triangles, by the way, sort of like the "inverse" of Voronoi diagrams.)
Some other shots of the blade after a bit of sanding the finish and some sharpening. It's not that neat, but what do you expect when sanding by hand. The edge is pretty polished and I only went up to 1200 grit, but it's not that sharp. I've never managed to get a sharp edge from the mousepad-sandpaper method, but that's fine for now while I'm still handling it. I'll probably take it to a stone and give it a tiny flat bevel after all this is done.
The scales arrived today, a couple slabs of stabilized, dyed redwood burl cut from this block.
I had a tough time working these scales. I'm doing a rough shaping so far and decided to go about it by drilling a bunch of holes to outline the shape. I tried taking a small plastic model hobby saw to it, but it didn't work too well. I decided to get out my chisel from when I was into woodworking (yeah, I'm into a lot of hobbies) and started hammering away.
Unfortunately the wood tore out on the other side when doing this chiseling. It is a pretty deep chunk.
However, the scales are 7/16" thick so I have plenty of room to go if I want to match the thickness of the original scales, which are 1/4", so I'd have to trim down the thickness anyway. As you can probably tell from the odd method of roughing, I don't have the right equipment for shaping the handles, so I am not looking forward to sanding this down at all. I do have a planer, but I can't see myself comfortably planing such a small piece of wood.
I'm going with a rounded, convex polygon-ish (sorry, still have computational geometry stuck in my head) bolster as opposed to the stock scales' odd "boney head of a deformed baby quail eating food on the ground" shape. I call it a scquaile. Scale quail. Squail. Squale. I don't know.
I tried rotating the scale 90 degrees counterclockwise, and it looked less deformed. It almost looked like the shape of a penguin instead.
I wasn't too sure about this so I had to confirm. I think it was successful.
I also tried a rockhopper penguin variation. Although they look grumpy and angry, they are still pretty friendly and playful. I saw them in the aquarium in Boston about five years ago.
I'll also be shaping it all the way to the pommel hole rather than having a cutout there, but I'll be putting brass tubing for a lanyard.
I was using this leftover piece of walnut as a working surface for the drilling. My wife is kind of ditzy and naive sometimes, so when she asked if I wanted anything from the grocery store one time, I gave her this grocery list on this block of wood asking for "Superman Juice." I almost got away with it, but then she caught on and got angry at me for trying to make her look stupid in public.
Unfortunately, I drilled some of the holes too deep.
Yep. What can you do. Didn't really like this cheap Ikea desk that much anyway.
Thanks for reading.
Last edited:
")


 however, I don't think I'm ever going to be removing these. Drilling out the pins, breaking away the wood, and sanding away all the dried epoxy are things I don't want to do.