Re-handling Old Kitchen Knives

me2

Joined
Oct 11, 2003
Messages
5,094
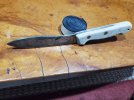
When we went to mo moms for Christmas she gave me two of my grand mothers old knives to clean up and sharpen. These are old carbon steel blades with wood handles. They are both partial tang with grooves cut in the wood and brass rivets holding them together. They were sharpened on an electric sharpener on the back of an electric can opener for many years. They’re both at least 50 years old and likely 65 - 70 years old.

I’d like to remove the old handles, clean the tangs, & correct some profile deformities like severe recurves and such. Then I want to replace the handles and sharpen them. Is there a standard way to make these slotted style handles? How much tolerance is there in the size of the slot? If I want a perfect fit, I’ll likely have to laminate some woods together. They certainly aren’t a perfect fit now, so maybe that’s not necessary.
 
That pretty much the larger knife in terms of how the handle is assembled. Otherwise it looks like an Ontario cabbage knife.
 
With partial tang knives I use a filler piece for the missing tang and full length scales on the sides. Works out pretty well and you can get a nice contrast by using a differnt wood or material for the tang filler piece.
 
That’s kinda my plan. I just sharpened them as they were but a multi layered handle is an option.
 
I use a filler as well and attach scales to it, kinda like a partial frame handle. Most are around .060 to .125" for the tang thickness, which is easy to get with .15, .30 and .60 G10 liner material available and 1/16, 3/32 and 1/8" regular scale materials. You can always go a bit thicker and then sand down to the tang size, too. If you are doing a multi piece spacer, remember to sand down from both sides, or sand the middle piece down. You can also relieve the insides of the handle scale a touch as well if needed for more clearance.
 
Three-piece handle construction
Use Corby Bolt
I do these in Micarta with a contrast center strip.

TIP:
How to get a perfect fit for the center strip:
Note - It is always smart to tape up the blade to keep it clean and avoid accidental scratches.

Start with a pair of scales, and a center strip that is just a tad thicker than the tang. I like a contrasting color strip.

Assembling the handle:
Drill the two holes through the scales for the Corby bolts that will go through the partial tang, but don't drill the end hole.
Screw the Corby bolts through the scales without the blade and clamp together. Shape, sand, and finish/polish the front end of the sales now, because you can't do that area after assembly. Leave the scales and center piece a bit oversize along the spine/belly/butt and sand flush after the final assembly. Unclamp and take out Corby bolts.
Temporarily put one scale on the tang with the female Corby bolts through the tang holes and clamp in place.
Slip the center strip up to the partial tang and make sure it fits properly.
Put epoxy on the exposed scale area and fit the center strip up snug to the tang. Clamp in place gently and let the epoxy cure until just setting up firm.
Remove the clamp (and Corby bolts if still in place) from the tang and scale. The scale and still clamped center strip should come off easily. Let the epoxy fully cure while clamped. Clean up any squeeze-out.
Slip the male Corby bolts through the scale/strip again and attach the assembly to the tang again with two small drops of super glue (don't put it near the Corby bolts!), and clamp in place. You can take the Corby bolts out after clamping the scale in place.
Give the super glue time to set up and then sand the filler strip flush with the tang thickness. This only takes a few seconds on the disc grinder. You can also do it on a granite flat plate with a piece of 100 grit sandpaper.
Pop the assembled handle off the tang with a firm tap on the side. Putting it in the freezer for 30 minutes will make it come off even easier.
Clean off the residue of the super glue.
Dry fit the scales with the Corby bolts and drill the last rivet hole through the end portion.
When everything is ready, assemble the handle and three Corby bolts with epoxy as normal.
After letting the epoxy cure overnight, cut off the excess Corby bolts heads, sand the handle to the desired shape bringing it flush to the partial tang.
The new handle will be a perfect fit, rock solid, and should have no gaps to let water and food in.
 
Be careful when reworking the blade. Some of that old steel can be really soft, or of a funky composition… so that it can’t be taken to a small TBE without damage, cant support a thin edge even if you get there, and/or just can’t be made sharp. among other such projects of mine I have an old knife (maybe 80-100 years) from my grandmother that I just have never been able to get sharp. I don’t use it, but keep it around in memory of her.
 
Another little trick I do for fitting the tang piece is grind a slight concave on the end of the tang, from top to bottom. Much easier for me to do this and get a seemless fit.
 
Last edited:
This was a full tang though:

K5pXMwx.jpg


sW1avJK.jpg


TDGkhVb.jpg


I wrote this WIP on this project sometime ago:


Because of its age the pics have gone away. This happens even when they are in the Stickies. Kinda makes a guy not want to bother......
 
Well my grand designs seem to have been cut short. I talked with my mom and she wants the handles left as they are and just wants the edges sharpened. That’s already done so I guess I’ll take them back when I go visit again.
 
Mix up some JB Kwik Weld and try to push it into some of the gaps. It's a thick, dark grey epoxy and will help to prevent food from getting in between the blank and the scales. It sets in a few minutes, so you can use denatured alcohol on a paper towel, wrapped around a razor blade, to clean up the excess and give a nice, clean look to it. Maybe smooth the handles a touch so there aren't any splinters and apply some oil to them?
 
Yeah, I wanted to give you the same advice to not touch the handles. Some sandpaper and oil will bring the handles back to life. I did a similiar knife for a friend and filled the gaps with a bit of CA glue and wood dust and then sanded it back and applied some oil.
 
A re-handle of my own fifty year old carbon steel Sabatier. I tried to duplicate the original handle shape, but used Corby Bolts (and epoxy) instead of the simple cutlers rivets Sabatier used. It should keep the knife going to the century mark. The fit and finish on these old knives is nowhere close to what's being produced today. Also, the blades of the old Sabatiers are much, much softer....... a few swipes on a steel usually does the trick.
Saludos
J

4J3F1JL.jpg
Nice. My old sabatiers still have the phenolic handles. Those are holding up well … but your knife with that handle and the patina on the blade looks classy!
 
Nice. My old sabatiers still have the phenolic handles. Those are holding up well … but your knife with that handle and the patina on the blade looks classy!
This was was originally black phenolic too. Once some rust started under the scales, it got worse and worse. The wood is Chechen. Also known as Mexican Rosewood. The tree is known as Black Poisonwood because of the extremely toxic sap and leaves......like a super poison ivy. Once dried, the wood is safe to handle.

Anyway, the knife's a pleasure to use again.

Saludos
J
 
Back
Top