fishface5
Gold Member
- Joined
- Feb 3, 2001
- Messages
- 9,760
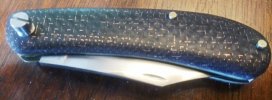
I have done a lot of rehandling of fixed blades and production folders, but never tried a slippie before. So - for anyone contemplating doing so, here is a description of my saga. TL;DR version: holy crap it was a lot of work! But rewarding.
But making one from scratch?!? All I can say is that slipjoint makers are mysterious and powerful wizards.
So here goes – it is stupidly long, but that is my reason for posting it, to show how many steps go into this (wonderful) nonsense. & Sorry for the sucky phone pics.
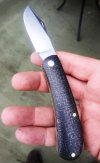
Anyway, I saw this LaCombre handmade slippie for sale on the forum cheap (thanks JTB_5
!). I thought that I would just clean up the slightly grimy handle scales, but when I got it the combination of super-strong backspring + swedge meant I couldn’t pinch it open, and with the small nail nick + my short soft nails I couldn’t get it open with my left thumbnail (barely so with my right). And the handle scales didn’t look like they could be improved much.
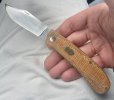
So, I decided that I would take it apart, grind the spring a little thinner to reduce its strength, make the handles a little narrower to hopefully make enough room to be able to pinch and pull the blade open, and replace the scales. Originally I intended to use a sweet piece of stabilized koa but it turned out that once I cut it in half it would be too thin, so then I decided to try some bronze LSCF.
1. Use a dremel to grind off the peen on the handle pins and the lid of the pivot.
2. Use punch and light hammer to push the pins and pivot out, saving them to be measured later.
3. Aha, there are two more pins under the scales holding the backspring in place! Use the same process to extract the top pin, but leave the bottom pin in place, since I can rotate the spring out with one pin in place, and keeping it there means one less thing to screw up later. I was sloppy and marred the brass liner, luckily that won’t be seen since it will be under the scales!
4. Use the dremel with sanding wheel to grind about 1/3 of the thickness of the backspring in the area where it dips, in between the hole for the top pin and where it widens to contact the blade tang. Use belt sander and dremel to reduce the width of the handle a little bit, to leave more blade exposed when closed so that I can hopefully pinch-grip it open.
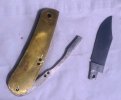
5. Now to replace the pin for the backspring. Checking my brass pin stock compared to the original pin, micrometer says it’s .014 too thick. I don’t have a lathe, so I carefully spin the stock rod on a belt-sander and to finish it off to true round, I put it in my drill press and use a file on it, checking frequently with the mic until I have the right diameter. Cut a piece slightly wider than the spring + liners, and then peen it into place on both sides, filling the gaps left around the holes for that purpose . . . Hey this looks like crap! How did the maker get his to look so perfectly precise? Grumble. File the peened pins flat to the liners so the handle scales will lie flat on them.
6. Ok time to figure out the pivot. I have some screw-together steel units that I think are meant for fixed-blade handles that should work (I have some brass ones as well, but the wrong size). Mic the original pivot and the replacement unit. Of course the new unit is .018 too large. Back to the belt-sander, spin and reduce, then onto the drill-press-in-place-of-lathe with files. Going well until I let my mind wander for a couple seconds . . . now it’s too small. Swear, throw it away, luckily I bought 2 of these sometime in the past so I grab the 2nd one and do it right this time. It fits the blade and liners just right.
7. As long as I’m in here maybe I should skeletonize the liners, since they are thick and heavy. But the internal machining of them is so well done that I am afraid to create any waves in the liners by pushing through them with a drill bit. So instead I drill a bunch of semi-holes, gently drilling into but not through the liners. This does reduce the weight a little bit, without endangering the inside surface of either liner.
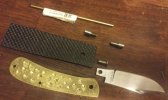
8. Grab the LSCF and cut off two scale-sized rectangles. Realize that none of my drill bits are the same size as the pivot. This means I need to drill a slightly smaller hole in each scale, then carefuly enlarge each of them to perfectly fit the pivot, BEFORE trying to drill any of the other holes in the scales, otherwise they might not all line up properly. This I do very, very carefully and slowly.
9. By the way, when sanding/drilling anything -- but ESPECIALLY with carbon fiber -- wear a mask! I wore a basic one and was working outside on my back deck, and yet somehow my snot was still black for several hours. That crap gets everywhere. Also don’t forget eye protection! A piece of something got around my glasses and into one eye, causing me a period of distraction and discomfort, which you really don’t want when trying to be precise with power tools.
(cont)
But making one from scratch?!? All I can say is that slipjoint makers are mysterious and powerful wizards.
So here goes – it is stupidly long, but that is my reason for posting it, to show how many steps go into this (wonderful) nonsense. & Sorry for the sucky phone pics.
Anyway, I saw this LaCombre handmade slippie for sale on the forum cheap (thanks

So, I decided that I would take it apart, grind the spring a little thinner to reduce its strength, make the handles a little narrower to hopefully make enough room to be able to pinch and pull the blade open, and replace the scales. Originally I intended to use a sweet piece of stabilized koa but it turned out that once I cut it in half it would be too thin, so then I decided to try some bronze LSCF.
1. Use a dremel to grind off the peen on the handle pins and the lid of the pivot.
2. Use punch and light hammer to push the pins and pivot out, saving them to be measured later.
3. Aha, there are two more pins under the scales holding the backspring in place! Use the same process to extract the top pin, but leave the bottom pin in place, since I can rotate the spring out with one pin in place, and keeping it there means one less thing to screw up later. I was sloppy and marred the brass liner, luckily that won’t be seen since it will be under the scales!
4. Use the dremel with sanding wheel to grind about 1/3 of the thickness of the backspring in the area where it dips, in between the hole for the top pin and where it widens to contact the blade tang. Use belt sander and dremel to reduce the width of the handle a little bit, to leave more blade exposed when closed so that I can hopefully pinch-grip it open.

5. Now to replace the pin for the backspring. Checking my brass pin stock compared to the original pin, micrometer says it’s .014 too thick. I don’t have a lathe, so I carefully spin the stock rod on a belt-sander and to finish it off to true round, I put it in my drill press and use a file on it, checking frequently with the mic until I have the right diameter. Cut a piece slightly wider than the spring + liners, and then peen it into place on both sides, filling the gaps left around the holes for that purpose . . . Hey this looks like crap! How did the maker get his to look so perfectly precise? Grumble. File the peened pins flat to the liners so the handle scales will lie flat on them.
6. Ok time to figure out the pivot. I have some screw-together steel units that I think are meant for fixed-blade handles that should work (I have some brass ones as well, but the wrong size). Mic the original pivot and the replacement unit. Of course the new unit is .018 too large. Back to the belt-sander, spin and reduce, then onto the drill-press-in-place-of-lathe with files. Going well until I let my mind wander for a couple seconds . . . now it’s too small. Swear, throw it away, luckily I bought 2 of these sometime in the past so I grab the 2nd one and do it right this time. It fits the blade and liners just right.
7. As long as I’m in here maybe I should skeletonize the liners, since they are thick and heavy. But the internal machining of them is so well done that I am afraid to create any waves in the liners by pushing through them with a drill bit. So instead I drill a bunch of semi-holes, gently drilling into but not through the liners. This does reduce the weight a little bit, without endangering the inside surface of either liner.

8. Grab the LSCF and cut off two scale-sized rectangles. Realize that none of my drill bits are the same size as the pivot. This means I need to drill a slightly smaller hole in each scale, then carefuly enlarge each of them to perfectly fit the pivot, BEFORE trying to drill any of the other holes in the scales, otherwise they might not all line up properly. This I do very, very carefully and slowly.
9. By the way, when sanding/drilling anything -- but ESPECIALLY with carbon fiber -- wear a mask! I wore a basic one and was working outside on my back deck, and yet somehow my snot was still black for several hours. That crap gets everywhere. Also don’t forget eye protection! A piece of something got around my glasses and into one eye, causing me a period of distraction and discomfort, which you really don’t want when trying to be precise with power tools.
(cont)
Last edited:

